Template:The Dome of D'Sparil
- This level occupies the map slot E3M1. For other maps which occupy this slot, see Category:E3M1.
E3M1: The Storehouse is the first level in The Dome of D'Sparil episode of Heretic. It is considered extremely difficult, due to a large number of enemies and a shortage of weapons and ammunition, which the player must ration carefully.

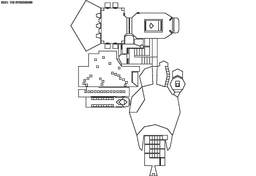
Map of E3M1

The namesake room of the level.
Walkthrough
'Use' the wall section in front of you with the bird motif to get out of the tiny cell. Take out the gargoyles, but don't bother with the sorcerers behind the barred windows to the west. Just avoid their attacks. Use the switch to open the gate. The other wall sections with the bird motif can be opened to get ammunition. Just on the other side of the gate to the left is another switch. This will lower the corner columns providing access to the much-needed Dragon Claw and Bag of Holding. You can take out those sorcerers now, along with the Undead warrior you may or may not have seen in the other area. Rest assured, however, that he saw you and will be coming for you.
Go back to the other area. You can see the green key through the barred window, but you can't get it yet. Collect all the ammunition and head through the door to the south. Go down the stairs and past the green door then go to the right. DO NOT go up the other set of stairs! Just before you enter the storehouse there's a darkened passage to the right. Get the Chaos device. Enter the storehouse and take out the Sabreclaws. In the southeast corner of the storehouse is an alcove with a Silver Shield. You will see an open area with large wooden pillars. To get to the other side you have to go all the way to the east then back to the west. Take out the beasties and get the yellow key in the back room by going around behind it. Head back to the yellow door. DO NOT go up the other set of stairs. You're still not well enough equipped to deal with what's up there yet. Go through the yellow door and get the green key. When you grab it, a wall section to the east will open containing an undead warrior ghost. Take him out then head for the green door. Inside you'll meet a new type of monster, the ophidian, which is the last monster type in the game. The only weapon you have is the dragon claw so take him out as best you can. Get the map scroll and press the switch. Well, you're still not well enough equipped, but head up those other stairs anyway.
SAVE THE GAME! When you walk out into the water you'll see the Iron lich. Just pour it on with the dragon claw and use the Chaos device if things get hairy. As if the lich is not bad enough, there are gargoyles in here that will get in your way or behind you if you're not careful. Watch out for those damn tornadoes the lich conjures! When he'd dead you can explore this area, just watch for any stray Gargoyles. To the east of the stairs is a narrow passage. You can see a Ring of Invincibility sitting on top of a pillar. If you press the switch at the back of the pillar a wall section behind you will open containing more gargoyles. Go up the stairs and get the torch.
Make a run at the gap and get the gauntlets, which can be of great help in saving scarce ammunition. If you time it right you can cross the gap at the corner and get the shadowsphere. You can now get onto the platform to the south. Get the Tome of Power and the Wings of Wrath. All of these items would have come in handy BEFORE you fought the iron lich, but nobody ever said being a Heretic was easy.
Secret 1: Use the Wings of Wrath to get the ring. Make sure you're close enough to the top of the pillar to trigger the secret.
Go back to the south and head down the stairs, taking out gargoyles as you go. Power up the dragon claw and take out the ophidians.
Secret 2: 'Use' the wall section between the two braziers to the east. Get the Hellstaff then exit the level.
Alternate Walkthrough (no save/load required)
Strafe-run like a pro. Press first switch, avoiding all those attacks. Rush under the bars, push the second one, grab the Dragonclaw and escape to the door. NOW you can begin fighting back at last. Shoot that pestering gargs, rush to the Lich and immediately run upstairs. You'll get Gauntlets and you can kill the remaining gargs by the way. Rush to the exit pedestal, wait until Lich's tornado gets you there, grab the Tome and use it with gauntlets to tear Lich apart. Rush back down and use the remaining Tome power to rip and tear, rip and tear: it will save tons of ammo, critical for Skill 5 play. Now you can calm down, switch back to Claw and clear the level the common way. Corner-shoot second Lich with Elvenwand, fly to the Ring and collect the remaining ammo. Ring goes to next level, bad thing we can't tell the same about the Tome.
Speedrunning
If you want to complete the level quickly or are having difficulty finishing it, then you can use the Iron Lich at the lake to whirlwind jump onto the unreachable stone platform at the south end. There is another Iron Lich protecting the exit, but it can be easily dealt with using the Dragon Claw you found earlier. This whirlwind jump strategy takes practice to get just right.
This trick is also useful for picking up the Hellstaff early (useful if you find yourself running out of ammo a lot trying to get 100% kills). You can also take the Tome of Power and Wings of Wrath placed before the descending stairwell.
Screenshots
")
")
")