Wastelandmaster96 (talk | contribs) No edit summary Tag: Source edit |
|||
| (34 intermediate revisions by 16 users not shown) | |||
| Line 1: | Line 1: | ||
| ⚫ | |||
{{map|slot=E4M4}} |
{{map|slot=E4M4}} |
||
| + | {{map|slot=MAP27}} |
||
| − | |||
| + | {{Infobox Map |
||
| ⚫ | |||
| + | |title = E4M4: Unruly Evil |
||
| + | |image = [[File:E4M4-noHUD.png|thumb]] |
||
| + | |game =[[Doom]] |
||
| ⚫ | |||
| + | |level = |
||
| + | |map_number =4 |
||
| + | |entry_from =[[E4M3: Sever the Wicked (Doom)|Sever the Wicked]] |
||
| + | |exits_to =[[E4M5: They Will Repent (Doom)|They Will Repent]]<br>[[E4M8: Unto the Cruel (Doom)|Unto the Cruel]] (PSX/Saturn only) |
||
| + | }} |
||
| ⚫ | |||
==Overview== |
==Overview== |
||
The map title comes from ''James 3:8'': "But the tongue can no man tame; it is an ''unruly evil'', full of deadly poison."<ref>http://www.biblegateway.com/passage/?search=James%203:8&version=KJV</ref> |
The map title comes from ''James 3:8'': "But the tongue can no man tame; it is an ''unruly evil'', full of deadly poison."<ref>http://www.biblegateway.com/passage/?search=James%203:8&version=KJV</ref> |
||
| − | Unlike most the maps of Episode 4, this level is very easy, both in terms of size (it's very small and straightforward) and of monsters content: this map doesn't present any tough |
+ | Unlike most the maps of Episode 4, this level is very easy, both in terms of size (it's very small and straightforward) and of monsters content: this map doesn't present any tough enemies, there aren't any Cyberdemons or Barons of Hell, for example. Instead, there are only lots of Imps, Demons, Spectres, some Sergeants and a few Cacodemons (even if you're playing on the higher difficulty settings). On top of that, there is also a soul sphere as well as an invulnerability sphere. The only difficult thing is starting this map from scratch, since you have to fight Imps and Spectres at the start. Nonetheless, this is probably one of the easiest levels of the episode. |
| ⚫ | |||
| − | ==Strategy== |
||
| ⚫ | |||
| ⚫ | |||
| ⚫ | Behind the door of your starting room are some Imps and Spectres. After you've killed them all, lower a lift and open the door in front of you, it leads to a small outside area with two pits of lava, some Imps behind them and a pool of water with some armor bonuses around. There is also a small lava trench: if you follow it, you'll discover an invisibility bonus and a teleporter leading back to the outside area. Kill the Imps and drop into the area where they were. In this lower area is a door that will lead you to a pool of lava with a soul sphere and an invulnerability bonus: you can grab them whenever you need them or want them. The northeasternmost pillar in the pool lowers when pressing action on its northern face, thus making the medikits on the Cacodemons' platform accessible. Also, in the lower area is a lift that will take you back to the top. A wall has opened, revealing a couple of Sergeants and a platform with the red key. When you grab it, some Imps and Demons will be released. Once you've killed them, open the red door in the same area. Kill the Sergeants on the upper platforms, find a switch and flip it: it will lower a lift. The lift will take you in front of the exit, but it's barred. On your right and left are teleporters leading to the Sergeants' platforms. In both them are switches that will rise the exit bars and reveal some traps. |
||
| ⚫ | |||
| ⚫ | Behind the door of your starting room are some |
||
===Secrets=== |
===Secrets=== |
||
| Line 19: | Line 27: | ||
===Bugs=== |
===Bugs=== |
||
| − | # In the final room of the level, there are [[Hall of Mirrors effect]]s visible at the top-front of the side compartments when they open, and at the top of the entrances into northern compartments when they are opened and you are inside of them. |
+ | # In Sectors 60 & 66 (the final room of the level), there are [[Hall of Mirrors effect]]s visible at the top-front of the side compartments when they open, and at the top of the entrances into northern compartments when they are opened and you are inside of them. |
| − | # In the same room, on Hey, Not Too Rough difficulty or lower, the Spectres in each of the northern compartments occupy both the inner and door sectors, preventing the compartments from opening when the switches are flipped unless the player shoots at the doors with the [[rocket launcher]]. The rockets will punch through the doors and kill the Spectres with enough blasts. Upon killing them, the doors will open as normal when the switches are flipped. In addition, the |
+ | # In the same room, on Hey, Not Too Rough difficulty or lower, the Spectres in each of the northern compartments occupy both the inner and door sectors, preventing the compartments from opening when the switches are flipped unless the player shoots at the doors with the [[rocket launcher]]. The rockets will punch through the doors and kill the Spectres with enough blasts. Upon killing them, the doors will open as normal when the switches are flipped. In addition, the Spectres also jam three of the four pillars blocking access to the exit despite not sharing sectors or overlapping. Note that some source ports fix this issue. |
# Also in this room, on Ultra-Violence difficulty or higher, the [[Cacodemon]] pairs in the northern compartments are each glued together, and will not move until one of them is killed. |
# Also in this room, on Ultra-Violence difficulty or higher, the [[Cacodemon]] pairs in the northern compartments are each glued together, and will not move until one of them is killed. |
||
| − | # Along the south side of the map is a pen containing three [[Demon]] that can be killed through the closed pen entrance with any projectile attack (Rocket, Plasma or BFG), though strangely, not hitscan attacks before the wall revealing them lowers. If using a source port with the ability to look up and down, one can also kill them with any projectile attack by firing at the wall behind the back side of the pen. This is because the Demons are actually too big for then pen and their hit boxes expand to outside the pen enterance and also heavilly into the back wall of the pen. Due to specific quirks in Doom's Blockmap code though, the pen will still lower when triggered despite the Demon's hit boxes crossing over the pen entrance and the Demons are able to move once the pen entrance has lowered despite their hit boxes being heavily embedded in the back wall of the pen. |
+ | # Along the south side of the map is a pen containing three [[Demon]]s that can be killed through the closed pen entrance with any projectile attack (Rocket, Plasma or BFG), though strangely, not hitscan attacks before the wall revealing them lowers. If using a source port with the ability to look up and down, one can also kill them with any projectile attack by firing at the wall behind the back side of the pen. This is because the Demons are actually too big for then pen and their hit boxes expand to outside the pen enterance and also heavilly into the back wall of the pen. Due to specific quirks in Doom's Blockmap code though, the pen will still lower when triggered despite the Demon's hit boxes crossing over the pen entrance and the Demons are able to move once the pen entrance has lowered despite their hit boxes being heavily embedded in the back wall of the pen. |
==Speedrunning== |
==Speedrunning== |
||
| − | ===Routes and tricks=== |
||
| − | |||
===Records=== |
===Records=== |
||
The [[Compet-N]] records for the map are: |
The [[Compet-N]] records for the map are: |
||
| + | {| class="WikiaTable" |
||
| − | {| {{prettytable}} |
||
| − | !Run |
+ | !Run!!Time!!Player!!Date!!File!!Notes |
|- |
|- |
||
| − | |[[UV speed]]||00:35||[[Adam Hegyi]]||2000-10-28||{{competnftp|doom/speed/u4m4-035.zip|u4m4-035.zip}}|| |
+ | |[[UV speed]]||00:35||[[Adam Hegyi]]||2000-10-28||{{External Link|site=competnftp|file_path=doom/speed/u4m4-035.zip|text=u4m4-035.zip}}|| |
|- |
|- |
||
| − | |[[NM speed]]||00:37||[[Vincent Catalaá]]||2000-01-18||{{competnftp|doom/nmare/n4m4-037.zip|n4m4-037.zip}}|| |
+ | |[[NM speed]]||00:37||[[Vincent Catalaá]]||2000-01-18||{{External Link|site=competnftp|file_path=doom/nmare/n4m4-037.zip|text=n4m4-037.zip}}|| |
|- |
|- |
||
| − | |[[UV max]]||01:36||[[Radek Pecka]]||2001-03-25||{{competnftp|doom/max/u4m4-136.zip|u4m4-136.zip}}|| |
+ | |[[UV max]]||01:36||[[Radek Pecka]]||2001-03-25||{{External Link|site=competnftp|file_path=doom/max/u4m4-136.zip|text=u4m4-136.zip}}|| |
|- |
|- |
||
| − | |[[NM100S]]||00:51||[[Adam Hegyi]]||1999-06-23||{{competnftp|doom/nm100s/n4s4-051.zip|n4s4-051.zip}}|| |
+ | |[[NM100S]]||00:51||[[Adam Hegyi]]||1999-06-23||{{External Link|site=competnftp|file_path=doom/nm100s/n4s4-051.zip|text=n4s4-051.zip}}|| |
|- |
|- |
||
| − | |[[UV -fast]]||02:28||[[Ole Hartvigsen]]||2000-06-05||{{competnftp|doom/fast/f4m4-228.zip|f4m4-228.zip}}|| |
+ | |[[UV -fast]]||02:28||[[Ole Hartvigsen]]||2000-06-05||{{External Link|site=competnftp|file_path=doom/fast/f4m4-228.zip|text=f4m4-228.zip}}|| |
|- |
|- |
||
| − | |[[UV -respawn]]||01:27||[[Radek Pecka]]||2001-03-26||{{competnftp|doom/respawn/r4m4-127.zip|r4m4-127.zip}}|| |
+ | |[[UV -respawn]]||01:27||[[Radek Pecka]]||2001-03-26||{{External Link|site=competnftp|file_path=doom/respawn/r4m4-127.zip|text=r4m4-127.zip}}|| |
|- |
|- |
||
| − | |[[UV Tyson]]||02:22||[[Xit Vono]]||2003-04-09||{{competnftp|doom/tyson/t4m4-222.zip|t4m4-222.zip}}|| |
+ | |[[UV Tyson]]||02:22||[[Xit Vono]]||2003-04-09||{{External Link|site=competnftp|file_path=doom/tyson/t4m4-222.zip|text=t4m4-222.zip}}|| |
|- |
|- |
||
| − | |[[UV pacifist]]||00:37||[[Vincent Catalaá]]||2000-01-18||{{competnftp|doom/pacifist/p4m4-037.zip|p4m4-037.zip}}|| |
+ | |[[UV pacifist]]||00:37||[[Vincent Catalaá]]||2000-01-18||{{External Link|site=competnftp|file_path=doom/pacifist/p4m4-037.zip|text=p4m4-037.zip}}|| |
|} |
|} |
||
| + | |||
| + | == Trivia == |
||
| + | |||
| + | This is the one of the two levels with a 'falling into the sky' type of exit, the other being [[E4M8: Unto the Cruel]]. |
||
==Statistics== |
==Statistics== |
||
===Map data=== |
===Map data=== |
||
| + | {| class="WikiaTable" |
||
| − | {| {{prettytable}} |
||
|[[Things]]||153 |
|[[Things]]||153 |
||
|- |
|- |
||
| Line 64: | Line 74: | ||
===Things=== |
===Things=== |
||
| + | {| class="WikiaTable" |
||
| − | {| {{prettytable}} |
||
| − | !Monsters |
+ | !Monsters!![[I'm Too Young To Die|ITYTD]] and [[Hey, Not Too Rough|HNTR]]!![[Hurt Me Plenty|HMP]]!![[Ultra-Violence|UV]] and [[Nightmare!|NM]] |
|- |
|- |
||
|[[Sergeant]]s||8||12||12 |
|[[Sergeant]]s||8||12||12 |
||
| Line 77: | Line 87: | ||
|[[Cacodemon]]s||1||4||7 |
|[[Cacodemon]]s||1||4||7 |
||
|- |
|- |
||
| − | !Powerups |
+ | !Powerups!!ITYTD and HNTR!!HMP!!UV and NM |
|- |
|- |
||
|[[Medikit]]s||7||5||5 |
|[[Medikit]]s||7||5||5 |
||
| Line 93: | Line 103: | ||
|[[Partial invisibility|Invisibilities]]||1||1||1 |
|[[Partial invisibility|Invisibilities]]||1||1||1 |
||
|- |
|- |
||
| − | !Weapons |
+ | !Weapons!!ITYTD and HNTR!!HMP!!UV and NM |
|- |
|- |
||
|[[Shotgun]]s||1||1||1 |
|[[Shotgun]]s||1||1||1 |
||
| Line 101: | Line 111: | ||
|[[Rocket launcher]]s||1||1||1 |
|[[Rocket launcher]]s||1||1||1 |
||
|- |
|- |
||
| − | !Ammunition |
+ | !Ammunition!!ITYTD and HNTR!!HMP!!UV and NM |
|- |
|- |
||
|[[Ammo clip]]s||3||3||3 |
|[[Ammo clip]]s||3||3||3 |
||
| Line 109: | Line 119: | ||
|[[Box of rockets|Rocket boxes]]||1||1||1 |
|[[Box of rockets|Rocket boxes]]||1||1||1 |
||
|- |
|- |
||
| − | !Keys |
+ | !Keys!!ITYTD and HNTR!!HMP!!UV and NM |
|- |
|- |
||
|[[Red skull]]s||1||1||1 |
|[[Red skull]]s||1||1||1 |
||
| − | |- |
||
|} |
|} |
||
==References== |
==References== |
||
| + | <references /> |
||
| − | {{reflist}} |
||
==External links== |
==External links== |
||
| Line 122: | Line 131: | ||
[[Category:Levels by name|Unruly Evil (Doom)]] |
[[Category:Levels by name|Unruly Evil (Doom)]] |
||
[[Category:American McGee levels]] |
[[Category:American McGee levels]] |
||
| + | [[Category:Doom levels]] |
||
Latest revision as of 13:56, 14 August 2022
- This level occupies the map slot E4M4. For other maps which occupy this slot, see Category:E4M4.
- This level occupies the map slot MAP27. For other maps which occupy this slot, see Category:MAP27.
E4M4: Unruly Evil (MAP27 in PSX/Saturn) is the fourth map of Thy Flesh Consumed in The Ultimate Doom. It was designed by American McGee and uses the music track "Suspense".
Overview
The map title comes from James 3:8: "But the tongue can no man tame; it is an unruly evil, full of deadly poison."[1]
Unlike most the maps of Episode 4, this level is very easy, both in terms of size (it's very small and straightforward) and of monsters content: this map doesn't present any tough enemies, there aren't any Cyberdemons or Barons of Hell, for example. Instead, there are only lots of Imps, Demons, Spectres, some Sergeants and a few Cacodemons (even if you're playing on the higher difficulty settings). On top of that, there is also a soul sphere as well as an invulnerability sphere. The only difficult thing is starting this map from scratch, since you have to fight Imps and Spectres at the start. Nonetheless, this is probably one of the easiest levels of the episode.
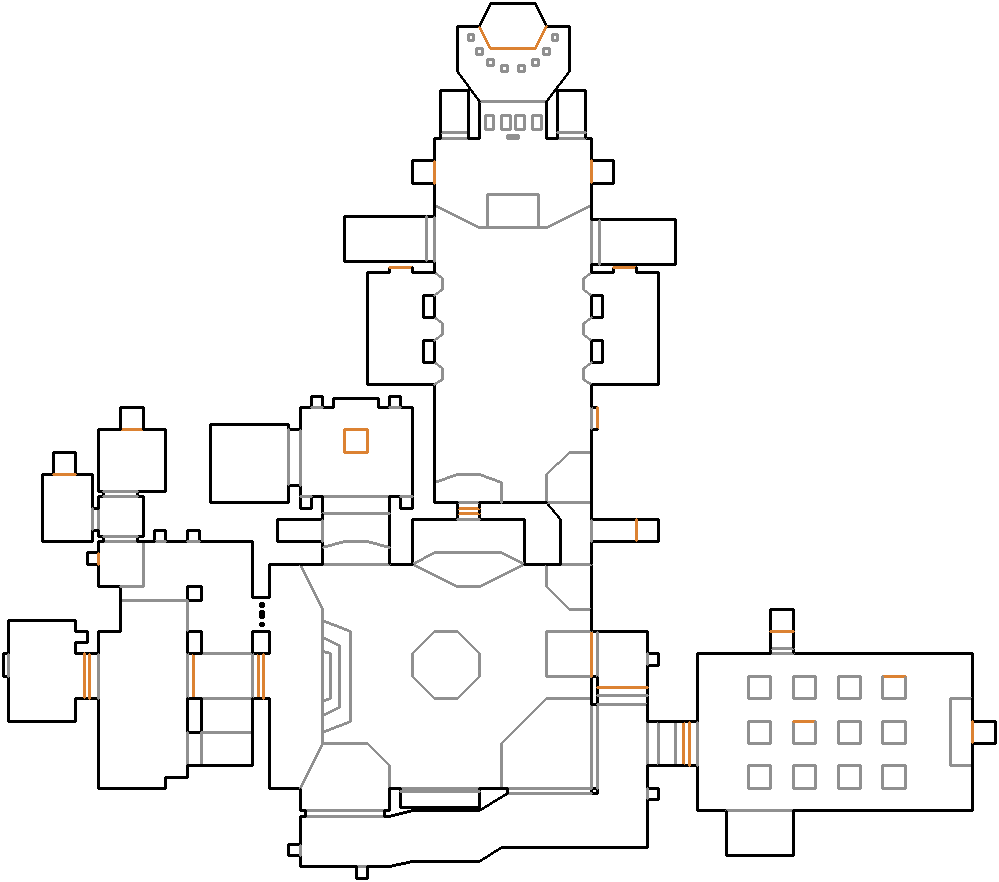
Map of E4M4
Walkthrough
Behind the door of your starting room are some Imps and Spectres. After you've killed them all, lower a lift and open the door in front of you, it leads to a small outside area with two pits of lava, some Imps behind them and a pool of water with some armor bonuses around. There is also a small lava trench: if you follow it, you'll discover an invisibility bonus and a teleporter leading back to the outside area. Kill the Imps and drop into the area where they were. In this lower area is a door that will lead you to a pool of lava with a soul sphere and an invulnerability bonus: you can grab them whenever you need them or want them. The northeasternmost pillar in the pool lowers when pressing action on its northern face, thus making the medikits on the Cacodemons' platform accessible. Also, in the lower area is a lift that will take you back to the top. A wall has opened, revealing a couple of Sergeants and a platform with the red key. When you grab it, some Imps and Demons will be released. Once you've killed them, open the red door in the same area. Kill the Sergeants on the upper platforms, find a switch and flip it: it will lower a lift. The lift will take you in front of the exit, but it's barred. On your right and left are teleporters leading to the Sergeants' platforms. In both them are switches that will rise the exit bars and reveal some traps.
Secrets
- In the second room, take the elevator up and continue left around the walkway until you reach a green torch. Press it to lower the floor you're standing on. Continue through two archways to get a berserk pack.
- Return to the green torch and press it again, but only pass through the first archway. The floor in the second room will raise along with the first lift, taking you up to a rocket launcher.
Bugs
- In Sectors 60 & 66 (the final room of the level), there are Hall of Mirrors effects visible at the top-front of the side compartments when they open, and at the top of the entrances into northern compartments when they are opened and you are inside of them.
- In the same room, on Hey, Not Too Rough difficulty or lower, the Spectres in each of the northern compartments occupy both the inner and door sectors, preventing the compartments from opening when the switches are flipped unless the player shoots at the doors with the rocket launcher. The rockets will punch through the doors and kill the Spectres with enough blasts. Upon killing them, the doors will open as normal when the switches are flipped. In addition, the Spectres also jam three of the four pillars blocking access to the exit despite not sharing sectors or overlapping. Note that some source ports fix this issue.
- Also in this room, on Ultra-Violence difficulty or higher, the Cacodemon pairs in the northern compartments are each glued together, and will not move until one of them is killed.
- Along the south side of the map is a pen containing three Demons that can be killed through the closed pen entrance with any projectile attack (Rocket, Plasma or BFG), though strangely, not hitscan attacks before the wall revealing them lowers. If using a source port with the ability to look up and down, one can also kill them with any projectile attack by firing at the wall behind the back side of the pen. This is because the Demons are actually too big for then pen and their hit boxes expand to outside the pen enterance and also heavilly into the back wall of the pen. Due to specific quirks in Doom's Blockmap code though, the pen will still lower when triggered despite the Demon's hit boxes crossing over the pen entrance and the Demons are able to move once the pen entrance has lowered despite their hit boxes being heavily embedded in the back wall of the pen.
Speedrunning
Records
The Compet-N records for the map are:
| Run | Time | Player | Date | File | Notes |
|---|---|---|---|---|---|
| UV speed | 00:35 | Adam Hegyi | 2000-10-28 | u4m4-035.zip | |
| NM speed | 00:37 | Vincent Catalaá | 2000-01-18 | n4m4-037.zip | |
| UV max | 01:36 | Radek Pecka | 2001-03-25 | u4m4-136.zip | |
| NM100S | 00:51 | Adam Hegyi | 1999-06-23 | n4s4-051.zip | |
| UV -fast | 02:28 | Ole Hartvigsen | 2000-06-05 | f4m4-228.zip | |
| UV -respawn | 01:27 | Radek Pecka | 2001-03-26 | r4m4-127.zip | |
| UV Tyson | 02:22 | Xit Vono | 2003-04-09 | t4m4-222.zip | |
| UV pacifist | 00:37 | Vincent Catalaá | 2000-01-18 | p4m4-037.zip |
Trivia
This is the one of the two levels with a 'falling into the sky' type of exit, the other being E4M8: Unto the Cruel.
Statistics
Map data
| Things | 153 |
| Vertices | 539 |
| Linedefs | 648 |
| Sidedefs | 925 |
| Sectors | 123 |
Things
| Monsters | ITYTD and HNTR | HMP | UV and NM |
|---|---|---|---|
| Sergeants | 8 | 12 | 12 |
| Spectres | 3 | 3 | 5 |
| Imps | 14 | 24 | 33 |
| Demons | 1 | 2 | 3 |
| Cacodemons | 1 | 4 | 7 |
| Powerups | ITYTD and HNTR | HMP | UV and NM |
| Medikits | 7 | 5 | 5 |
| Soul spheres | 1 | 1 | 1 |
| Health bonuses | 11 | 11 | 11 |
| Armor bonuses | 8 | 8 | 8 |
| Invulnerabilities | 1 | 1 | 1 |
| Berserks | 1 | 1 | 1 |
| Invisibilities | 1 | 1 | 1 |
| Weapons | ITYTD and HNTR | HMP | UV and NM |
| Shotguns | 1 | 1 | 1 |
| Chainguns | 1 | 1 | 1 |
| Rocket launchers | 1 | 1 | 1 |
| Ammunition | ITYTD and HNTR | HMP | UV and NM |
| Ammo clips | 3 | 3 | 3 |
| Shells | 4 | 3 | 2 |
| Rocket boxes | 1 | 1 | 1 |
| Keys | ITYTD and HNTR | HMP | UV and NM |
| Red skulls | 1 | 1 | 1 |