- This level occupies the map slot E4M3. For other maps which occupy this slot, see Category:E4M3.
- This level occupies the map slot MAP26. For other maps which occupy this slot, see Category:MAP26.
E4M3: Sever the Wicked (MAP26 in PSX/Saturn) is the third map of Thy Flesh Consumed in The Ultimate Doom. It was designed by Shawn Green, and was his first Doom level. It uses the music track "Deep into the Code."
Overview[]
The map title comes from Matthew 13:49: "So shall it be at the end of the world: the angels shall come forth, and sever the wicked from among the just."[1]
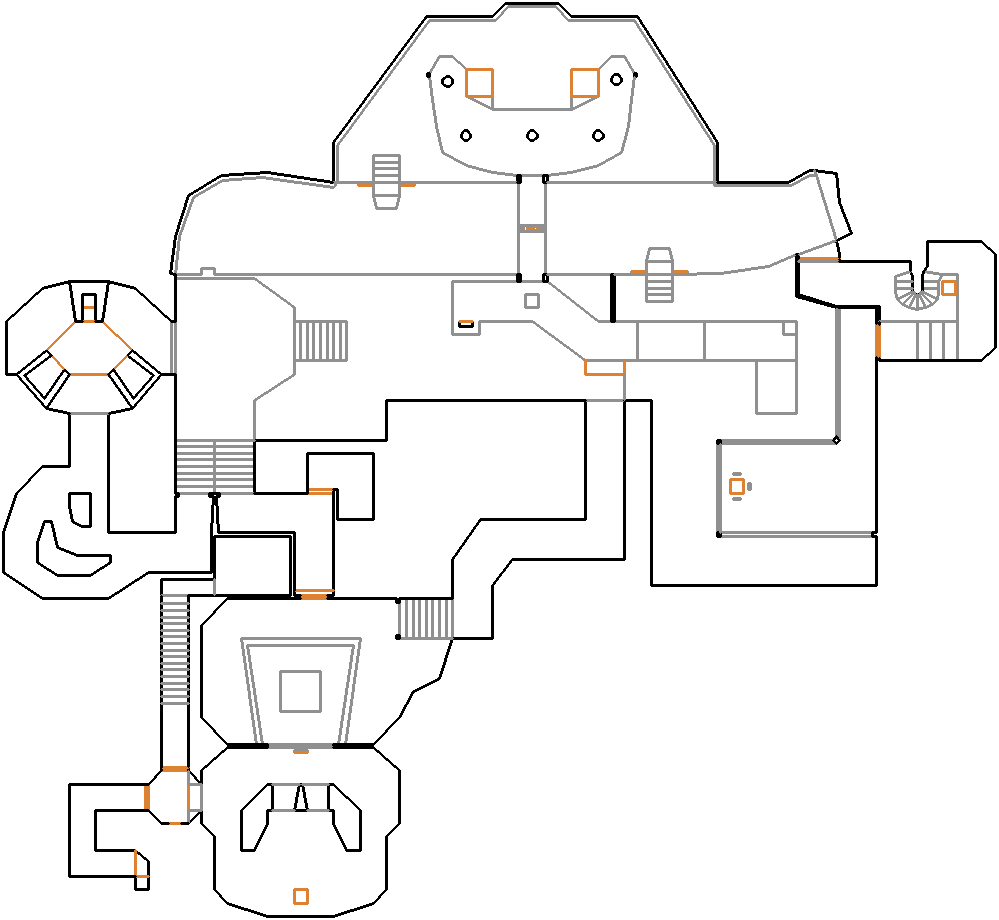
Map of E4M3
Walkthrough[]
First of all, fall down into the lower courtyard and go down the stairs to the west. Go up the stairs to the left, then follow the path to a door. Open it, you will pass the red key, inaccessible across lava surrounding it, fall down and press the lion switch to lower the platform and get the red key. To backtrack, turn right, into four torches, open the wall to the west,T it's a non-secret, it has a passage to a teleporter that takes you back to the start. Now since you have the red key, open the red bars to the north, to a room with the blue key. With both keys, fall down into the east of the huge lava river, and to the southeast is a red door. Open it, kill the Spectre, and go up the stairs. Be careful because there is a teleporter that takes you back to the start requiring to try again. Once you got up, go through the blue door, and go to the exit.
Other points of interest[]
From the start point, press the switch to raise a bridge to the invulnerability sphere.
There are several ledges overlooking the wide lava river. One of them have a backpack, berserk pack, and invisibility. The other has another invisibility. Another one has a chaingun.
You can get the blue key without the red key. To do so, fall into the west of the wide lava river and press either lion switch to lower the lift. Ride it to the top, lower either lift overlooking the caged room, and get the blue key, behind the red bars. That doesn't mean you don't need the red key - the blue door to the exit is behind another red door.
Secrets[]
- From the start, drop onto the ground in front of you and head down through the staircase. In the next room, take the upward staircase and continue along the hall until you reach a lion-faced door. Before you reach it, a door in the corner behind you (you also can open this door manually) will open, unleashing some enemies, but also allowing you to get some goodies.
- In the wooden room at the far south of the map (where the red skull key lowers to) is an alcove in the west. There are four torches here, the two easternmost of which are standing on secret sectors. Unfortunately, you cannot get credit for the secrets, if you really need them, type idspispopd and walk directly through either torch.
- Do the same for the other torch.
- Open the wall to the north (opposite side of the switch) to access a secret area. This is actually several secrets in one - not only the entrance to the room is a secret, but also the top room and ALL 19 steps are tagged as secrets! Make sure you have stepped on all of them without skipping one to get credit for each secret!
Bugs[]
- As detailed above, it is impossible to get 100% secrets without cheating.
- Between secrets 2 and 3 is a trigger that raises a crushing floor. However, it's activated by pressing use rather than walking across it. The floor is lowered when you press the switch within the secret, or if you take the teleport.
- A plasma gun near the exit has no difficulty flags set, and will never appear.
- A rocket is located off-map, at one of the northeast corners.
- In the PlayStation version of Doom, a "Texture Cache Overflow" may happen occasionally, requiring a system reset.
Speedrunning[]
Routes and tricks[]
It is possible to complete the map in about 10 seconds by raising a bridge and then jumping across the gap from the invulnerability powerup to the blue key door with precise SR50 jump.
Records[]
The Compet-N records for the map are:
| Run | Time | Player | Date | File | Notes |
|---|---|---|---|---|---|
| UV speed | 00:08 | Marijo "Sedlo" Sedlic | 2002-11-14 | u4m3-008.zip | |
| NM speed | 00:09 | Jonathan Rimmer | 2000-05-04 | n4m3-009.zip | |
| UV max | 02:44 | Radek Pecka | 2001-12-06 | u4m3-244.zip | |
| NM100S | 00:39 | Adam Hegyi | 2000-04-25 | n4s3-039.zip | |
| UV -fast | 02:53 | Radek Pecka | 2001-12-07 | f4m3-253.zip | |
| UV -respawn | 01:58 | Radek Pecka | 2001-12-07 | r4m3-158.zip | |
| UV Tyson | 05:19 | Anders Johnsen | 2002-11-21 | t4m3-519.zip | |
| UV pacifist | 00:08 | Marijo "Sedlo" Sedlic | 2002-11-14 | u4m3-008.zip |
Statistics[]
Map data[]
| Things | 384 |
| Vertices | 657 |
| Linedefs | 822 |
| Sidedefs | 1216 |
| Sectors | 156 |
Things[]
| Monsters | ITYTD and HNTR | HMP | UV and NM |
|---|---|---|---|
| Sergeants | 30 | 46 | 59 |
| Spectres | 8 | 9 | 15 |
| Imps | 26 | 33 | 42 |
| Demons | 5 | 6 | 7 |
| Barons of Hell | 1 | 1 | 7 |
| Troopers | 4 | 9 | 9 |
| Cacodemons | 0 | 6 | 1 |
| Lost Souls | 5 | 5 | 10 |
| Powerups | ITYTD and HNTR | HMP | UV and NM |
| Backpacks | 2 | 2 | 2 |
| Stim packs | 6 | 6 | 6 |
| Medikits | 9 | 9 | 9 |
| Soul spheres | 1 | 1 | 1 |
| Blue armors | 1 | 1 | 1 |
| Invulnerabilities | 1 | 1 | 1 |
| Berserks | 1 | 1 | 1 |
| Invisibilities | 2 | 2 | 2 |
| Radiation suits | 1 | 1 | 1 |
| Weapons | ITYTD and HNTR | HMP | UV and NM |
| Shotguns | 1 | 1 | 1 |
| Chainguns | 1 | 1 | 1 |
| Rocket launchers | 1 | 1 | 1 |
| Plasma guns | 1 | 1 | 1 |
| Chainsaws | 1 | 1 | 1 |
| Ammunition | ITYTD and HNTR | HMP | UV and NM |
| Bulk cells | 1 | 1 | 1 |
| Ammo clips | 7 | 7 | 7 |
| Shells | 21 | 21 | 21 |
| Rockets | 17 | 17 | 17 |
| Rocket boxes | 19 | 19 | 19 |
| Energy cells | 3 | 3 | 3 |
| Ammo boxes | 11 | 6 | 6 |
| Shell boxes | 9 | 9 | 9 |
| Keys | ITYTD and HNTR | HMP | UV and NM |
| Red skulls | 1 | 1 | 1 |
| Blue skulls | 1 | 1 | 1 |