- This level occupies the map slot E4M9. For other maps which occupy this slot, see Category:E4M9.
E4M9: Mausoleum is the secret map in The Ossuary episode of Heretic Shadow of the Serpent Riders, and can be accessed from E4M4.
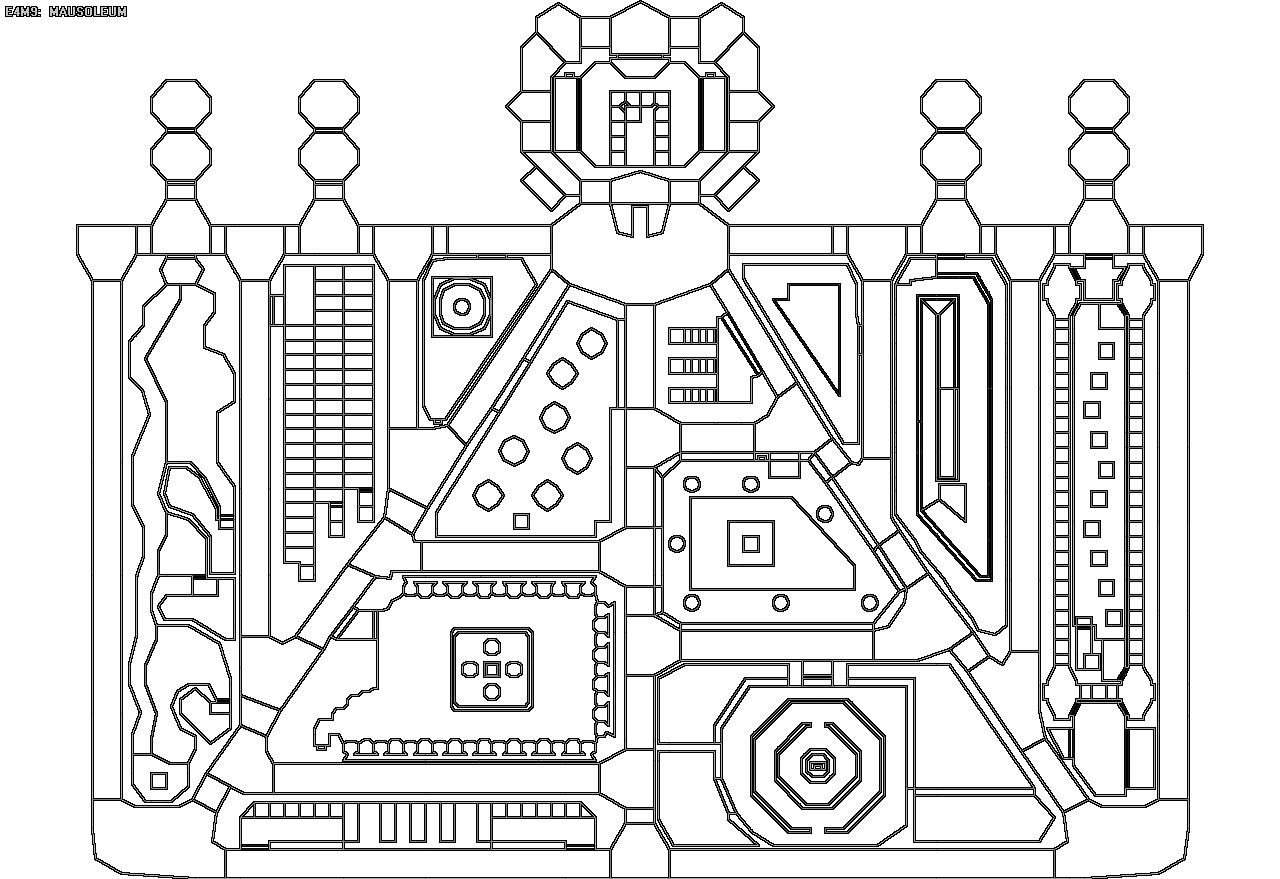
Map of E4M9
Walkthrough[]
The Mausoleum is a large level with many hidden locations. Almost all of them must be visited in order to exit the level, so get ready to spend a good while in here.
First off, it's useful to kill all of the enemies lurking in the spooky corridors, thus allowing you to freely navigate the place. There are some gargoyles and fire gargoyles around the starting point, a handful of undead warriors in a caged area at the centre of the map, golems and nitrogolems in almost all corridors and behind the entrance, where the yellow door and the exit are located.
There is also an Iron Lich in each of the rooms situated in the south-western and south-eastern corners of the map. In addition, at some point during exploration 4 alcoves will open alongside the northern border, revealing some items, but as soon as you try to pick up one of them 4 more alcoves will open, each one with another Iron Lich. All of them will be alerted of your presence and will come after you, provided they don't get lost in the labyrinth and force you to hunt them down.
Now the mausoleum looks quiet and you can explore the corridors. Why are there no doors in this place? There are several locations where there should be doors, but they are only sculpted walls that appear to be stuck. The automap marks some of these walls as doors, but no matter how much you try, they are all closed and there's no way to get inside. To get a useful hint, go to the south-western border of the map and find a place where you can see wooden platforms with ammo and items on them. If you check the wall on either the right or the left of the platforms, you'll notice carvings showing a demon with green eyes. They are actually hidden doors that you can open, but the area behind doesn't count as a secret. After taking the goodies, you have to find the only other place with the same carving in the whole level. It is found just west of the starting point.
You'll find a room with some gargoyles and a strange fountain with a Bag of Holding in the middle. It looks like a crusher trap and it surely is, but if you stop in the centre you can take the item without being squished. There's a trigger inside this room. Use it to continue your journey.
The next accessible chamber is located south-east of the starting area. A teleporter inside will bring you to the closest western chamber, which is very dark and contains some gargoyles. There are two doors to leave the chamber, clearly visible if using a torch. Leaving the chamber will raise the pillars in the room, revealing a handful of time bombs. The pillars now act as crushers and will activate as soon as you move under them. Get back to the room with the teleporter and you'll notice that a second teleporter has appeared.
Now things start getting tough. The second teleporter brings you to the southernmost chamber of the level, a large room with a small octagonal labyrinth patrolled by a swarm of gargoyles and some golems. Once you reach the centre and press the switch, you'll see walls lowering outside the labyrinth. Behind them are many disciples and you'll be forced to fight them from a disadvantaged position. You'd better use the Chaos Device you've just found. It's much easier to deal with them from the room entrance, if you want to get all kills and pick up the items in the room. Beware there's a second ambush by some nitrogolems and entering their hidden section will lower the labyrinth walls for some time, thus allowing you to take the quartz flasks.
Go back to the room with teleporters and get into the new one (the third). You're in a chamber with a lava pool and a flock of gargoyles. There's only a switch in the south-western corner that you have to push, then you can take the Dragon Claw in the middle of the pool and exit the chamber.
There's no place for other teleporters to appear in the previous room, so don't go back there but turn left then immediately right. You'll notice that a new chamber has opened. Disciples will attack you when inside, but you will find a teleporter at the bottom of the first ramp of stairs (others are unaccessible for now). Jump inside and you'll find yourself into the caged room at the centre of the mausoleum. There's a switch to trigger and some items to collect, but no door will open. You have to use the teleporter to get out.
Surprise! You're not in the room with the stairs, but in the westernmost chamber of the level. It is full of lava and gargoyles, but don't panic. If you walk close of the western wall in the shadowed area, you don't get hurt. However, if you want to get secrets #1, #2 and #3, you have to walk over damaging lava and then you're welcomed by undead warriors at point-blank range. You're surely going to take heavy damage to find all but extraordinary stuff.
Now it should be clear how this level works. Get back to the room with the stairs and a second teleporter can be entered. You'll find yourself in the easternmost chamber and to your right there's a hidden door leading to a long stairway with landings. Get to the top, killing everything that moves (don't forget to get secret #4), and you'll be in the central room with a lava pit and a series of staggered pillars descending towards a Phoenix Rod. That's not your final destination, because the exit is behind the carved wall on the right, accessible from the bottom of the pit. The teleporter brings you to the bottom of the stairway and the door will be open.
Again, go to the room with the stairs and find the third teleporter. It leads to the opposite room on the eastern side of the map. Basically it is a spiral clogged by undead warriors and golems. When you reach the centre, all raised walls inside the room will lower revealing two nitrogolems (one in front of you and the other behind) and, finally, the yellow key.
Behind the yellow door an Iron Lich on a platform and a classic disciple ambush are your last trial before the exit. Pull the two switches in the hidden rooms with the disciples and get to the exit... wait, did you notice the map has a chamber where you haven't been yet? This chamber is now accessible and the switch inside gives you access to secret #5. It is surely worth going there to get your armor maxed out after enduring so many challenges.
Secrets[]
- The lava lake in the west part of the map has several paths leading east. Each one leads to a secret door. The southmost one contains a shadowsphere
- From the above secret. The middle one has some quartz flasks
- From the above secret. The north one has ammo and an urn. You will get hurt getting these. If you spend as much time as possible in the shadowed area of the lake, where you can't get hurt, you can minimize the amount of damage you take.
- In the structure with the long stairway with landings, the southeast landing has a blue banner. Behind it is a hidden door to a room with some health, ammo, and wings of wrath. The best use for this artifact is to get secrets #1, #2 and #3.
- After entering the exit room, and revealing the switches, go back to the starting room. Go east to the first junction, then south. Enter the door on your right, and go to the northwest corner of the room and hit the switch. This will reveal another Iron Lich, and an enchanted shield.
Screenshots[]
")
")
")
")
")