- This level occupies the map slot E2M5. For other maps which occupy this slot, see Category:E2M5.
E2M5: The Catacombs is the fifth level in the Hell's Maw episode of Heretic.
Walkthrough[]
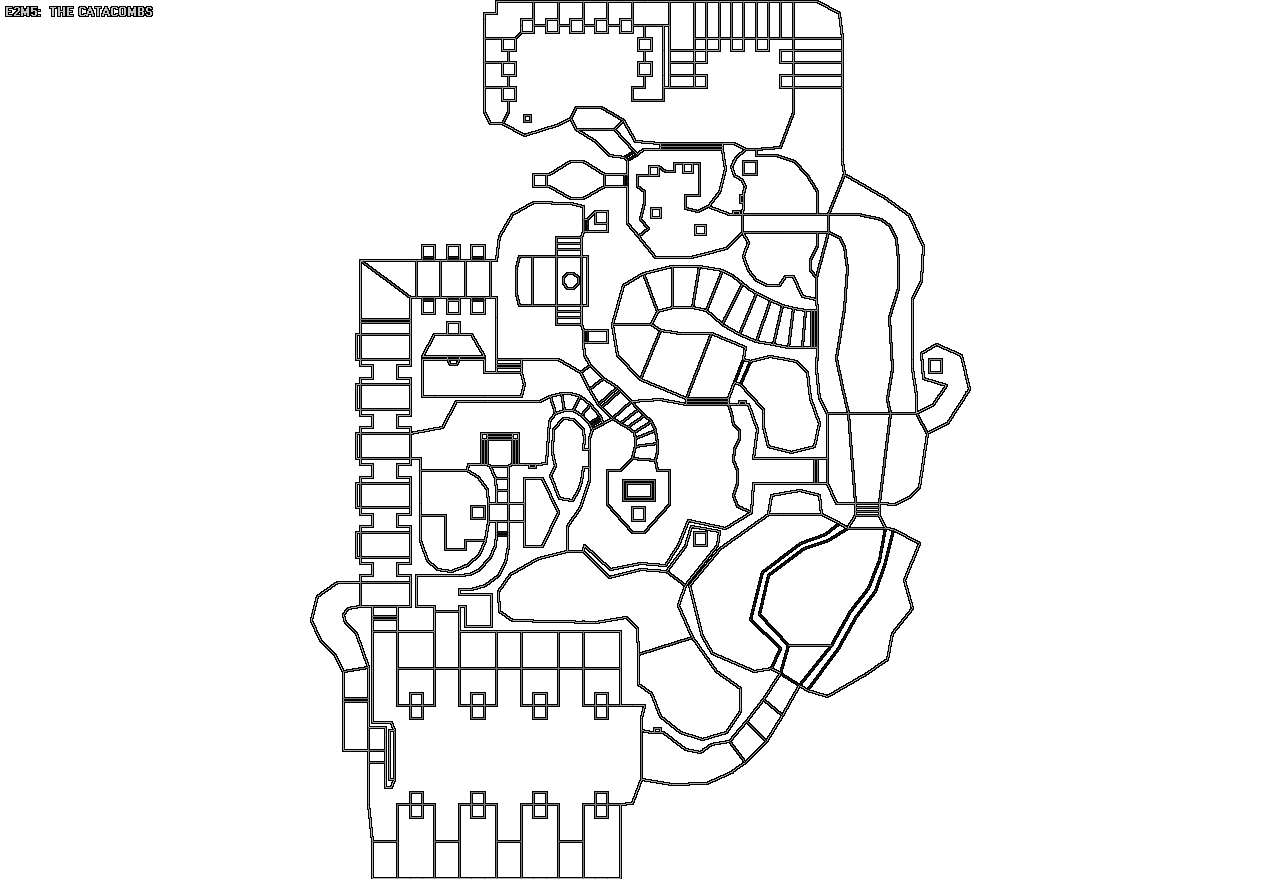
Map of E2M5
Start by clearing out the beasties. There's one weredragon up on a ledge near the yellow key, one behind the barred window and a sorcerer past the waterfall at the top of the stairs. Now go get the yellow key. If you look carefully at the east branch of the stairs you will see a switch. Drop down into the hole and get the dragon claw, then press the switch to raise the floor.
There's another switch beside the waterway. Press it to lower the water. This gets you into the cell with the barred window. Press the other switch to lower the water again to get out. Head for the yellow door, but don't go inside yet. Across from the door is a small cavern. Get the torch. IF you go through the teleporter it will send you back to the waterway and is the only way back to the first part of the level from here. Go back to the yellow door.
You'll see the blue key (and a weredragon) on a pillar in the middle of a field of volcanic rock. Watch out, there's another weredragon in the barred room to the north. Take them out and get the tome of power. The switch opens a door behind you allowing you to continue down the river. When you go over the falls, wall sections on either side lower containing beasties. When you approach the alcove with the shield the passage south opens up. Proceed forward carefully! Go down three tiers and save the game! The next step drops you into a fast-flowing channel that will deposit you in a room with an iron lich. You can fight the current but it's hard. Also in here is a switch that provides access to the first secret. Note: once you're down in the room below there's no way back up here for a while. Try to take out the lich from the channel.
Head to the northeast and go through the door. Take out the sorcerer in the darkened cell to the north. Get the green key then head back to the large room that contained the Iron Lich.
There is a gentle current that will push you west. Get the goodies in here then go up the stairs behind the large picture. Drop down into the next channel and take out the saberclaws. If you turn around and face south you can 'use' the wall section to lower a passage back to the big room. The gentle current will push you towards the green door. Half-way down is an opening to the right. If you go in there you'll recognize the cell with the sorcerer. If you got secret 1 you should have taken him out already. When you approach the grey pillar it will lower providing access to that area. Behind the cell is a mystic urn and a switch behind it. Press the switch to make the blue key accessible later. If you go down the stairs a door will open leading to the volcanic rock area under the blue key. Head to the green door. There is a weredragon on a dais at the top of the stairs. Now to finally get that blue key. Go back up the stairs and all the way back to the dais beyond the green door.
Go up the narrow passage to the southeast and through the door. Get the blue key but don't use the teleporter or it will take you all the way back to the beginning of the level.
Go all the way back to the blue door. Use the cell accessible from the waterway as a shortcut back. Take out the last two beasties then exit the level.
Secrets[]
- When you press the switch in the water channel just above the room with the Iron Lich, pillars with teleporters will lower in the big room. All the teleporters lead to the same place - a passage above and behind the pillars on the north side of the room. Enter the passage to the right. Get the tome of power in the small room to the southeast.
- On the stairs with a Weredragon on a dais at the top. Half-way up the stairs are wall sections with the sorcerer motif. Open the center one on the south side to open an alcove. When you do this the other five will open containing Sabreclaws. Get the map scroll and the morph ovum.
- On the left side of the room with the dais is a wall section with the sorcerer motif. Open the wall section to open an alcove. Go through the teleporter. Get the phoenix rod and the enchanted shield.
- After collecting the above secret, open the wall back to the cell and use the switch to lower the waterway and get out. Drop down and you'll see what opened. Take out the weredragon and head down the stairway to the west. At the bottom of the stairs you'll see a brightly-lit room. Get the tome of power, chaos device and the inferno orb.
- If you look to the southwest of the blue key you can see a ring floating seductively above the deadly floor. Take a run at the alcove visible to the northeast. Get the wings of wrath and use them to safely cross the volcanic rock to a ring of invincibility.
- From the above secret, there's a large cave to the southeast full of goodies. Get the hellstaff, then exit through the portal in the passage to the northeast. This takes you back to the beginning of the level.
Note[]
There is no original music in this map. Instead, music from "The Guard Tower" is reused here.
Screenshots[]
")
")
")
")
")