- This level occupies the map slot MAP05. For other maps which occupy this slot, see Category:MAP05.
MAP05: Rites of Passage is the fifth level of Memento Mori II. It was designed by Paul Noble and uses the music track "Anchor" by Mark Klem.
Mission briefing[]
According to both the text file and the Infopack:
- Ok marine, here is the mission based in sector 5 of the combat zone, we'll go through it step by step so you don't miss anything....
- Infiltration. We have sent three scout marines into this area and only one has managed to make it back with what looks like a very disturbed combat senario, [sic] there were update reports from the marines who didn't make it back about several varying areas, spanning deadly molten lava to a semi civilised area. Marine 002002345 who was second into the zone managed to setup the Close Range Teleporter Enhancement Pad (CRTEP) which will allow you to beam directly to the area and bypass the initial enemy sentries...
- Enemy deployments. The scout marines encountered varying forms of depraved fiends and also several zombified marines who are to be looked out for - see if you can appeal to their human side and then they may help you. The 1st scout in was quickly dispatched by what looked like what we know as imps but the image was very badly effected by the site locations [sic] interference. Scout 2 managed to make it to a moat of burning lava before he was exploded by a massive energy discharge - viewing his bod-cam the bolt of energy seemed to emanate from over the moat. Third in managed to make it a bit further before he request [sic] evac, but his exploration has left him a jibbering wreak [sic] and it was only with intense electroshock therapy that we managed to get any real information out of him. It seems that the self destruct switch for this bunker system is actually beyond the moat - how to get to this or excatly [sic] where it is, is what you'll have to discover...
- Armament. It seems that the demons have wised up to our CRTEP as they have scrambled the signal some what, when we beamed down your supplies the equipment was spread through the combat area, so you'll have to go in with just the bare minimum as the CRTEP does not allow us to download you with too much mass so you'll only have your pistol and the faithful knuckle dusters.
- Priority. Kill as many of the Hell Spawn as possible, and get out of there... Come back alive and you'll be awarded ice cream privilages [sic] for two whole weeks, oh and a medal I suppose.
- Good Luck Marine, and Kick ASS!
Walkthrough[]
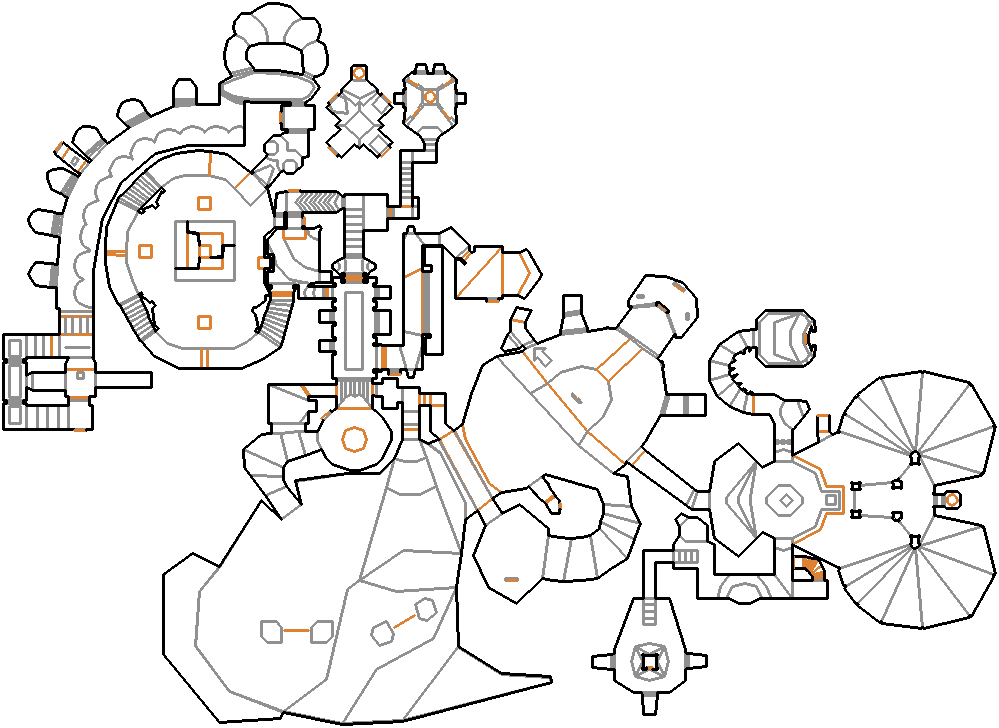
Map of MAP05
- Letters in italics refer to marked spots on the map. Sector numbers in boldface are secrets which count toward the end-of-level tally.
Secrets[]
Official[]
- At the beginning of the level, the steel door (sector 3) just behind you can be opened to reveal a chaingun.
- From secret #1, shoot the northern wall with the upside-down cross on it to reveal a stairway with a trooper. Climb up the stairway to find a secret room (sector 93) with a teleporter. Enter the teleporter to be warped to another room. Flip the switches, taking out the enemies (among a sergeant on easy or a chaingunner on medium and hard skill levels) along the way, until you find another teleporter. Enter this one to be taken to the north of the previous room, where you can obtain a backpack and two bullet boxes. Flip the switches to lower the barriers, and also to obtain two shell boxes.
- After lowering the segmented elevator south of the first hallway, enter the eastern opening. In the room east of the one with the two sets of shells and stimpacks, a part of the eastern wall is aligned differently; open this wall (sector 254) to reveal an elevator up to a passageway (press against the next metal wall to reveal it) lined with seven armor bonuses leading over a stimpack to a room with a clip, four sets of shells, three health bonuses, and, on Ultra-Violence or higher, a super shotgun and a chaingun. At the south of this room is a switch floating in mid-air; press this to raise a stairway leading down into the room with the exit.
- In the passageway leading up to the blue skull key, there are fake, passable walls bearing gargoyle faces on them. These cover a passageway containing nine armor bonuses, a stimpack, two clips and a hell knight. The very top step (sector 288) of this passageway counts as a secret.
Non-official[]
- In the yellow door room, you get ambushed by an imp on easy or a demon on medium and hard skills. He comes through the fake wall under the gargoyle stone face in the southeast. Enter this place to find a set of shells.
- When facing the lava pit with the "exit" signs for the first time, drop down into its northwest and enter the passage marked with an arrow on your automap to get a radiation suit, releasing an imp. Enter the pit's southern passage. Facing the yellow skull key, enter the southern hallway, where you get ambushed by skill dependant one/two/three spectres (and a demon on easy skills). They come through the eastern wall's southernmost part that has blood between the bricks and is actually a fake wall. Enter it to find a super shotgun and a passage leading to a gargoyle switch. Pushing it changes this whole area's lava floor into a non-harming stone floor, making live a lot easier down here.
Bugs[]
On the way to the blue skull key, right after secret #4, there is a long curved hallway with six compartments with cacodemons (and pain elementals on Ultra-Violence or higher), health and armor bonuses. It is possible to get trapped in each of them with no possibility to escape other that activating the idclip cheat. Trapping the player requires the following sequence of movements and pressing the switches:
- Do not step on the elevator-like looking floor right north of the blue skull key. (Stepping on it triggers (Linedef 1778, Type 130 - W1 Floor Raise to Next Higher Floor (fast), Tag 68) the compartments' floors (sectors 357, 360, 363, 380, 381 and 416) to raise.)
- Go back to the curved hallway, pressing a newly revealed gargoyle switch (Linedef 1794, Type 103 - S1 Door Open Stay, Tag 70) between the third and fourth compartment. It opens the compartments and reveals yet another gargoyle switch (Linedef 2696, Type 15 - S1 Floor Raise by 24 (changes texture), Tag 46) in the dark room south of secret #4 that raises the floor in the curved hallway, allowing to enter the compartments.
Since the compartments' unraised floors still have a height of -128 map units while the adjacent sectors have a floor height of +160, entering any of those will trap the player.
Demo files[]
- Short demo showing the red skull key grab (see below), as well as the bug trapping the player.
Speedrunning[]
Routes and tricks[]
At the beginning of the level, you can straferun off the steps and through the window. It is best done if you start at the eastern side of the steps, and then strafe run toward the window from that location, going across the second and first steps. After that, you can obtain the red skull key through the grate by straferunning against it. This is performed in the record-holding UV and NM speed runs of this level, as well as the record-holding UV max and NM100S demos. Following this, you can take the northern teleport in the pit and head for the blue skull key as usual. After that, you can drop back down into the pit, take the eastern teleporter to return to the start of the level, unlock access to the segmented elevator as usual, and then finish the level as you normally would.
In addition, as also shown in that run, you can flip the switch raising the bridge to the exit without exposing it first, although it's a bit tough to find due to its small size. To find this, face outward into the brown stone area, standing along the center of the platform, and head toward the outer end while pressing "Use" repeatedly. Once you remember the location, doing this quickly will be easier.
Finally, if you run onto the exit platform from its sides instead of its southern end, the enemy-holding compartments will not open, reducing the number of foes you must face upon reaching this location, and thwarting the trap sprung when you cross the raised bridge.
Current records[]
The Compet-N records for the map are:
| Run | Time | Player | Date | File | Notes |
|---|---|---|---|---|---|
| UV speed | 00:58 | Oyvind Stenhaug | 2002-10-28 | m205-058.zip | |
| NM speed | 01:08 | Radek Pecka | 2003-05-12 | m205n108.zip | |
| UV max | 07:05 | Anders Johnsen | 2003-05-12 | m205-705.zip | |
| NM100S | 01:23 | Eugene Kapustin | 2004-08-29 | m205s123.zip | [1] |
| UV -fast | |||||
| UV -respawn | |||||
| UV Tyson | |||||
| UV pacifist | 00:58 | Oyvind Stenhaug | 2002-10-28 | m205-058.zip |
Miscellaneous demos[]
| Run | Time | Player | Date | File | Notes |
|---|---|---|---|---|---|
| .zip |
Statistics[]
Map data[]
| Things | 414 |
| Vertexes | 2335 |
| Linedefs | 2887 |
| Sidedefs | 4037 |
| Sectors | 547 |
Things[]
| Monsters | ITYTD and HNTR | HMP | UV and NM |
|---|---|---|---|
| Barons of Hell | 0 | 0 | 1 |
| Cacodemons | 14 | 19 | 21 |
| Chaingunners | 3 | 4 | 6 |
| Demons | 11 | 9 | 6 |
| Hell Knights | 4 | 9 | 11 |
| Imps | 21 | 21 | 19 |
| Lost Souls | 17 | 7 | 7 |
| Pain Elementals | 0 | 0 | 2 |
| Sergeants | 17 | 22 | 26 |
| Spectres | 3 | 4 | 11 |
| Troopers | 2 | 1 | 1 |
| Powerups | ITYTD and HNTR | HMP | UV and NM |
| Armor bonuses | 60 | 73 | 73 |
| Backpacks | 1 | 1 | 1 |
| Green armors | 4 | 3 | 3 |
| Health bonuses | 17 | 17 | 17 |
| Medikits | 4 | 4 | 4 |
| Radiation suits | 5 | 5 | 5 |
| Stimpacks | 16 | 16 | 16 |
| Weapons | ITYTD and HNTR | HMP | UV and NM |
| Super shotguns | 2 | 2 | 3 |
| Chainguns | 1 | 1 | 2 |
| Ammunition | ITYTD and HNTR | HMP | UV and NM |
| Ammo clips | 21 | 21 | 21 |
| Bullet boxes | 7 | 7 | 7 |
| Shells | 24 | 24 | 26 |
| Shell boxes | 5 | 5 | 5 |
| Rockets | 2 | 2 | 2 |
| Keys | ITYTD and HNTR | HMP | UV and NM |
| Blue skulls | 1 | 1 | 1 |
| Red skulls | 1 | 1 | 1 |
| Yellow skulls | 1 | 1 | 1 |
| Barrels | ITYTD and HNTR | HMP | UV and NM |
| Exploding barrels | 15 | 15 | 15 |
References[]
- ↑ This demo is erroneously placed in the UV speed directory instead of the NM100S one.