- This level occupies the map slot MAP13. For other maps which occupy this slot, see Category:MAP13.
MAP13: 2400 Fulton Street is the sixth map of the 7-map PWAD Eternal Doom IV: Return from Oblivion. Designed by Chris Couleur, who also did Map 11 and 12, Map 13 is a huge, sprawling map with 6 keys and 7 secrets to discover, and about 1000 enemies to kill, notably several cyberdemons. Many of the enemies are spawned, sometimes silently. The player's inventory from the previous map is not carried over. Only a pistol is available at the start, but all other weapons can be found in the map. The player must also obtain 13 artifact items in order to achieve 100% items.
In terms of the map's architectural designs, there is a nice mixture of elegant medieval structures, rough outdoor terrains, as well as dark castle interiors and swampy areas.
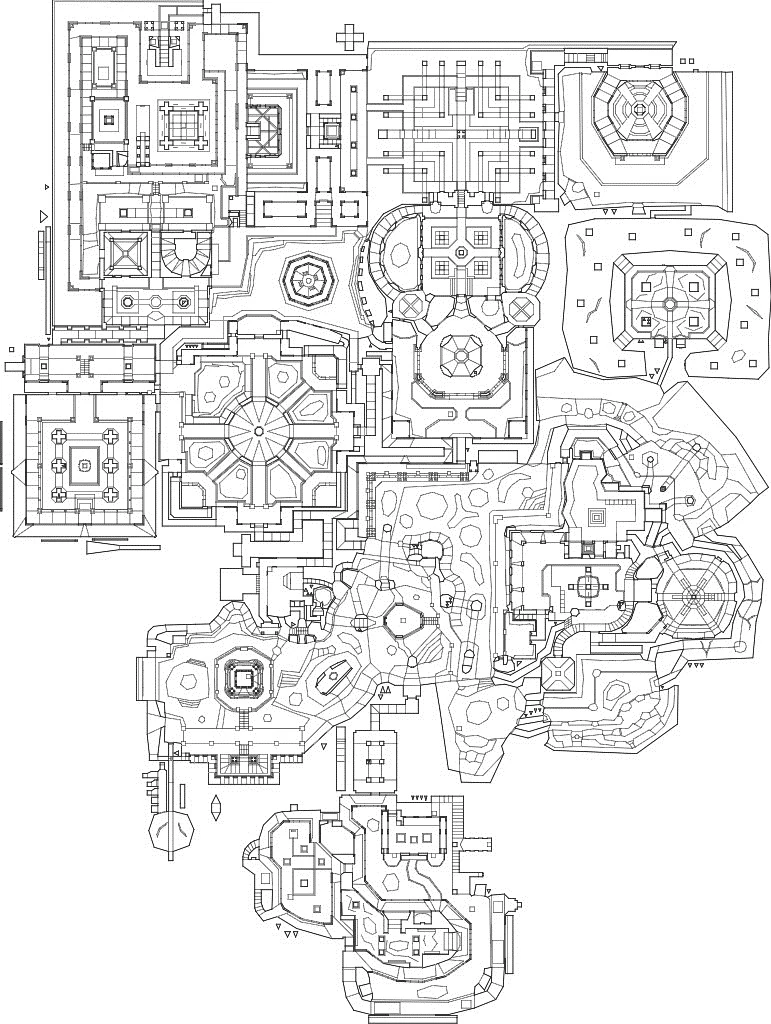
Complete map layout of Map 13 from the PWAD Eternal Doom IV.
Per the map designer, jumping is disabled by default for this map, unlike other maps in the WAD.
Walkthrough[]
The map is divided into several regions, which the player must unlock one by one with keys or triggers. Every unlocked region invariably contains a key that unlocks the next region. Like other maps in the WAD, there is a "hub" area that connects several regions together, provided that all paths are cleared with the proper keys or triggers.
A video walkthrough for this map is also available[1].
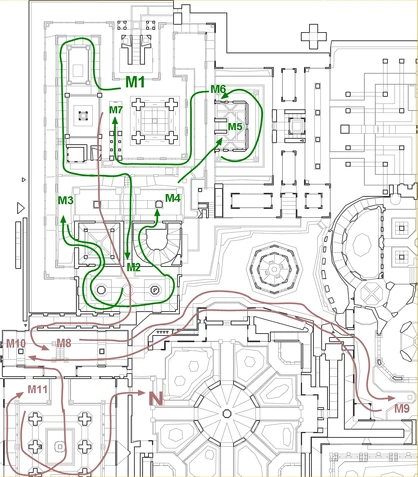
Part 1: SW and SE regions[]
You begin in a dark room in the southwest part of the map. A small canal leads you to a wide open area ("A", Fig. 1a), where a shootout lasting several minutes ensues. A small room (B) is accessible by swimming underwater or walking on the ledges above. An underwater passage leads you to a smaller pool, where you find a blue key card and a soul sphere (item 1 of 13).

Fig. 1a - Map 13 walkthrough part 1, the SW and SE regions.
Head east and use the blue key card to unlock the door that leads to a small lake with several small islands. Dispatch any enemies close by. At one corner of the lake, there is a hard-to-see underwater passage. It leads you to a castle area at southeast (C).
A pool is in the middle of this area, surrounded by grey stone structures. This area has an intricate sequence of switches to activate. On the landing beside the pool, a face switch (C1, Fig. 1b) opens up staircases that lead to the upper levels. Go up the stairs to the second level and kill all enemies in your way. There is a marine hung inside a small room behind bars (C2). To pick up the health bonus behind bars (item 2 of 13), run towards the bars and bump against them repeatedly, and eventually you will grab the health bonus.
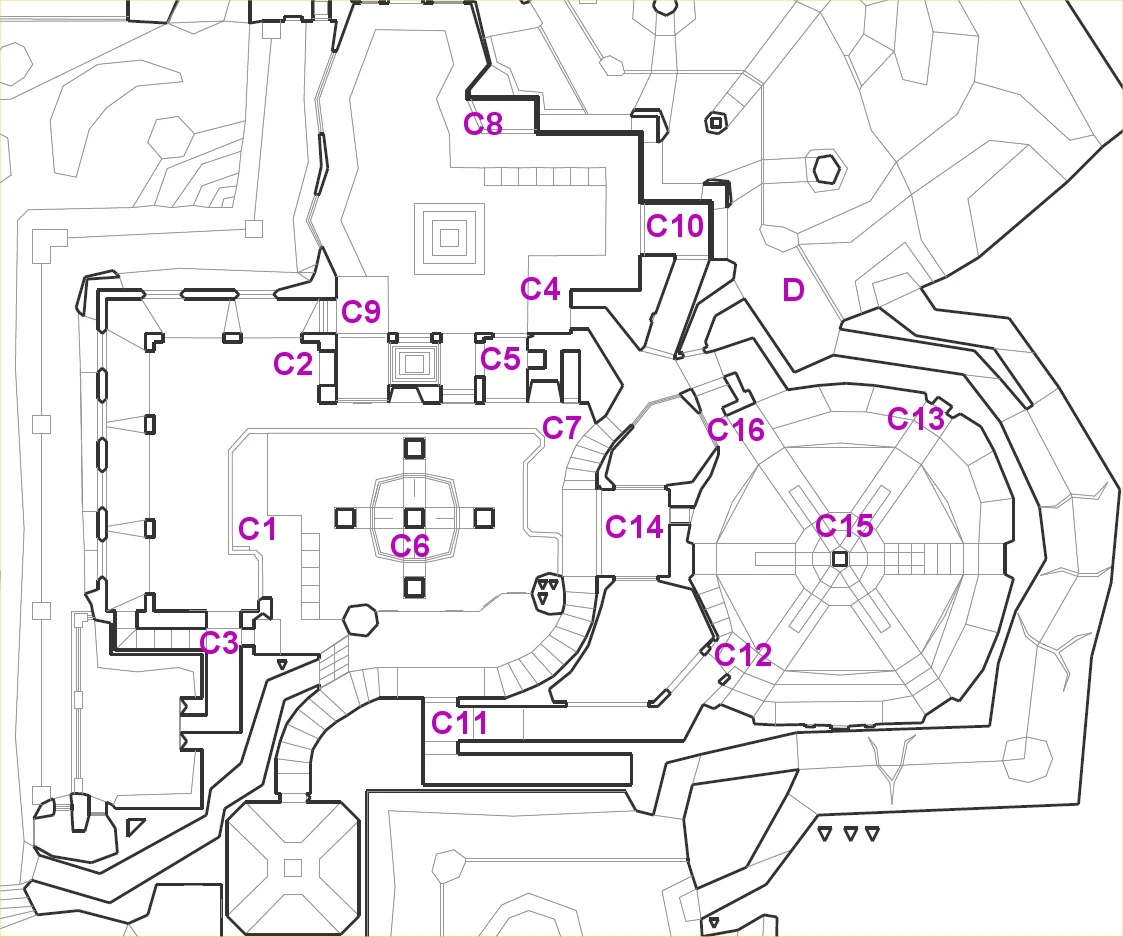
Fig. 1b - Map 13 walkthrough, the SE region.
Shoot the marine behind bars (coup de grace?) and a nearby wall (C3) will open up and a few mancubi and revenants will appear. Kill them, and go to the balcony (C3), where another face switch opens a staircase that takes you up another level. Go up to the third level. The end of the corridor is a door that opens to a room with a rocket launcher on top of a pillar.
At one corner (C4) of this room, a face switch lowers the rocket launcher, but also opens up a room (C5) from which a few hell knights and barons of hell emerge. This room also has a teleporter that takes you to the tall pillar (C6) in the middle of the pool.
There are two switches on the pillar. One opens a small space (C8) in the previous room, and the other opens up a wall nearby that reveals an arachnotron. You jump down from the pillar to give yourself more space to fight the monsters. At one corner on the second level, there is a face switch (C7) that opens up a secret room (secret 1 of 7) inside a wall, where a revenant and a few powerups are revealed.
Go up to the third level again and go to the newly revealed face switches at C8. One of them lowers a platform (C9) that reveals a room (secret 2 of 7). An arch-vile spawns right next to you. You go back to C8 and flip the other switch. A nearby wall opens (C10), revealing a passage that takes you to a room with another tall pillar at the center.
After the ensuing shootout, go down a long corridor (C11) and flip the switch there. It raises a staircase that takes you to another switch (C12). Flipping that switch reveals another switch (C13) on the other side of the wall and also opens up a room (C14) next to two deep pits. Flip the switch at the corner, which raises the platform around the pillar. There are two cacodemons in those two deep pits that you can't see due to your inability to jump. They don't hear you either. You need to fire rockets down there, so the splash damage will make the cacodemons come up. After killing them, return to C13 and flip the switch, which raises a staircase that takes you to the top of the pillar. Three of the switches at the pillar spawn monsters, while the last one opens a door below that leads to an outdoor area (D).
At the outdoor area (D), head west, and you see a red skull key on an island inaccessible to you. Keep heading west and fight your way through a long narrow ledge overlooking the pool and small islands. At the end of the ledge is a plasma gun. Stay on the ledge and head back east, back to area D.
At area D (Fig. 1a), head towards a long dark passage over a canal. When you exit the passage, several bazooka zombies and other monsters are waiting for you, shooting at you from hilltops and ledges. After a tough shootout, go through a tiny opening to another pool area and kill all enemies there. Jump to the ledge where the red skull key is located (E, Fig. 1a). From there, jump down to the pool below, where a staircase takes you back to the SW area. Head south, stay on the ledge, and use the red skull key to open the door to the south wing.
Part 2: South wing[]
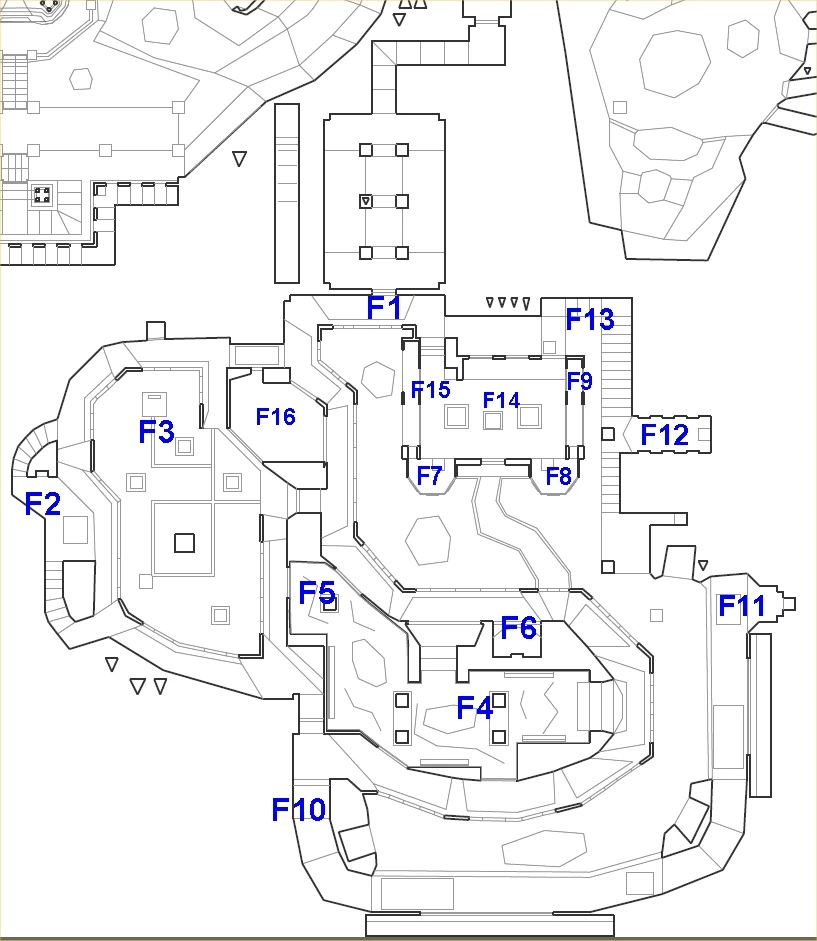
A dark and somber-looking castle area occupies the southernmost region of the map. After passing through the first door (F1, Fig. 2), you will need a yellow key card in order to exit through it later. Explore all available areas and kill any enemies in sight. To progress further, a switch in an elevated room (F2) needs to be flipped, which causes a narrow ledge to rise up from the lava pool below. The narrow ledge leads to an important switch (F3) that opens up several walls nearby, while spawning several monsters. Head towards the garden area (F4), where two armor bonuses (items 3 & 4 of 13), an invisibility sphere (F5; item 5 of 13), and a switch are located. The switch opens up a small room outside (F6), where a cyberdemon is waiting.
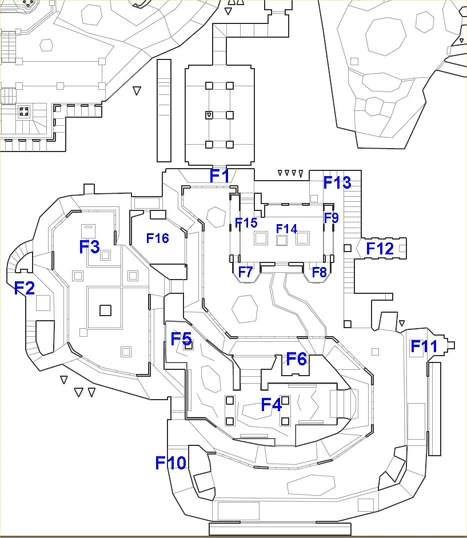
Fig. 2 - Map 13 walkthrough part 2, the south wing.
To have an easier time fighting the cyberdemon, locate an invulnerability sphere nearby. Near the entrance at F1, a door leads to a room with three pillars. Flipping the switch at F7 lowers the platform next to it. Step on the platform and go up. Go to the end of the narrow passage and flip another switch, which lowers a nearby teleporter halfway (F15). Flip the switch near the platform to lower another platform at the opposite end (F8). Run towards it to get up to F8. Get the invulnerability sphere (item 6 of 13) at the end of the narrow passage (F9).
The best weapon to fight the cyberdemon while you are invulnerable is the rocket launcher (you don't have the BFG yet), so make sure you preserve some rockets beforehand. After killing the cyberdemon, return to the small room (F6), pick up the soul sphere (item 7 of 13) and ammos, and flip the switch there. It opens up a passage to the upper level (F10). Fight your way to the end of the passage (F11) and step on the teleporter. It takes you to a narrow area with two face switches and a teleporter (F12). Flip the face switch on the right, and it raises a staircase. Go up the staircase, kill the monster, and flip the switch at the corner, which opens another staircase. Go up that staircase, kill the arch-vile, open the hard-to-see wooden door (F13), and you are back in the room with three pillars.
Flip the switch on the wall, and the yellow key card emerges from the middle pillar (F14). The nearby teleporter (F15), which was lowered halfway before with the switch near F7, is now lowered all the way. Two of the pillars have crushers on top, so do a quick double jump to grab the yellow key card. Jump down to the floor and use the teleporter (F15) that has been lowered.
You are back to the narrow area (F12). Flip the switch on the left, which opens the locked door to the room with the megasphere (F16). Quickly use the teleporter, which takes you to right in front of the opened door. Go in to the room before the door closes and grab the megasphere (item 8 of 13; secret 3 of 7).
Look for any spawned monsters you haven't killed in the area. When you are sure the area is cleaned up, open the door at F1 with the yellow key card and leave the area.
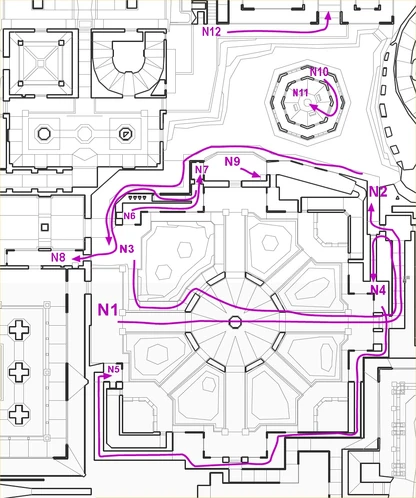
Part 3: NE region[]
After exiting the south castle, the player needs to go north and unlock the NW region with the yellow key card. Follow the path shown in Fig. 3a to get to the area (G) with symmetrical left and right pools, left and right staircases, and a marble room in the middle.
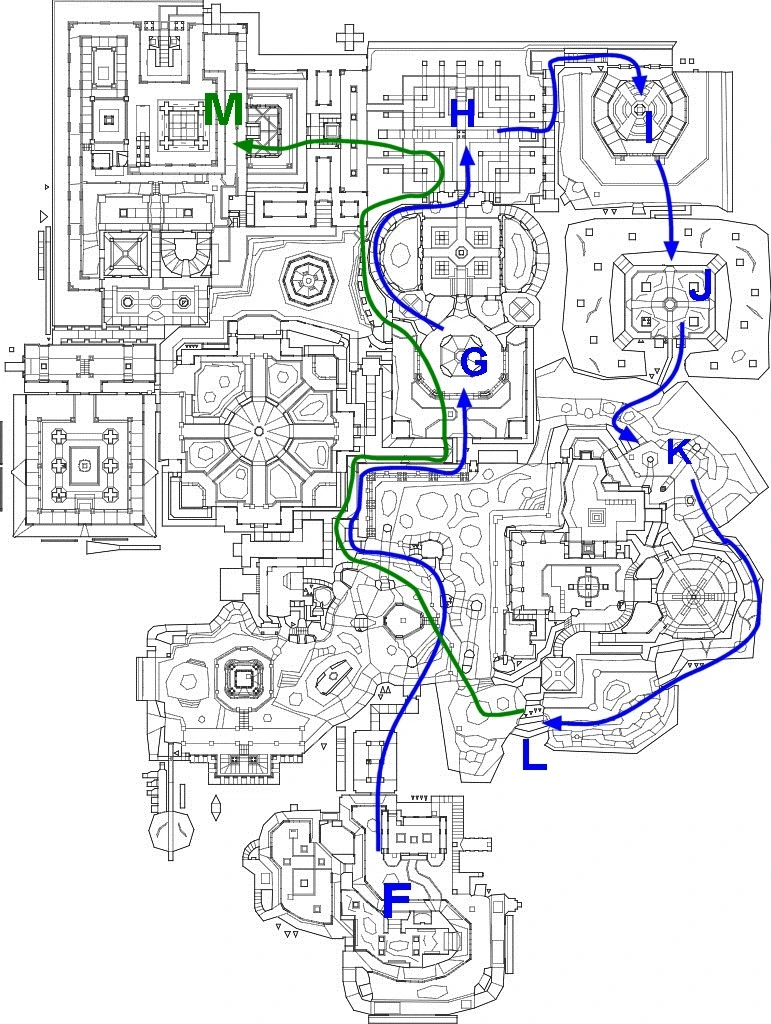
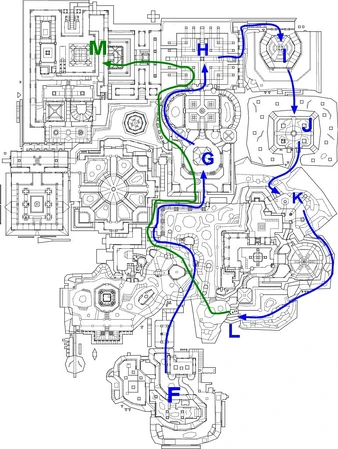
Fig. 3a - Map 13 walkthrough part 3, the NE region.
The pool on the left (G1, Fig 3b) contains an underwater soul sphere, which is accessible only from the northwest region much later in the walkthrough. Kill all the enemies you see. The room in the middle has four deep pits where four revenants will rise up if you run along the left corridor (G5). To get to the unreachable megasphere (G4), go through the middle passage. A hidden teleporter teleports you from G2 to G3, where a switch on your right lowers the platform at G4. Teleport back from G3 to G2, and quickly step on the platform at G4 before it elevates. Drop down to the landing below to pick up the megasphere (item 9 of 13; secret 4 of 7) below.
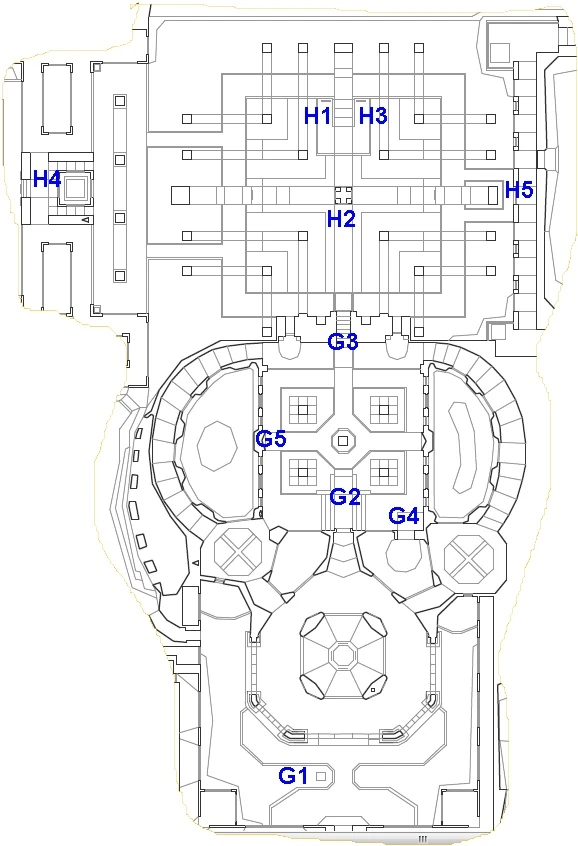
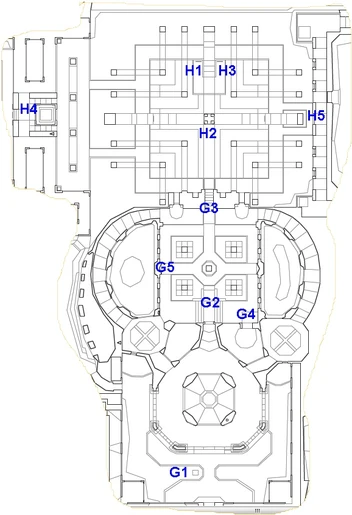
Fig. 3b - Map 13 NE region, area G and H.
Use either the left or right staircase to go up to the balcony, where a door leads to an open area with marble corridors. After killing all enemies, flip the switch at H3, which reveals a blue skull key (H2) inside a pillar in the middle. Flip the switch at H1, and a passage at G3 opens up, unleashing several revenants and other monsters.
To get the blue skull key, you need to go back to the previous area, use the teleporter at G2 to get to G3, then head to H2. When you pick up the key, several imps will spawn. Kill them, and pick up the ammos in the area if you need to.
Use either the left or right staircase again to return to the area with the marble corridors. There are two exits from this area: the locked door at H4 leads to the northwest region, but you currently don't have a red skull key to unlock it; another locked door (H5) can be unlocked with the blue skull key you just picked up, and it takes you to the next area.
Part 4: NW region[]
With the red skull key, the player enters the most challenging region in the map, the northwest.

Fig. 4 - Map 13 walkthrough part 4, the NW region.
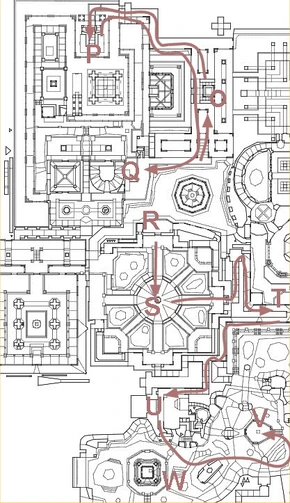
Part 5: NW courtyard[]
The NW courtyard is like a hub that connects to several regions of the map.

Fig. 5 - Map 13 walkthrough part 5, NW courtyard.
Part 6: Final Stages[]
The yellow skull key allows the player back to the SW region to fight the cyberdemons and exit the map.
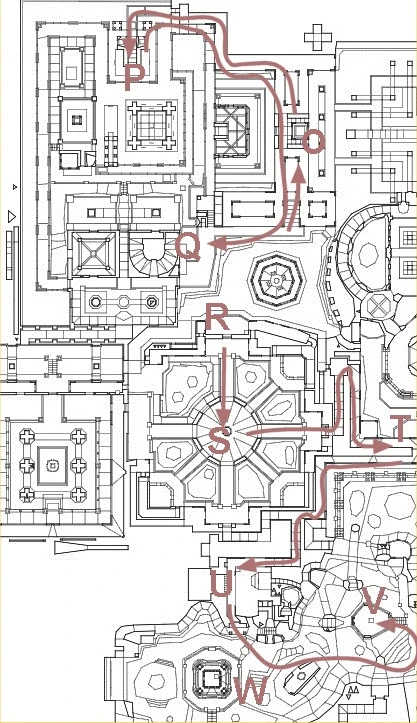
Fig. 6 - Map 13 walkthrough part 6, final stages.
References[]
- ↑ Map 13 video walkthrough on Youtube: http://www.youtube.com/watch?v=LrPcBfsOtDY