- This level occupies the map slot MAP02. For other maps which occupy this slot, see Category:MAP02.
MAP02: The Pain Labs is the second map of No Rest for the Living. It was designed by Richard Heath and uses the music track "The Dave D. Taylor Blues". The par time is 1:45.
Walkthrough[]
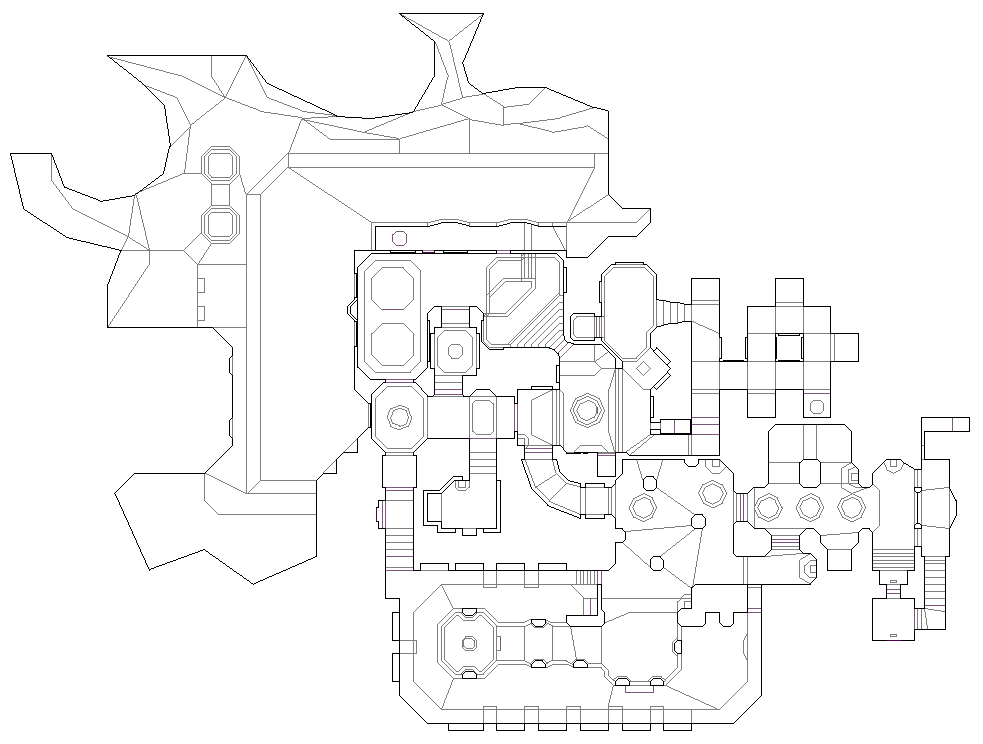
Map of MAP02
- Letters in italics refer to marked spots on the map. Sector numbers in boldface are secrets which count toward the end-of-level tally.
Secrets[]
There are twelve secrets on the map, in nine secret areas, some of which can be accessed from several places:
- From the starting position, head up the stairs. Near the top is a tripwire activating an entrance to the northeast. Open the door to your right and run past the chaingun platform, turn left. As you enter the corridor, the first aperture on your left will be open, revealing three armor bonuses and a light amplification visor (sector 23).
- Collecting the red keycard opens five nearby closets, the back wall of the one in the southwest of the dark section (behind a box of bullets) can be opened, revealing a berserk pack. Stepping in this secret (sector 144) triggers an ambush and opens a passage to the room with the chaingun platform.
- Return to the north of the stairs from the starting position and look to the west. The northern wall behind a set of shotgun shells halfway to the soul sphere opens a secret area (sector 311) with (one on easy, two on medium or three on hard skill levels) imps, a super shotgun, three stimpacks and eight armor bonuses. This area can also be accessed by opening the tech panel on the southern wall between the two nukage pools in the area north of the red door.
- Grab the super shotgun in secret #3. It is located on its own, also secret, sector (sector 440).
- Grabbing the red keycard opened an alcove in the south of the soul sphere platform, containing six imps (you met halfway returning from the red key), a box of shotgun shells and a bullet box. Open the southern wall to face two (easy) or four (medium and hard skills) imps. The sector south of the door counts as secret (sector 208).
- In secret #5, walk a step to the south on the slightly darker square (sector 438) with the seven health bonuses arranged like an arrow pointing at the western wall.
- Leave secret #6 to the south. The sector in front of the lowermost stair counts as a secret (sector 439). Secrets #5-7 can also be accessed by opening the wall in the northwest of the ledge surrounding the yellow keycard area, beyond the blue door. (See secret #10.)
- Open the western wall in secret #6 to reveal a switch that lowers the soul sphere platform. It counts as a secret (sector 77).
- Open the slightly differently textured wall north of the eastern nukage pool mentioned in secret #3 to access a secret balcony (sector 417) with two troopers, two clips, a stimpack and a chainsaw on a platform with two health bonuses behind. Picking up the chainsaw after lowering its platform by using the nearby switch sparks an ambush (with three troopers and two demons).
- Beyond the blue door, just westsouthwest of the southernmost cement pillar, the western wall behind a stimpack can be opened, allowing access to the ledge surrounding the area with the yellow keycard. The section of that ledge just beyond the stairs is secret (sector 383). An alternate route to secret #5-7 can be opened by activating the northern wall in the northwest corner.
- Circle all along the ledge mentioned in secret #10 to reach the megaarmor. The northern wall of the ledge can be opened, revealing a secret sector containing a blur sphere (sector 342).
- Inside the exit chamber, the eastern wall opens a passage with a flight of stairs leading to the imp balcony (sector 437), which is a secret area where you can find a clip, a set of shells, a computer area map and six health bonuses.
Bugs[]
- This bug is not present in Chocolate Doom, but it is in Doomsday and maybe other source ports:
- After opening the yellow door and using any weapon, the player attracts the attention of a pain elemental (Thing 53 (hard)/222 (easy)/283 (medium skill)) in sector 391 who starts moving and is supposed to teleport (Linedef 1794; Action: 125 - W1 Teleport (Monsters only), Tag 11) to sector 277.
- Since the exploding barrel in the south of this sector is blocking the teleport destination, the pain elemental is not able to teleport in when crossing the linedef. The linedef is usable only once, so the pain elemental will rest forever in his place, thus the player cannot reach 100% of the kills.
- To avoid this, the player should open the southern yellow door first and immediately destroy the barrel to his right (in the south of the shell box), so that the pain elemental can teleport onto the shell box.
Speedrunning[]
Miscellaneous demos[]
| Run | Time | Player | Date | File | Notes |
|---|---|---|---|---|---|
| .zip |
Statistics[]
Map data[]
| Things | 448 |
| Vertices | 1555 |
| Linedefs | 1999 |
| Sidedefs | 3079 |
| Sectors | 441 |
Things[]
This level contains the following numbers of things per skill level:
| Monsters | ITYTD and HNTR | HMP | UV and NM |
|---|---|---|---|
| Cacodemons | 2 | 6 | 8 |
| Chaingunners | 0 | 2 | 8 |
| Demons | 21 | 11 | 4 |
| Hell Knights | 2 | 3 | 6 |
| Imps | 35 | 43 | 46 |
| Lost Souls | 0 | 0 | 3 |
| Mancubi | 0 | 1 | 3 |
| Pain Elementals | 2 | 2 | 3 |
| Sergeants | 4 | 7 | 18 |
| Spectres | 0 | 1 | 0 |
| Troopers | 22 | 16 | 9 |
| Powerups | ITYTD and HNTR | HMP | UV and NM |
| Armor bonuses | 13 | 13 | 13 |
| Berserk packs | 1 | 1 | 1 |
| Blur artifacts | 1 | 1 | 1 |
| Blue armors | 1 | 1 | 1 |
| Computer maps | 1 | 1 | 1 |
| Health bonuses | 34 | 34 | 34 |
| Light amplification visors | 1 | 1 | 1 |
| Medikits | 5 | 5 | 5 |
| Soul spheres | 1 | 1 | 1 |
| Stimpacks | 12 | 11 | 11 |
| Weapons | ITYTD and HNTR | HMP | UV and NM |
| Chainguns | 1 | 1 | 1 |
| Chainsaws | 1 | 1 | 1 |
| Shotguns | 1 | 1 | 1 |
| Super shotguns | 1 | 1 | 1 |
| Ammunition | ITYTD and HNTR | HMP | UV and NM |
| Ammo clips | 9 | 9 | 14 |
| Bullet boxes | 12 | 12 | 12 |
| Shells | 12 | 12 | 15 |
| Shell boxes | 4 | 4 | 4 |
| Keys | ITYTD and HNTR | HMP | UV and NM |
| Blue cards | 1 | 1 | 1 |
| Red cards | 1 | 1 | 1 |
| Yellow cards | 1 | 1 | 1 |
| Barrels | ITYTD and HNTR | HMP | UV and NM |
| Exploding barrels | 15 | 15 | 15 |