- This level occupies the map slot MAP05. For other maps which occupy this slot, see Category:MAP05.
MAP05: The Canyon is the fifth map of Requiem. It was designed by Bill McClendon, and uses the music track "Mystic's Glance" by David "Tolwyn" Shaw.
Description[]
According to both the text file and the Requiem info pack:
- It just doesn't seem to be getting any easier, does it...?
- NOW it appears the mutant hellspawn have located and utterly corrupted the waste-processing plant in an outlying area. The only reason you can think of for them to do this is the ample room they have in the canyon... but that area is sealed...
- ...isn't it?
Walkthrough[]

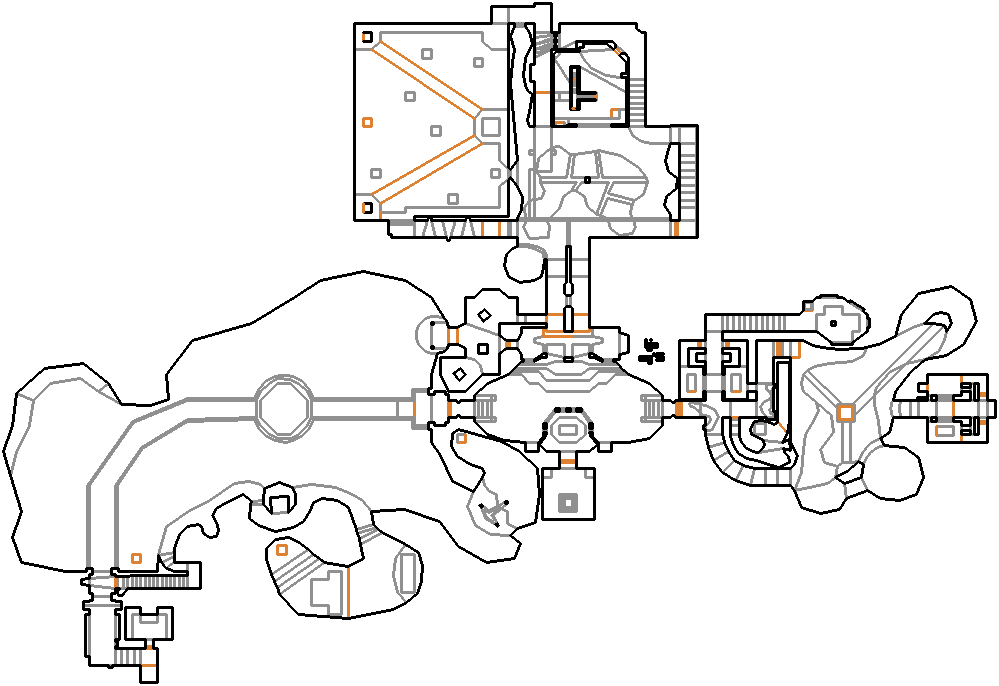
Map of MAP05
- Letters in italics refer to marked spots on the map. Sector numbers in boldface are secrets which count toward the end-of-level tally.
Secrets[]
- In the room west of the two lifts, one portion of the wall in the northeast of the room is borded by rusted metal and has some moss on it. This wall can be walked through, leading into a hole with combat armor at the bottom. (sector 63) Press on the wall on the opposite end to activate the lift and exit.
- In the northern computer room, the east side of the mainframe has two yellow boxes with thick, gray corners at its bottom corners. Push it to find a secret passage into a corridor with security armor on one side and an unreachable yellow key on the other. (sector 188) Walk toward the yellow key, and a switch will appear behind you. Press it to raise a staircase leading to the key, allowing you to obtain it.
- Once you go through the blue key-locked door, look east of the intersection to find a wall with two yellow boxes bearing thick, gray borders at the bottom. This is a door that requires the yellow key from secret #2 to open. Once you have it, open it to find an intestine-covered passage leading to two medikits, and a tunnel with a soul sphere at the end. (sector 207) Approaching the soul sphere will cause a spectre (or demon on Hey, Not Too Rough or lower) to appear; at his location is an ammo box.
- At the end of the southwest, outdoor bridge, look to the west of the cave to see another section of wall with gray-bordered, yellow boxes at the bottom. This is another door that requires the yellow key from secret #2 to open. If you have it, open this to find a stairway up to higher ground. (sector 359) Follow the path until you reach a gray, stone area with an unreachable platform holding a rocket launcher, rockets, and a radiation suit. Head through the room and you will be attacked by enemies suddenly appearing. Kill them, and enter the teleporter at the northwest of the room to get on the platform and obtain the goods it carries.
- From secret #4, you can jump into the sludge pool south of the bridge. Look to the southeast to find a section of the pool covered by an animated teleporter texture (see Bugs.) Behind it is the cave from which the monsters who teleport onto the bridge originate; enter to find two medikits, and (on Hurt Me Plenty or lower) a soul sphere. (sector 53) Use the teleporter to get back on the bridge.
- Directly north of the exit teleporter is a section of wall without any lines cut in it. Open it to find a room with four medikits, security armor (on Hurt Me Plenty or higher), soul sphere and combat armor (both on Hey, Not Too Rough or lower), a box of ammo with a chaingun, a box of shells with a super shotgun, and a computer map. (sector 367)
Bugs[]
The deathmatch portion of this level does not contain an exit, preventing you from leaving the level in multiplayer gameplay unless a timer has been set through the -timer switch. The Deathmatch Repair File created by Steve Terry adds an exit to this area located in the southwest.
The floors of sectors 52 and 85 are covered with an animated teleporter texture, even though they are at the same height as the brown sludge pool nearby them, and the sectors do not conform to the fixed grid that flats are aligned on. It is possible that this level was designed before the animated teleporter texture was added to the wad, using the start and end of the alternate brown slime animation (SLIME05 and SLIME08) as bookends, and no one on the development team remembered that the alternate brown slime animation was already used in a map.
Areas / screenshots[]
")
")
")
")
")
")
Speedrunning[]
Current records[]
The Compet-N records for the map are:
| Run | Time | Player | Date | File | Notes |
|---|---|---|---|---|---|
| UV speed | 03:30 | Xit Vono | 2003-01-21 | rq05-330.zip | |
| NM speed | |||||
| UV max | 08:44 | Xit Vono | 2001-11-13 | rq05-844.zip | |
| NM100S | |||||
| UV -fast | 13:57 | Tomas "DeDo" Kollar | 2004-03-23 | rf051357.zip | |
| UV -respawn | 12:01 | Xit Vono | 2002-02-12 | rr051201.zip | |
| UV Tyson | 34:15 | Xit Vono | 2004-06-01 | rt053415.zip | |
| UV pacifist |
Miscellaneous demos[]
| Run | Time | Player | Date | File | Notes |
|---|---|---|---|---|---|
| .zip |
Statistics[]
Map data[]
| Things | 659 |
| Vertexes | 2174 |
| Linedefs | 2668 |
| Sidedefs | 3782 |
| Sectors | 430 |
Things[]
| Monsters | ITYTD and HNTR | HMP | UV and NM |
|---|---|---|---|
| Barons of Hell | 1 | 2 | 2 |
| Cacodemons | 3 | 7 | 12 |
| Chaingunners | 6 | 16 | 25 |
| Demons | 16 | 24 | 28 |
| Hell Knights | 10 | 11 | 16 |
| Imps | 19 | 39 | 50 |
| Lost Souls | 14 | 8 | 10 |
| Pain Elementals | 0 | 1 | 2 |
| Sergeants | 15 | 18 | 18 |
| Spectres | 7 | 14 | 17 |
| Troopers | 15 | 15 | 19 |
| Powerups | ITYTD and HNTR | HMP | UV and NM |
| Armor bonuses | 55 | 55 | 55 |
| Backpacks | 1 | 1 | 1 |
| Blue armors | 4 | 3 | 3 |
| Computer maps | 1 | 1 | 1 |
| Green armors | 4 | 5 | 5 |
| Health bonuses | 33 | 33 | 33 |
| Medikits | 27 | 26 | 27 |
| Radiation suits | 2 | 2 | 2 |
| Soul Spheres | 3 | 2 | 1 |
| Stimpacks | 24 | 21 | 19 |
| Weapons | ITYTD and HNTR | HMP | UV and NM |
| Chainsaws | 1 | 1 | 1 |
| Shotguns | 6 | 6 | 6 |
| Super shotguns | 6 | 6 | 6 |
| Chainguns | 5 | 5 | 5 |
| Rocket launchers | 5 | 5 | 5 |
| Plasma rifles | 1 | 1 | 1 |
| BFG 9000s | 1 | 1 | 1 |
| Ammunition | ITYTD and HNTR | HMP | UV and NM |
| Ammo clips | 10 | 10 | 14 |
| Bullet boxes | 8 | 9 | 15 |
| Shells | 10 | 10 | 14 |
| Shell boxes | 8 | 9 | 12 |
| Rockets | 7 | 5 | 2 |
| Keys | ITYTD and HNTR | HMP | UV and NM |
| Blue cards | 1 | 1 | 1 |
| Red cards | 1 | 1 | 1 |
| Yellow cards | 1 | 1 | 1 |
External links[]
- REQUIEM DOOM DEATHMATCH REPAIR FILE - Adds an exit to the deathmatch area of this level (see Bugs.)
- Requiem demos from the Compet-N database