- This level occupies the map slot MAP07. For other maps which occupy this slot, see Category:MAP07.
MAP07: Not That Simple is the seventh map of Memento Mori. It was designed by Jens Nielsen, and uses the music track "Night Bats" by Mark Klem.
Walkthrough[]
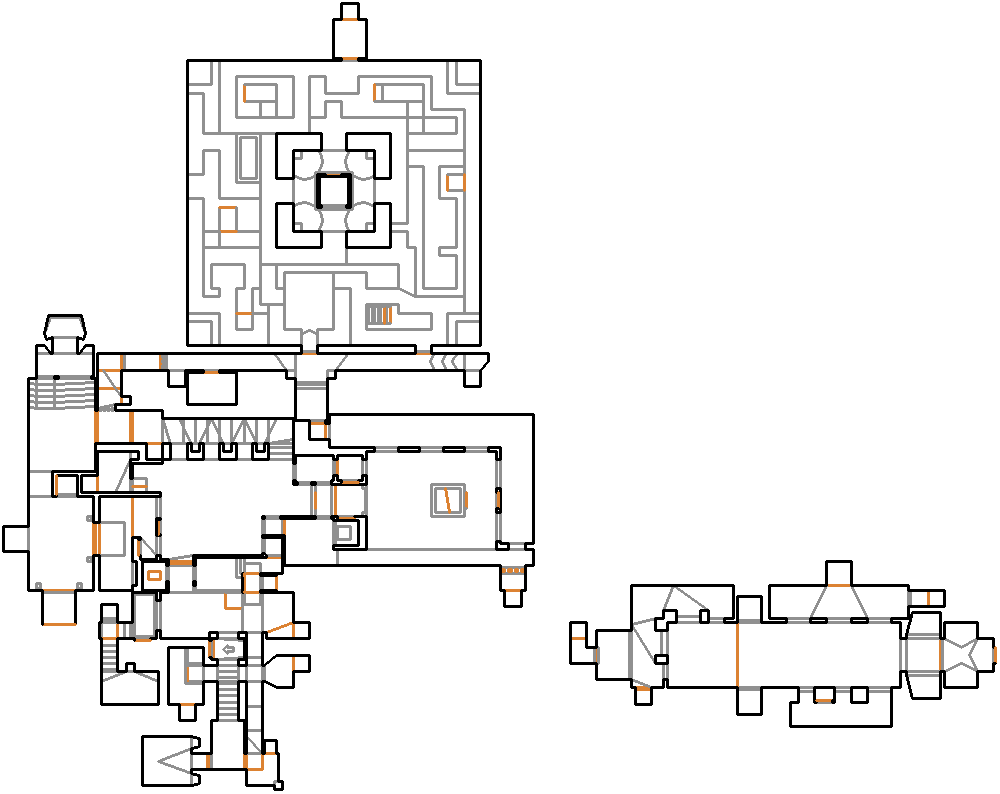
Map of MAP07
- Letters in italics refer to marked spots on the map. Sector numbers in boldface are secrets which count toward the end-of-level tally.
Essentials[]
Open the door in front of you, and head downstairs. At the foot of the stairway is an arrow on the floor pointing to a wall. Press on it to reveal a switch, and use it. Head back upstairs, and enter the doorway. You will be lifted up to the northern walkway. Head outside, and fall onto the platform where the super shotgun is. Step off, and open the northwest door. Press the western switch, and run past the lowered lift to the east. The wall in front of you will lower. Trigger the eastern switch, and grab the blue key. Return to the central section, and go upstairs. Open the next two doors, head south, and open the eastern, blue door. Head to the northeast, and a wall will open in the previous room to reveal a switch. Press it, and go back to the apex of the staircase to find that the silver bars have lowered. Take the lift down, open the eastern door, and rush through either one of the northern doorways to enter a maze.
In the maze, you must find various switches that will cause the maze to deconstruct itself over time. Navigate your way to the west of the maze to find the first switch. Hit it, and search the east side of the maze for the second one. Hit it, and go to the southwest of the maze to find the third. Pull it, and head to the northeast of the maze to find the fourth. Use it, and pull the switch in the northwest of the maze to give yourself more room to move. Go to the south of the maze, face east to find the final switch, and flip it to reveal four mancubi in each corner of the room. Kill them all, and flip the switch on the northern side of the central pillar. Head back through the southern doorway to find the red key. Flip the switch to activate the lift, and take it up. Go around to the red bars in the southeast, open them, and step into the teleporter.
Open the eastern door, flip the switch, and enter the southern alcove. Flip the switch here, and head through the new opening in the west. Enter the teleporter, grab the yellow key, open the southern, yellow door, and press the switch.
Other points of interest[]
Approaching the first switch in the maze triggers the eastern maze entrance to close. So exit the maze through the western entrance and reopen the eastern door from the southern hallway. Use your automap to locate it. Approaching the second switch in the maze triggers the western entrance to close. Exit the maze through the eastern entrance to reopen the western door from the hallway. Both doors will now stay open for good since each door is only once triggered to close, so there is no need to worry about reclosing the doors by accident. This way you easily can take cover from the (skill dependent) two, three or four mancubi, at the cost of the two (one on easy skills) revenants being released simultaneously together with the mancubi.
Secrets[]
- After entering the secret passage in the first hallway, flip the switch by the elevator to find a chainsaw (sector 54).
- In the central courtyard, there is a muddy patch of grass to the northwest. Circle counter-clockwise around the tree and run onto it; the floor will lower beneath you, taking you to a secret room (sector 148) with a rocket launcher and five rockets. Use the teleporter to return to the height of the stairway. If the baron of hell (hell knight on easy skill levels) in that location has not been awakened, he will be telefragged.
- After flipping the switch in the compartment east of the blue door, return to the hallway next to secret #1 and use the switch at its northern end to take the second elevator down. A compartment (sector 61) in the east will have opened to reveal a berserk pack and a switch.
- Flip the switch in secret #3, and then take the elevator up to the northern walkway. The switch opens two walls, revealing a secret compartment (sector 44) containing a plasma gun and four energy cells.
- After flipping the switch in the compartment east of the blue door, return to and take the elevator blocking the blue key area. Head south, and you will find that a compartment (sector 142) has opened to reveal a soul sphere.
- In the corridor beyond the silver bars at the height of the stairway, press on the green torch to reveal a teleporter. Quickly pass the eastern door to the stairway and use the teleporter in the southern wall before it closes. It leads to a secret room (sector 63) with a berserk pack. If the plasma gun is acquired in secret #4, there will also be a backpack. If the switch is flipped in the chaingunner's compartment in the northwest of the blue keycard area, there will also be an elevator here.
- Activate the elevator in secret #6, and take it up. Run across the gaps to a secret compartment (sector 65) containing two sets of shotgun shells. Enter the teleporter to be warped into an alcove in the final area of the level where a megasphere resides. Run out of the alcove to reveal a teleporter back to this secret. Since the teleporter to the megasphere is only once usable, it is recommended that you killed all enemies in the map before entering it to benefit from the megasphere at the start of the next map.
Bugs[]
- Because mancubi are required to be present in order to access the red key, it is impossible to finish this level in no monsters mode unless the command line argument -timer is used or the player uses the idclip cheat code.
- Opening access to the blue key will cause walls to the north and south of the western lift to lower, enabling access to new areas. However, if you do this while the lift is still down, the walls will lower all the way to the same level as the ground, creating Hall of Mirrors effects.
- Two stimpacks (Things 384 and 385) near player #3's spawn are only accessible in multiplayer, but are not flagged as multiplayer only. So are the two stimpacks (Things 386 and 387) near player #4' s spawn.
Areas / screenshots[]
")
")
")
Speedrunning[]
Current records[]
The Compet-N records for the map are:
| Run | Time | Player | Date | File | Notes |
|---|---|---|---|---|---|
| UV speed | 03:08 | Jim Leonard (Xit Vono) | 2005-12-18 | mm07-308.zip | |
| NM speed | |||||
| UV max | 06:20 | Oyvind Stenhaug | 2003-05-28 | mm07-620.zip | |
| NM100S | |||||
| UV -fast | 11:26 | Tomas "DeDo" Kollar | 2003-07-08 | mm071126.zip | |
| UV -respawn | |||||
| UV Tyson | |||||
| UV pacifist |
Miscellaneous demos[]
| Run | Time | Player | Date | File | Notes |
|---|---|---|---|---|---|
| .zip |
Statistics[]
Map data[]
| Things | 410 |
| Vertices | 1449 * |
| Linedefs | 1678 |
| Sidedefs | 2470 |
| Sectors | 377 |
- The vertex count without the effect of node building is 1278.
Things[]
| Monsters | ITYTD and HNTR | HMP | UV and NM |
|---|---|---|---|
| Barons of hell | 1 | 2 | 7 |
| Cacodemons | 0 | 2 | 2 |
| Heavy weapon dudes | 3 | 10 | 11 |
| Hell Knights | 4 | 12 | 10 |
| Imps | 13 | 19 | 27 |
| Mancubi | 2 | 3 | 4 |
| Revenants | 2 | 5 | 6 |
| Shotgun guys | 18 | 22 | 28 |
| Spectres | 8 | 11 | 17 |
| Zombiemen | 14 | 15 | 16 |
| Powerups | ITYTD and HNTR | HMP | UV and NM |
| Armor bonuses | 9 | 9 | 9 |
| Backpacks | 1 | 1 | 1 |
| Berserk packs | 2 | 2 | 2 |
| Green armors | 1 | 2 | 2 |
| Health bonuses | 17 | 17 | 17 |
| Medikits | 7 | 3 | 3 |
| Megaspheres | 1 | 1 | 1 |
| Soul Spheres | 1 | 1 | 1 |
| Stimpacks | 42 | 42 | 42 |
| Weapons | ITYTD and HNTR | HMP | UV and NM |
| Chainsaws | 1 | 1 | 1 |
| Shotguns | 3 | 3 | 3 |
| Super shotguns | 2 | 2 | 2 |
| Chainguns | 3 | 3 | 3 |
| Rocket launchers | 1 | 1 | 1 |
| Plasma guns | 1 | 1 | 1 |
| Ammunition | ITYTD and HNTR | HMP | UV and NM |
| Clips | 36 | 36 | 36 |
| Bullet boxes | 6 | 6 | 6 |
| 4 shotgun shells | 50 | 53 | 53 |
| Shell boxes | 1 | 1 | 1 |
| Rockets | 8 | 8 | 8 |
| Energy cells | 4 | 4 | 4 |
| Keys | ITYTD and HNTR | HMP | UV and NM |
| Blue cards | 1 | 1 | 1 |
| Red cards | 1 | 1 | 1 |
| Yellow cards | 1 | 1 | 1 |
Trivia[]
- The name "Not that simple" is a reference to MAP07: Dead Simple from Doom 2.