- This level occupies the map slot MAP08. For other maps which occupy this slot, see Category:MAP08.
MAP08: And the Dead Shall Rise is the eighth map of Memento Mori. It was designed by Orin Flaharty, and uses the music track "Bullets Are For Blazin'", by Mark Klem. It uses the marble, wood, and rusted metal texture theme prevalent throughout Ultimate Doom's Thy Flesh Consumed. Prior to its inclusion in Memento Mori, it was an Ultimate Doom level released standalone as DEADSHRI.WAD.
Walkthrough[]
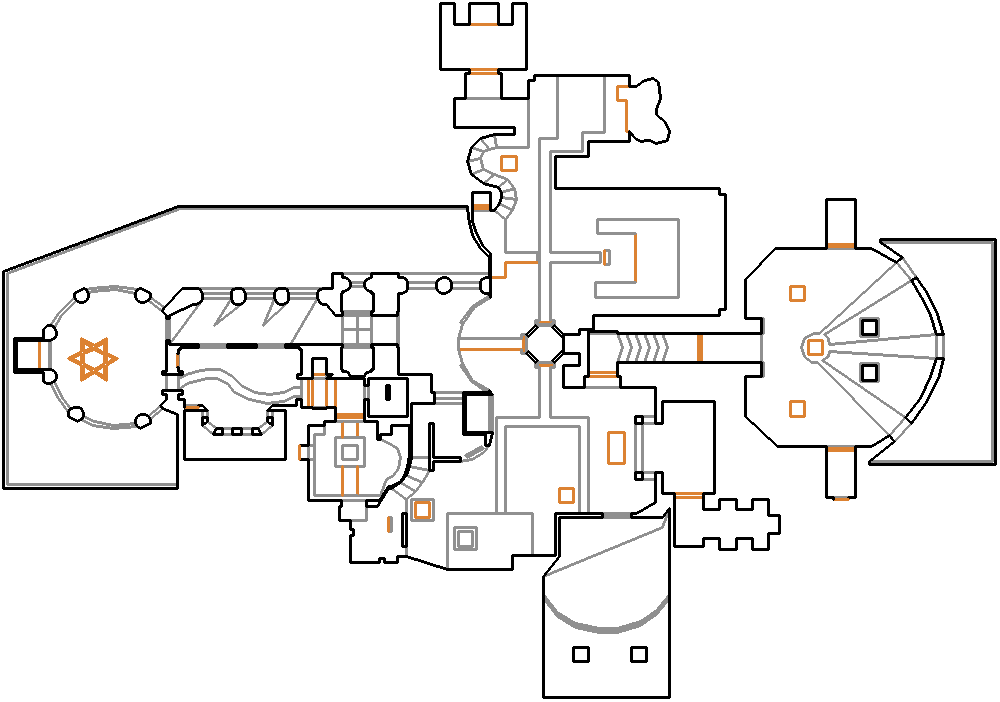
Map of MAP08
- Letters in italics refer to marked spots on the map. Sector numbers in boldface are secrets which count toward the end-of-level tally.
Essentials[]
Hit the switch in front of you, and keep going west until you reach the pentagram. Head across the curving bridge, open the door, go down the lift, and then open the next door. Drop into the lava pit, flip the switch, and wait for the bridges to rise. Lower any of the bridges from either side, and take the "lift" up. Go across the bridges and hit the next switch. Go upstairs, grab the red key, jump to the walkway, and go east. Fall into the lava pit here, and open the red door to the north. Go up the staircase, open the door, and press on the demonic face to the south to reveal a switch. Hit it, and leave through the red door. Press on the rectangular platform south of it, and ride it up like a lift. Get back on the walkway, and head north. Hit the eastern switch, and stand over or fall on top of the slab it rests on. Once it rises up and lifts you, do a running jump to the security armor. Head back onto the walkway, and go north. Press on the sides of the platform to the east to find the blue key. Once the platform rises, drop back down to the walkway, and cross the western bridge. Run up the stairway, open the blue door, and jump into the hole.
Secrets[]
- From the winding bridge above the lava pit, drop into the pit and flip the switch to lower the bridge like an elevator. Get onto the bridge, and once it rises again, quickly run to the east and into the newly-opened compartment (sector 166) to the north to get a radiation suit.
- In the room filled with sergeants in the southeast of the map and east of the chaingun, there is a misaligned portion of the wall to the south. Open this wall to find a room (sector 175) filled with damaging blood. On Hurt Me Plenty or lower, this contains two sets of shotgun shells and a berserk pack. On Ultra-Violence or higher, this contains two energy cells and two medikits.
Areas / screenshots[]
")
")
Speedrunning[]
Routes and tricks[]
This level is one of the few levels in Memento Mori that can be completed in under a minute, and one of the few that can be finished in less than 30 seconds. At the start of the level, if you run along the inner corners of the western and northern bridges, you can cross onto the northern bridge and skip most of the level. It may take some practice before you can pull it off successfully, however, due to the small size of the corners in question. If you fail, just enter the teleporter to the north to try again. This trick was first documented in demo form in Oyvind Stenhaug's 00:24 UV speed run of this level (mm08-024.zip).
Even without that particular shortcut, the northern and southern barriers can be lowered early by dropping to either side of the pit, standing within activation range of the back of one barrier, pressing it, and then activating the western bridge elevator to head to the other side and doing the same thing with the other barrier. This is demonstrated in Stenhaug's record-holding NM100S run of this level.
In addition, you can straferun across the gap between the eastern fork of the northern bridge, and the security armor platform, allowing you to reach it without having to use the elevator first. After that, just stand on the inner linedef of the western side, or cross it from the "prongs" of the platform, and the western bridge will rise. Just straferun back onto the eastern fork after that. This was first demonstrated in demo form in Doug "Opulent" Merrill's 01:19 UV speed run of this level (mm08-119.zip,) although he took the elevator to get back onto the northern bridge.
The blue skull key elevator can be lowered without having to jump into the lava first. Just stand at the east side of the northern platform and press on the side of the elevator that sticks out furthest. If you are fast enough, you can do this, perform the security armor platform shortcut, head back and grab the key as the elevator rises, and then drop back down to the northern bridge and head up the stairs to the exit in quick succession. This sequence of maneuvers is performed by Adam Hegyi following the western/northern bridge shortcut in his record-holding 00:17 UV speed demo.
When recording NM speed or NM100S runs for this level using these shortcuts, grabbing the invulnerability by the northern teleporter is needed to survive the Lost Souls at the blue skull key elevator.
Current records[]
The Compet-N records for the map are:
| Run | Time | Player | Date | File | Notes |
|---|---|---|---|---|---|
| UV speed | 00:17 | Adam Hegyi | 2002-04-11 | mm08-017.zip | |
| NM speed | 00:21 | Oyvind Stenhaug | 2002-04-10 | mm08n021.zip | |
| UV max | 02:37 | Anthony Soto | 2002-03-10 | mm08-237.zip | |
| NM100S | 00:44 | Oyvind Stenhaug | 2004-07-03 | mm08s044.zip | |
| UV -fast | 03:32 | Tomas "DeDo" Kollar | 2003-10-02 | mm08f332.zip | |
| UV -respawn | 03:55 | Casey Alvis | 2002-04-10 | mm08r355.zip | |
| UV Tyson | |||||
| UV pacifist | 00:17 | Adam Hegyi | 2002-04-11 | mm08-017.zip |
Miscellaneous demos[]
| Run | Time | Player | Date | File | Notes |
|---|---|---|---|---|---|
| .zip |
Statistics[]
Map data[]
| Things | 188 |
| Vertexes | 1039 |
| Linedefs | 1235 |
| Sidedefs | 1733 |
| Sectors | 188 |
Things[]
| Monsters | ITYTD and HNTR | HMP | UV and NM |
|---|---|---|---|
| Barons of hell | 0 | 5 | 7 |
| Cacodemons | 8 | 8 | 5 |
| Imps | 7 | 9 | 9 |
| Lost souls | 5 | 7 | 9 |
| Shotgun guys | 15 | 17 | 22 |
| Spectres | 1 | 2 | 2 |
| Powerups | ITYTD and HNTR | HMP | UV and NM |
| Berserk packs | 1 | 1 | 0 |
| Green armors | 1 | 1 | 1 |
| Invulnerabilities | 1 | 1 | 1 |
| Medikits | 3 | 5 | 7 |
| Radiation suits | 3 | 3 | 3 |
| Stimpacks | 7 | 7 | 6 |
| Weapons | ITYTD and HNTR | HMP | UV and NM |
| Shotguns | 1 | 1 | 1 |
| Super shotguns | 1 | 1 | 1 |
| Chainguns | 1 | 1 | 1 |
| Rocket launchers | 1 | 1 | 1 |
| Ammunition | ITYTD and HNTR | HMP | UV and NM |
| Clips | 4 | 4 | 3 |
| Bullet boxes | 0 | 1 | 1 |
| 4 shotgun shells | 7 | 10 | 9 |
| Shell boxes | 4 | 5 | 5 |
| Rockets | 3 | 5 | 3 |
| Rocket boxes | 1 | 1 | 2 |
| Energy cells | 0 | 1 | 4 |
| Keys | ITYTD and HNTR | HMP | UV and NM |
| Blue skulls | 1 | 1 | 1 |
| Red skulls | 1 | 1 | 1 |
Inspiration and development[]
The level was originally not intended to be included in Memento Mori. However, when Orin gave the level to some of his friends to test it, one of them uploaded it. He could not design another level to replace it before the megawad's release. [1]
This level was created with DoomEd 4.2. [2]
External links[]
Sources[]
- ↑ Flaharty, Orin (December 26, 1995) "Re: Memento Mori, the biggest and best Doom II Add-On ever!!" rec.games.computer.doom.playing.
- ↑ Memento Mori Infopack at idgames main mirror (February 10, 1996), map info for MAP08. "Editor Used: DoomEd 4.2".