Map of Sanctuary
- This level occupies the map slot MAP01. For other maps which occupy this slot, see Category:MAP01.
- Looking for the start of the Strife walkthrough? Like the game itself, it begins in the Town.
- Note that for the sake of image size (and hence usability), a purely cosmetic part of this image to the left (the river in Town) has been omitted, since this part of the map is unreachable (attempting to reach it causes a teleport to the corresponding part of the Town map).
The Sanctuary is an area in Strife accessible from The Town.
Walkthrough[]
(Mission 1 continued)[]
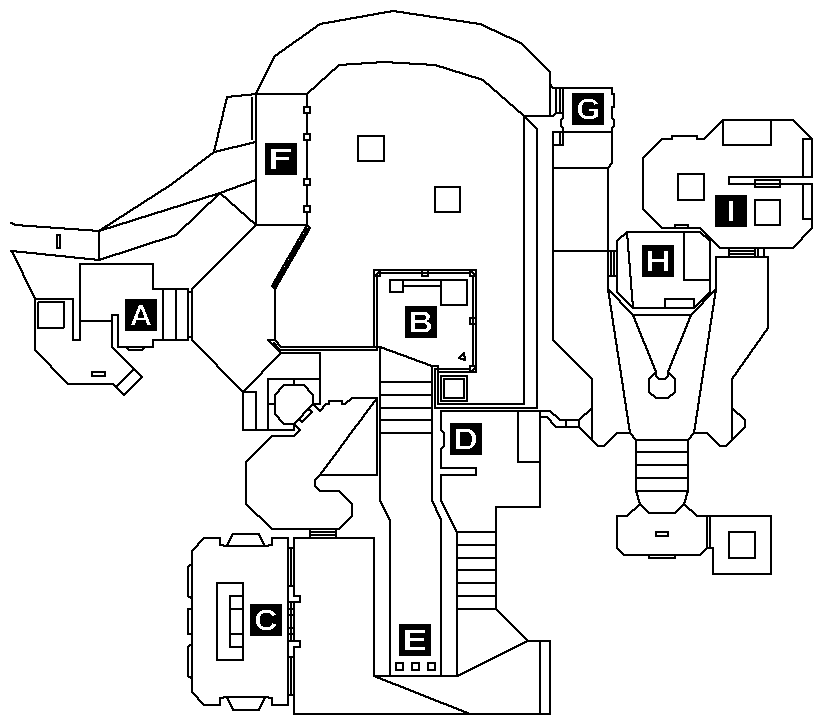
Letters in parentheses refer to marked spots on the map.
Go up the stairs. At the top there are two ways you can go; the door to your right is the front door which you just saw from the outside, and although you can open it from the inside to get out (handy if you fall in the river), of course you don't want to do this just now, so enter the corridor on your left (A). You will probably (especially on slower machines) notice a "blink" as the game replaces the Town level data with that for the Sanctuary.
Get your crossbow ready and press the button to your right to open the door. As you walk through the alarms will sound, so shoot the guard on the ledge in front of you (B). Although stealth was broken by the alarm trigger you just stepped over, you will probably want to switch back to the Punch Dagger to conserve ammo, since pickups are thin in this game, especially on the higher difficulty levels.
Take the elevator to your right. Continue right at the top and through the door. On your right is a room with yellow-glass windows and a forcefield door (C); you don't need to go in here, now or ever, as the only thing it contains is the Offering Chalice, which is a dangerous red herring. So turn left, past the blocked corridor, and left again to the room at the end. Press the button (D), then return and go down the corridor you just opened (E). You will end up on the ledge (B) you saw earlier; press the switch on this ledge, then turn around and drop off the ledge at the southeast corner to grab the two ammo clips there. Go over to the bridge you raised (F), and lower it with the switch to step on it; then head to the room (G) at the end of the path and ride the lift. (If for any reason the alarms have stopped sounding, they will start again.) The first door on your left is Beldin's cell (H), so go in. If you talk to him he will give you interesting info about Harris, but this is not essential, so just kill him already and grab his ring, and of course the other goodies here.
Exit and continue to the end of the corridor; push the button on the back of the light column to raise the exit stairs. Unless you are low on health, you can go in to the door (I) for some goodies, but there is no need to press the switch in here as all it does is to open the Chalice Room (C), which is best left unopened... So go up the stairs, and out of the Sanctuary's top entrance. Go back to Rowan and give him the ring. Mission Complete!