- This level occupies the map slot MAP27. For other maps which occupy this slot, see Category:MAP27.
The Lab is The Order's laboratory.
Beware, there are lots of tough enemies in here, including two Inquisitors.
Walkthrough[]
Mission G11 / B9: Onward to the Lab[]
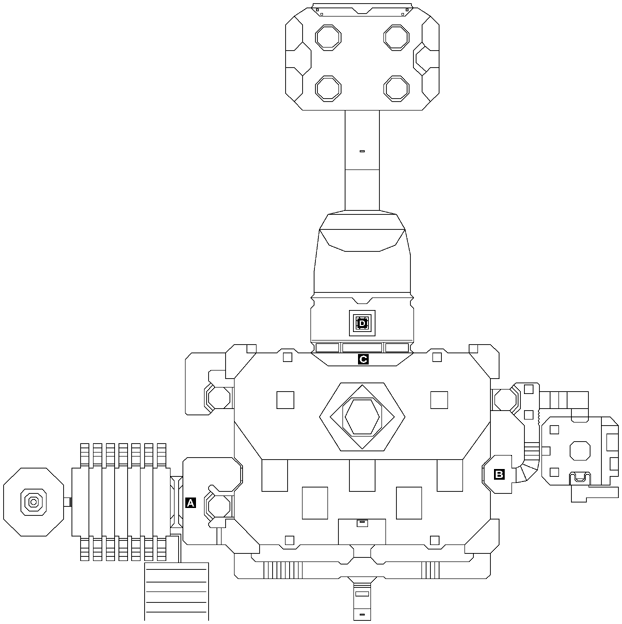
Press the switch in front of you (it may be best to finish off the Inquisitors first), then quickly run to the large room to the west (left as you came in) (A). Be sure to go down the sides of the room, as once the Loremaster is hurt, Acolytes will start teleporting in to the middle, and if you happen to be standing on one of their spawn spots, it's time for telefraggies...
Clear out the Acolytes which teleport in (I found phosphorus grenades to be very effective, as they also killed the replacements which teleported in while the flames were still burning), and try to lure the Loremaster in here as facing him here is a lot less dangerous than doing so outside, where his grappling-hook attack could pull you into a deep drop, resulting in serious injury or death. This tactic is especially important if you're doing mission B9, as you need to return to the Proving Grounds and thence to the Oracle, but won't be able to if the Loremaster has dropped you to the lower levels whence you can't get back up. (If that should happen, you need to reload your latest autosave and try again.)
Mission G12 / B11: Go for the Entity[]
You now have the complete Sigil, so take running jumps across the raised blocks to an alcove (B); go down the stairs and the lift, and through the huge arch (C). As Blackbird tells you, the switch before you (D) will only work if you have the full Sigil. Click it, and through the door and down the lift to the Alien Ship.

