Template:No Rest for the Living
- This level occupies the map slot MAP01. For other maps which occupy this slot, see Category:MAP01.
MAP01: The Earth Base is the first map of No Rest for the Living. It was designed by Russell Meakim and uses the music track "Message For The Archvile". The par time is 1:15.
Walkthrough
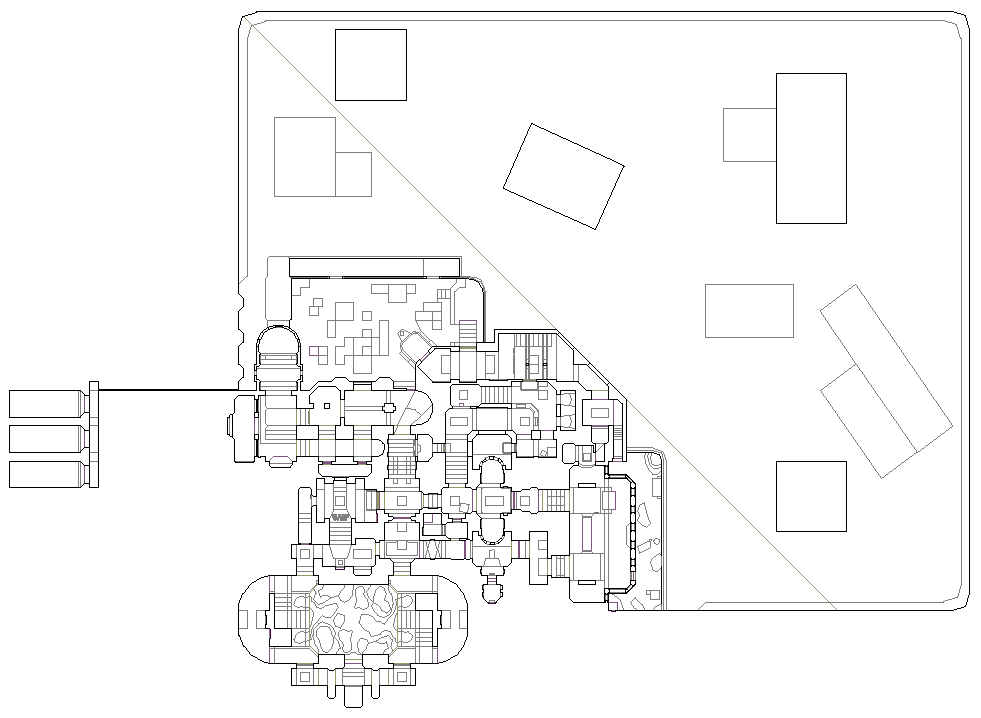
Map of MAP01
- Letters in italics refer to marked spots on the map. Sector numbers in boldface are secrets which count toward the end-of-level tally.
Essentials
Other points of interest

Route to the easteregg
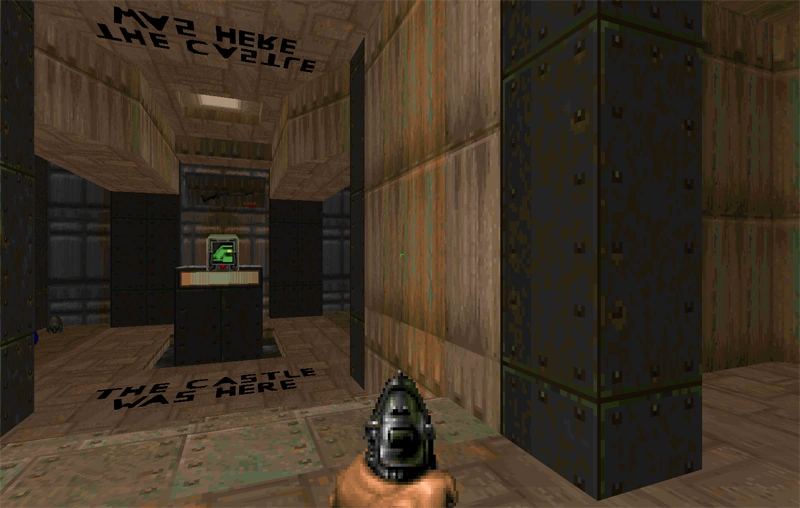
Easteregg
In this map is a hidden message from the designer of that map. The message is THE CASTLE WAS HERE. Castle means Russell "The Castle" Meakim.
To find that, you have to follow the exact route, shown on the picture.
Note: You must reach the switch under 30 seconds, after the map starts.
Follow the route, until you come to a point 1, there is a switch that you have to use from below the platform. This lowers some barriers in this area.
Take the route further to the next switch (point 2) and use it, to open the area, where the red key is located (point 3).
Grab the key, and go to point 4, take the small steps, to get access to the open area.
Follow the route to point 5, and use the switch.
Secrets
There are seven secrets on the map:
- From the start position, move directly southwards to the metallic bulkhead with the UAC logo. Open it to find a berserk pack (sector 772).
- Progressing through the level will bring you to a switch which lowers the bars protecting the red keycard. On the reverse of the switch is another (not very well hidden) switch. Flipping it lowers the barriers between the walls, and opens a pair of alcoves (sector 525) to the east, containing six health bonuses, six armor bonuses, two sets of shotgun shells, and two monsters (lost souls on easy, demons on medium or spectres on hard skill levels) for your troubles.
- Collect the red keycard, and make a 180 turn. Turn right down the stairs; behind the angled box is a dark wall. Open it to face two (one on easy skills) imps and six armor bonuses (sector 494).
- Go through the red door for the first time, and turn to the east to find a yellow door. Beside it is a switch; flip it and quickly backtrack to secret #3. Inside this room a door will have opened, revealing a teleporter (and, on hard skill levels, a spectre). Enter it to discover the room (sector 311) southwest of secret #2, on easy skills there is a chaingun along with two not-so-friendly imps if you didn't clear the room. On medium and hard, there are two chaingunners.
- In the blue keycard room is a computer map on a plinth. To reach it, go west from the blue keycard. On the northern wall is another discolored wall, use it to open a passage (sector 267) leading to the switch that lowers the computer map.
- East of the blue door, just in front of the stairs, is a tripwire which activates a door in the southeast of the room upstairs. Run from the blue door activating the tripwire, and through the narrow door into the corner (sector 655). Dependent on your skill level, two, three or four imps will greet you. Pick up the clip and the set of shells as well as the two health bonuses. Turn to the west and use the crate, which will reveal a switch. Use it, run along the outside wall to a metallic platform which will have lowered. Wait for it to raise and collect four armor bonuses atop a mound as a reward.
- From the armor bonuses reached in Secret #6, move directly west. The northern wall can be lowered to reveal a passage (sector 647), containing each four more health and armor bonuses (and on hard skills a spectre who starts attacking you). Ascend the stairs; walking westwards opens the door in the south of the room, where a demon (easy and medium) or a hell knight (hard skills) lures behind. Follow the passage in the south of his hideout to find a chainsaw. Approaching it opens an alcove in front of you, containing (skill dependent) three, four or six lost souls and each two health and armor bonuses.
- Return to the hideout and ride up the lift to the north. Continue through the secret area to find a stream of enemies, a megaarmor at the secret's highest point, and a series of health/armor bonuses along with ammunition. Use the automap to plan your jumps from the megaarmor's point to reach the yellow keycard. The loading bays on the northern wall will lower, unleashing a large number of enemies. Grabbing the yellow keycard also has the effect of spawning enemies throughout the level, culminating in one (easy) or two (medium) cacodemons or even a pain elemental (hard skill) in front of the exit room.
- At the southernmost point of the map is a garden with trees and soil mounds. Behind the westernmost wall is a yellow access switch; hit it to reveal an area holding the super shotgun, and an ambush of enemies.
Bugs
The hidden message "THE CASTLE WAS HERE" should not be visible simply by finding the automap, but it is.
"On the 360 it shouldn't be visible unless you flip the switch. hmmm" -Russell "TheCastle" Meakim[1]
Demo files
Areas / screenshots
Speedrunning
Routes and tricks
Miscellaneous demos
| Run | Time | Player | Date | File | Notes |
|---|---|---|---|---|---|
| .zip |
Deathmatch
Statistics
Map data
| Things | 477 |
| Vertices | 2835 |
| Linedefs | 3655 |
| Sidedefs | 5726 |
| Sectors | 804 |
Things
This level contains the following numbers of things per skill level:
| Monsters | ITYTD and HNTR | HMP | UV and NM |
|---|---|---|---|
| Arachnotrons | 0 | 0 | 1 |
| Cacodemons | 1 | 2 | 0 |
| Chaingunners | 0 | 2 | 2 |
| Demons | 6 | 15 | 18 |
| Hell Knights | 0 | 1 | 5 |
| Imps | 37 | 51 | 51 |
| Lost Souls | 5 | 4 | 10 |
| Mancubi | 0 | 1 | 2 |
| Pain Elementals | 0 | 0 | 1 |
| Revenants | 0 | 0 | 2 |
| Sergeants | 7 | 9 | 12 |
| Spectres | 0 | 0 | 6 |
| Troopers | 27 | 20 | 24 |
| Powerups | ITYTD and HNTR | HMP | UV and NM |
| Armor bonuses | 41 | 41 | 41 |
| Berserk packs | 1 | 1 | 1 |
| Blue armors | 1 | 1 | 1 |
| Computer maps | 1 | 1 | 1 |
| Health bonuses | 57 | 57 | 57 |
| Medikits | 12 | 10 | 9 |
| Green armors | 1 | 1 | 1 |
| Stimpacks | 5 | 5 | 5 |
| Weapons | ITYTD and HNTR | HMP | UV and NM |
| Chainguns | 1 | 0 | 0 |
| Chainsaws | 1 | 1 | 1 |
| Shotguns | 2 | 2 | 1 |
| Super shotguns | 1 | 1 | 1 |
| Ammunition | ITYTD and HNTR | HMP | UV and NM |
| Ammo clips | 5 | 5 | 5 |
| Bullet boxes | 4 | 3 | 3 |
| Shells | 25 | 25 | 25 |
| Shell boxes | 5 | 5 | 5 |
| Keys | ITYTD and HNTR | HMP | UV and NM |
| Blue cards | 1 | 1 | 1 |
| Red cards | 1 | 1 | 1 |
| Yellow cards | 1 | 1 | 1 |
| Barrels | ITYTD and HNTR | HMP | UV and NM |
| Exploding barrels | 10 | 10 | 10 |