(→Secrets: Refurbished) Tag: rte-source |
|||
| Line 12: | Line 12: | ||
===Secrets=== |
===Secrets=== |
||
| + | ====Official==== |
||
| − | {{wikilinks}} |
||
| ⚫ | |||
| − | |||
| ⚫ | # At the base of the [[Baron of hell|baron]]'s tower is a blue door. Continue up the tower a quarter of a turn to find an alcove in the south with a [[box of bullets]], a [[box of shotgun shells]] and a [[medikit]]. Open the back wall to find a [[chainsaw]], six [[health bonus]]es and six [[armor bonus]]es. The [[sector]] where the northern three health and two armor bonuses are on, counts as a secret ('''sector 519'''). |
||
| ⚫ | |||
| + | # In secret #2, the sector where the chainsaw, the southern three health and four armor bonuses are on, counts as a different secret ('''sector 633'''). Entering it opens the southern wall, releasing two [[demon]]s. |
||
| ⚫ | |||
| + | # From secret #3, move southwards. The opened wall itself counts as a secret ('''sector 631'''). |
||
| − | #From Secret 2, go back to the blue door mentioned. Run towards the previous secret, a tripwire will activate a door on the left wall of the alcove, allowing you to jump to a platform holding [[security armor]]. |
||
| + | # From secret #4, move southwards. The room where the two demons came from counts as a different secret ('''sector 632'''). |
||
| − | #To get the yellow [[keycard]], return to the hub room which had lots of switches and one door. Enter the door, turn right and descend the stairs. Score a [[radsuit]], and sprint along the opposite wall, which has a gap in it leading to a string of armour bonuses and a sole pillar. Hit the switch at the rear, and board the [[teleporter]] once the wall has fallen. |
||
| − | #From |
+ | # From secret #2-5, go back to the blue door. Run towards the previous secret, a tripwire will activate a door in the recessed northern wall of the alcove, allowing you to jump to a platform holding a [[green armor]] ('''sector 157'''). |
| + | # After using the skull switch atop of the central tower, look to the southwest where you see a door. Run towards it, thus climbing the wall in front of you and jumping over the next wall, landing on the stairs that started raising by pushing the switch. (Of course you can also walk back to the tower's base and climb the stairs.) Ascend the stairs and enter the door atop. Proceed to the "hub room" where are three skull switches. Open the (switchless) western wall to find a passage ('''sector 311'''), waking up a [[cacodemon]]. Pick up nine armor bonuses and a [[computer map]]. |
||
| − | #In the hub room, press against where the next switch would be to reveal access to the [[automap]]. |
||
| + | # Push the southern skull switch in the hub room to reveal a door that you enter. Follow the path to your left until you reach a wooden door with skulls on it. Behind the door, drop down to the east into the [[Damaging floor|lava]] and ascend the stairs behind the corner to your left. There is a ledge ('''sector 226''') upstairs where you find three health bonuses and a [[super shotgun]]. Drop down to the north and follow the bend to the west to return to the blue door east of the central tower. |
||
| − | #To reach the [[supercharge]], enter the yellow door where you respawn after getting the keycard. In the lava beyond is the tower with the teleport to the yellow keycard. Enter it, flick the switch, teleport out and head to the supercharge. |
||
| − | # |
+ | # Face the yellow door in the south of the hub room and descend the stairs to your left. Pick up the [[radiation suit]] to the north and return to the lowermost stair. Face southeast and sprint over the lava along the wall to your right, following its bends. It leads to a stone floor with a string of armor bonuses on it. To the southwest is a tower, push the switch at its southwestern side and enter the [[teleporter]] to get to the cage ('''sector 227''') holding the [[yellow skull key]], a medikit in front of a skull switch (that you need to use in order to access secret #10) and a teleporter. |
| + | # After using the teleporter in secret #9, ascend the stairs and return through the hub room to the central tower. Climb it until you see a platform with a yellow door to the north, unreachable since there is a wall preventing you from jumping on it. Continue ascending the stairs to the tower's southeast. Look to the north again and note the triangular part of the floor (with a medikit on it), cutting in the tower's wall. Open the wall to the triangle's north, revealing a switch. Using it lowers the wall in front of the yellow door's platform, where you find a [[berserk]] pack. Enter the yellow door to get ambushed by three [[trooper]]s, three [[imp]]s, a [[pain elemental]], a cacodemon and two demons. Downstairs you find a [[bulk cell]], six health bonuses and six armor bonuses. Open the western wall for another cacodemon, two more demons (you probably killed before through the window) and a passage ('''sector 371''') to the [[BFG9000]]. |
||
| − | #From Secret 8, enter the second yellow door. Jump down to the lower section of the room, the western wall can be used to reveal a passage to the [[BFG9000|BFG]]. |
||
| + | # Use the skull switch mentioned in secret #9 to lower the pillar ('''sector 238''') where the [[soul sphere]] rests on. |
||
| + | ====Non-official==== |
||
| + | # Enter the yellow door in the southeast of the hub room. In the northwestern tower you find a shell box, a [[box of rockets]] and two bulk cells. Enter the walkway with the five armor bonuses to open the southeastern tower's center, revealing an ambush, another super shotgun and three bullet boxes. Use the skull switch there to open the northwestern tower's center and the pentagram stone wall behind the bars to the north, both revealing ambushes. After killing the monsters, enter the now opened room north of the bars to find a bullet box, six health bonuses and a [[blue armor]]. |
||
===Bugs=== |
===Bugs=== |
||
Revision as of 12:24, 15 April 2015
Template:No Rest for the Living
- This level occupies the map slot MAP07. For other maps which occupy this slot, see Category:MAP07.
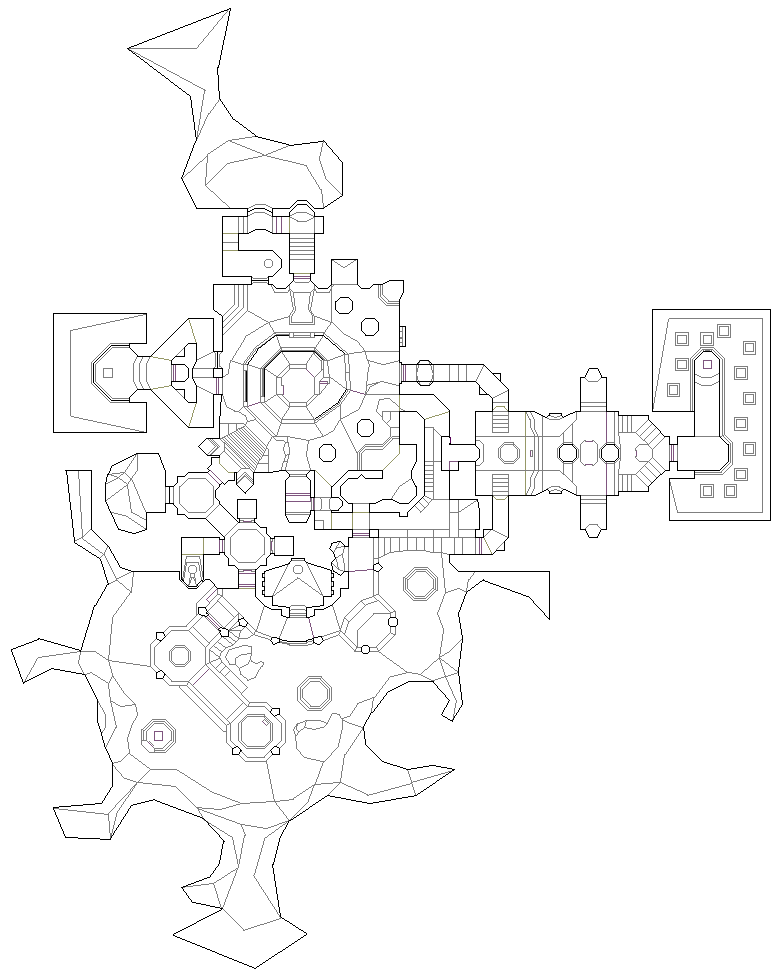
MAP07: Baron's Banquet is the seventh map of No Rest for the Living. It was designed by Richard Heath and uses the music track "Into Sandy's City". The par time is 2:45.
Walkthrough
Map of *MAP07*
- Letters in italics refer to marked spots on the map. Sector numbers in boldface are secrets which count toward the end-of-level tally.
Essentials
Other points of interest
Secrets
Official
- Ahead of the starting position is a wall of skulls. Open it to find a rocket launcher and two rockets (sector 173).
- At the base of the baron's tower is a blue door. Continue up the tower a quarter of a turn to find an alcove in the south with a box of bullets, a box of shotgun shells and a medikit. Open the back wall to find a chainsaw, six health bonuses and six armor bonuses. The sector where the northern three health and two armor bonuses are on, counts as a secret (sector 519).
- In secret #2, the sector where the chainsaw, the southern three health and four armor bonuses are on, counts as a different secret (sector 633). Entering it opens the southern wall, releasing two demons.
- From secret #3, move southwards. The opened wall itself counts as a secret (sector 631).
- From secret #4, move southwards. The room where the two demons came from counts as a different secret (sector 632).
- From secret #2-5, go back to the blue door. Run towards the previous secret, a tripwire will activate a door in the recessed northern wall of the alcove, allowing you to jump to a platform holding a green armor (sector 157).
- After using the skull switch atop of the central tower, look to the southwest where you see a door. Run towards it, thus climbing the wall in front of you and jumping over the next wall, landing on the stairs that started raising by pushing the switch. (Of course you can also walk back to the tower's base and climb the stairs.) Ascend the stairs and enter the door atop. Proceed to the "hub room" where are three skull switches. Open the (switchless) western wall to find a passage (sector 311), waking up a cacodemon. Pick up nine armor bonuses and a computer map.
- Push the southern skull switch in the hub room to reveal a door that you enter. Follow the path to your left until you reach a wooden door with skulls on it. Behind the door, drop down to the east into the lava and ascend the stairs behind the corner to your left. There is a ledge (sector 226) upstairs where you find three health bonuses and a super shotgun. Drop down to the north and follow the bend to the west to return to the blue door east of the central tower.
- Face the yellow door in the south of the hub room and descend the stairs to your left. Pick up the radiation suit to the north and return to the lowermost stair. Face southeast and sprint over the lava along the wall to your right, following its bends. It leads to a stone floor with a string of armor bonuses on it. To the southwest is a tower, push the switch at its southwestern side and enter the teleporter to get to the cage (sector 227) holding the yellow skull key, a medikit in front of a skull switch (that you need to use in order to access secret #10) and a teleporter.
- After using the teleporter in secret #9, ascend the stairs and return through the hub room to the central tower. Climb it until you see a platform with a yellow door to the north, unreachable since there is a wall preventing you from jumping on it. Continue ascending the stairs to the tower's southeast. Look to the north again and note the triangular part of the floor (with a medikit on it), cutting in the tower's wall. Open the wall to the triangle's north, revealing a switch. Using it lowers the wall in front of the yellow door's platform, where you find a berserk pack. Enter the yellow door to get ambushed by three troopers, three imps, a pain elemental, a cacodemon and two demons. Downstairs you find a bulk cell, six health bonuses and six armor bonuses. Open the western wall for another cacodemon, two more demons (you probably killed before through the window) and a passage (sector 371) to the BFG9000.
- Use the skull switch mentioned in secret #9 to lower the pillar (sector 238) where the soul sphere rests on.
Non-official
- Enter the yellow door in the southeast of the hub room. In the northwestern tower you find a shell box, a box of rockets and two bulk cells. Enter the walkway with the five armor bonuses to open the southeastern tower's center, revealing an ambush, another super shotgun and three bullet boxes. Use the skull switch there to open the northwestern tower's center and the pentagram stone wall behind the bars to the north, both revealing ambushes. After killing the monsters, enter the now opened room north of the bars to find a bullet box, six health bonuses and a blue armor.
Bugs
Demo files
Areas / screenshots
Speedrunning
Routes and tricks
Miscellaneous demos
| Run | Time | Player | Date | File | Notes |
|---|---|---|---|---|---|
| .zip |
Deathmatch
Statistics
Map data
| Things | 744 |
| Vertices | 1962 |
| Linedefs | 2570 |
| Sidedefs | 4267 |
| Sectors | 634 |
Things
This level contains the following numbers of things per skill level:
| Monsters | ITYTD and HNTR | HMP | UV and NM |
|---|---|---|---|
| Arch-Viles | 1 | 1 | 1 |
| Barons of Hell | 2 | 1 | 1 |
| Cacodemons | 13 | 21 | 32 |
| Chaingunners | 3 | 6 | 14 |
| Demons | 31 | 46 | 21 |
| Hell Knights | 6 | 13 | 20 |
| Imps | 56 | 46 | 39 |
| Lost Souls | 11 | 8 | 0 |
| Mancubi | 4 | 5 | 10 |
| Pain Elementals | 3 | 3 | 3 |
| Revenants | 0 | 4 | 12 |
| Sergeants | 7 | 7 | 3 |
| Spectres | 12 | 0 | 13 |
| Troopers | 10 | 7 | 3 |
| Powerups | ITYTD and HNTR | HMP | UV and NM |
| Armor bonuses | 45 | 45 | 45 |
| Berserk packs | 1 | 1 | 1 |
| Blue armors | 1 | 1 | 1 |
| Computer maps | 1 | 1 | 1 |
| Health bonuses | 33 | 33 | 33 |
| Medikits | 18 | 18 | 18 |
| Green armors | 1 | 1 | 1 |
| Radiation suits | 2 | 2 | 2 |
| Soul spheres | 1 | 1 | 1 |
| Stimpacks | 6 | 6 | 6 |
| Weapons | ITYTD and HNTR | HMP | UV and NM |
| BFG 9000 | 1 | 1 | 1 |
| Chainguns | 1 | 1 | 1 |
| Chainsaws | 1 | 1 | 1 |
| Plasma guns | 1 | 1 | 1 |
| Rocket launchers | 2 | 2 | 2 |
| Shotguns | 2 | 2 | 2 |
| Super shotguns | 2 | 2 | 2 |
| Ammunition | ITYTD and HNTR | HMP | UV and NM |
| Bulk Cells | 12 | 12 | 12 |
| Bullet boxes | 22 | 22 | 22 |
| Energy cells | 3 | 3 | 3 |
| Rocket boxes | 14 | 14 | 14 |
| Shells | 6 | 6 | 6 |
| Shell boxes | 6 | 6 | 6 |
| Rockets | 14 | 14 | 14 |
| Keys | ITYTD and HNTR | HMP | UV and NM |
| Blue skulls | 1 | 1 | 1 |
| Yellow skulls | 1 | 1 | 1 |