- This level occupies the map slot MAP12. For other maps which occupy this slot, see Category:MAP12.
Walkthrough[]
Sixth mission: Consult the Oracle[]
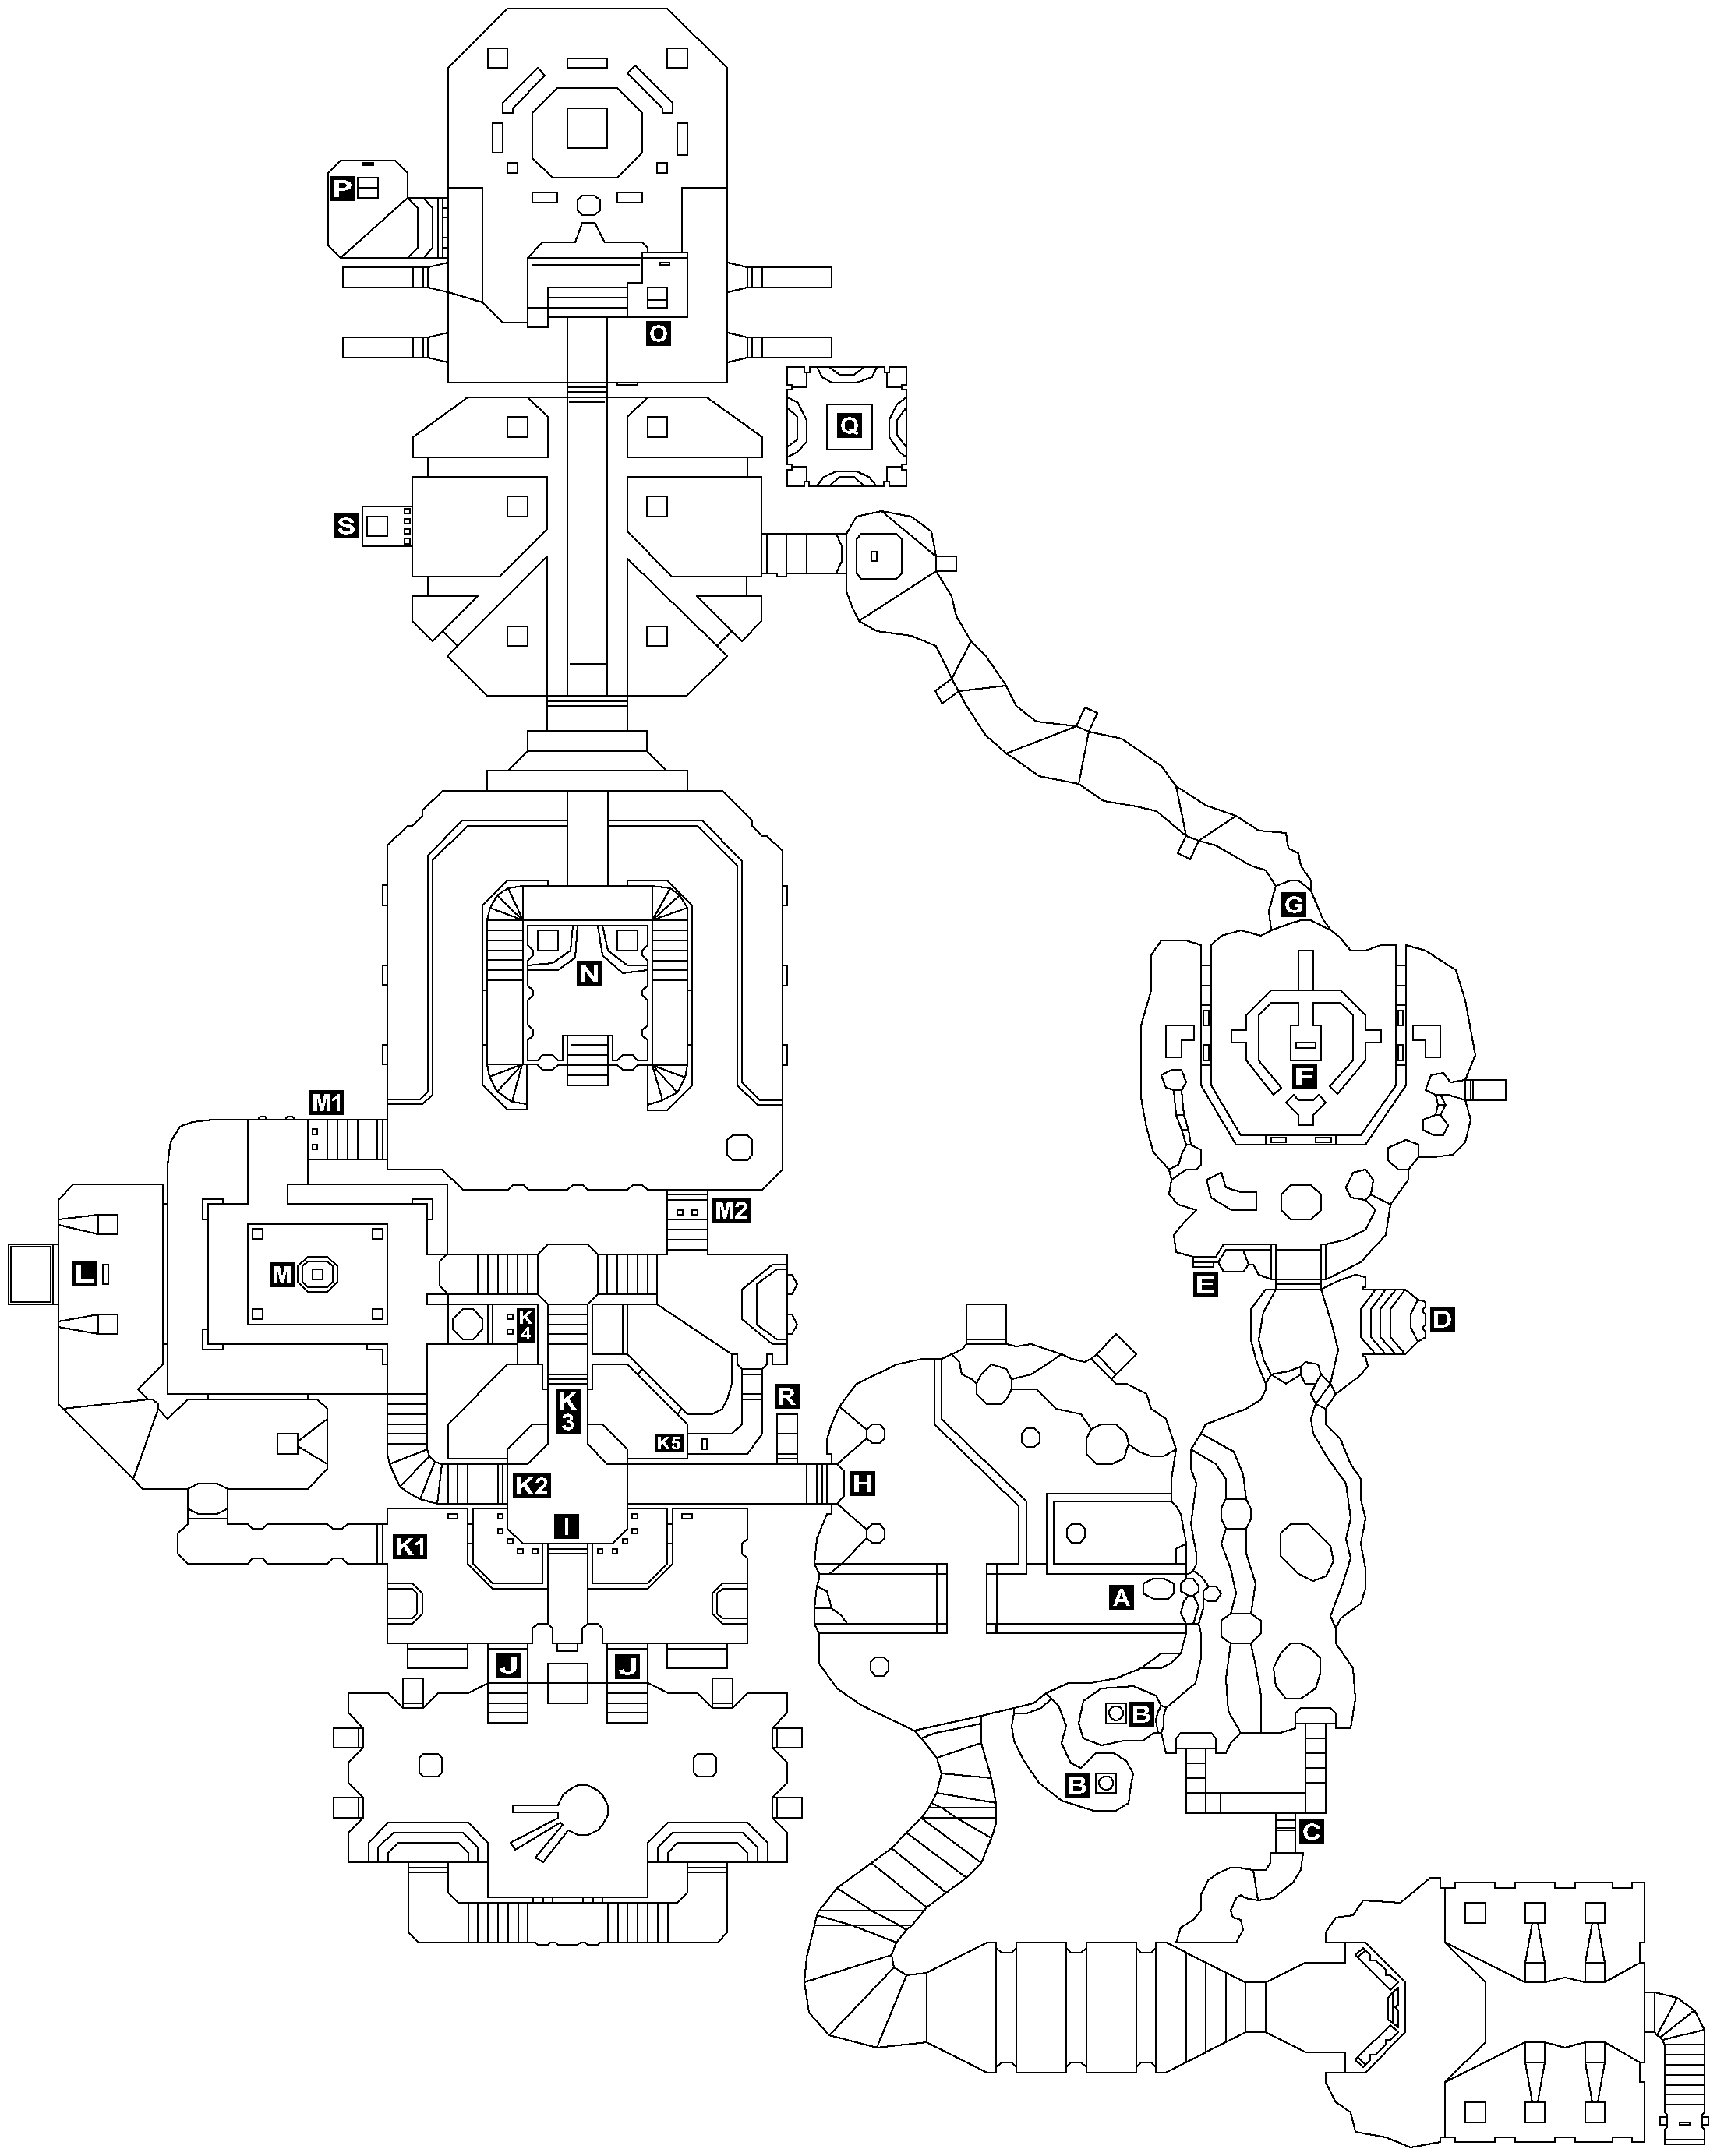
After the Programmer is destroyed, the player gets the first Sigil piece. Macil wants the player to find the Oracle and ask it about the other four pieces. The Oracle resides in its own temple which is found in the Borderlands.
Go down the stairs until you get to a cave-waterfall area. (There are Stalkers all around the ceiling, so be careful). From here there are two routes to the inner sanctum, one of which is hidden. Which one you take depends on whether you find it easier (or otherwise prefer) to deal with loads of guards (the overt route) or to jump from one small perch to another across tall drops (the covert route).
[]
Jump down to the right side of the bridge (A). The first time you do this, once you are down there you cannot climb back up. (When you get to nearly the end of this path, a two-way teleporter between the staircase and the waterfall cave opens (B); but by this point, it's quicker and easier (and safer) to go forward than to go back.) Also on the staircase is a door concealing an exit to another part of the Temple entrance hall in the Borderlands (C), but I have no idea whether, or under what circumstances, this door ever opens, ...
This door opens only from the south. It is accessed via 11:Borderlands next to the entry point described on that page. [Greg Kizior]
You will find yourself in a cave. Go right to the staircase, go down it and to the end of the path to the switch (D). This opens the door to the pillar area. Cross the pillars in either direction (right will take you past another door which you can't open; falling will hurt but not kill you, in which case head for the lift (E) at the start of this area). Finally you will reach the middle (F); press the switch in front of you (the north-facing one) to raise another pillar allowing you to leap across into the corridor (G). You may also want to go around to the other side and press the switch there, which opens that door you just passed if you took the right-hand route. In there are a box of ammo, a surgery kit and some phosphorus grenades.
Jump over and go through the dark cave hallway, and a switch will rise from the ground. Flip the switch and it will lower a small lift. Take the lift and flip the switch here to open the door to the atrium. (Note: the two Templars who were standing there are crushed by ceiling pillars.) Take the door to the right to find the Oracle.
The open path (plenty of enemies)[]
Go through the door across the bridge and to the left (H). Open the door to encounter a Templar. Once he is dead, proceed until you come to some doors. To the left are Acolytes behind bars and (sometimes) a sneaky one sniping from a window to the right. Finish them off, then take the left door (I; the one between the bars). To get inside the bars where the Acolytes were, simply turn left or right. At each end you will find a Templar, at first appearing to be peaceful, do not let that fool you, kill him. Flip the switch nearby to open the door and get the goodies, (now you are on the other side of the bars). Flipping the switch also reveals one or two Sentinels. Do the same for the other end. Kill the Templar, flip the switch, kill the Sentinel(s) and get the goodies. Once you are done, take one of the two lifts (J).
Up here (there's a hole in the ceiling in the shape of another of those stylized comet symbols) you will find either another "peaceful" Templar if you play on Training or Rookie or two ambushing Sentinels on Veteran, Elite or Bloodbath (and a Crusader on Elite or Bloodbath). Whatever you find, kill it. When you approach the left or right door, more Sentinels will appear just about everywhere in this room. Once they are finished, go through one of the two doors and flip the switch; this opens the five doors marked (Kx) on the map.
Return via either lift, go through the now opened door to the left (K1). Kill the Acolyte and take the lift up. Turn left, and flip the switch here (L). Quickly turn around, and kill the ambushing Stalkers before they get you. Jump down the balcony and kill any Templars you find down there, also flip the switch here (M), which opens the two sets of bars with the corresponding labels on the map.
Take the door to the left (M1), you will find another Crusader on higher skill levels. Be careful of the enemies on the edges, they will either be Reavers or Templars. Go up the middle stairway and flip the switch (N). Take one of the other stairs and you will notice a chanting sound. Kill any remaining enemies before opening the big silver-white door.
The green room is the atrium to the inner sanctum. You can take a break as the enemies here will not attack you (unless you attack them). The chanting sound is produced by the kneeling characters. They can be ignored. Walk past the stationary Templars and open the door to find the Oracle.
The inner sanctum and the Oracle[]
As you approach the Oracle, some Acolytes will rise from the ground to your left and right. Do not worry about them, they will not attack you. The same linedef which raises these Acolytes also opens the door to a hidden teleport near the start of this path (R), and, in the Veteran Edition, the bars blocking the alcove in the atrium (S). In this alcove is the Blue Berserker Talisman.
If you look up, you will see the Oracle's Spectre in the ceiling hole (the thing like a giant floating translucent dog-turd).
Talk to the Oracle, and ask your question. Once done, a teleporter will appear nearby (O) which leads back to the Borderlands. Remember, if you're seeking the Talismans, to first return to the atrium and pick up the Blue Talisman.
Interlude: The Fork (conclusion of seventh mission)[]
Talk to the Oracle and it will tell you that Macil is a traitor and secretly holds another piece of the Sigil. Is it telling the truth? For now, best trust (or pretend to trust) it, so finish the conversation and calmly and quietly take the teleporter back to the Borderlands, and from there the teleporter in the middle of the square (inside the green comet-shaped structure) back to Base.
Walkthrough to the good ending[]
Mission G8: Kill the Oracle[]
Note: as you are in possession of two parts of the Sigil, if you approach the Oracle too closely the teleporter to the Borderlands will close. This isn't a problem, as after you kill the Oracle you will be able to reopen the teleport (see below), so don't panic.
The Oracle is surprisingly easy to kill (it turns out that it was just a skull on top of a mechanism resembling a stool), but its Spectre will attack when you do, and as you may remember, Spectres can only be killed with the Sigil.
Once you kill the Spectre, a button will appear by the door to the atrium, to re-open the teleport if it closed. Use this button if need be, then teleport back to the Borderlands and from there to the Base.
Walkthrough to the bad ending[]
Mission B9: Onward to the Lab[]
Talk to the Oracle and it will open a teleporter to the Proving Grounds (P). It will also give you stamina and accuracy chits, so first return to Base to cash those. Don't forget to buy any supplies you need while there; this is your very last chance, you won't be returning.
Mission B10: Kill the Oracle[]
The Oracle will reveal that it has been using you to collect the Sigil for its purposes (its spiel is very similar to Macil's in mission G10, though without the crazy voice), and will attack you (as will the Acolytes) once you finish talking. If you so prefer, you can take the initiative.
Mission B11: Go for the Entity[]
Go back through the Proving Grounds and to The Lab.
Points of interest[]
- If you go through the teleport (R), you will be teleported into a square room sealed off from the rest of the level (Q). Walking off this landing spot opens the door to (R), if it wasn't already open.The teleporter in front and to your left when you land (the northwest one) leads to the room in the middle of the open path (the one with doors I, K2 and K3 leading off it); the northeast teleporter goes to the atrium; the southeast one to the room marked L; and the southwest one to the comet-symbol room.
- The graphics in the inner sanctum and at the entrance to the Programmer's Keep resemble modified SGA lettering. From top to bottom, they appear to read DAMEX.