(Secrets: Refurbished/Bugs: Added bug/Things: Added table) Tag: sourceedit |
|||
| Line 13: | Line 13: | ||
===Secrets=== |
===Secrets=== |
||
| − | # In the |
+ | # After leaving the map start area, standing in front of four steel walls, strictly go west. In the southwesternmost region of the map, east of the two dead trees, go south, but do not push the switch (it raises a stairway). Instead, run to the inset in the eastern wall, thus opening an alcove in the north of the dead trees, releasing a [[hell knight]] on easy, a [[baron of hell]] on medium or an [[arch-vile]] on hard [[skill level]]s and a [[pain elemental]]. Open the inset to reveal a lift. Take it up into the baron's pillbox, containing (a [[BFG9000]] on easy and medium skills,) a [[box of shotgun shells]], a [[box of rockets]], a [[Energy cell pack|bulk cell]] and a [[backpack]]. Entering this pillbox opens an alcove in its southeast, releasing a [[sergeant]], two (one on easy skills) [[chaingunner]]s, (an arch-vile on hard skills,) (a [[revenant]] on medium and hard skills,) and a baron of hell. (Raising the stairs after opening this alcove will not prevent you from registering the secret.) Enter this alcove to find (another deaf baron on medium and hard skills in front of) an elevator ('''sector 223''') (with an arch-vile on it on medium and hard) that you can take up to the pillbox and back again. Going through the bloodstained door in the northeast of the map will open the wall hiding this elevator in the pillbox if you have not opened it from the elevator before. |
| + | # From the four steel walls mentioned in secret #1, strictly go north, passing the [[super shotgun]]'s plinth and the lit circle with the three [[medikit]]s. Push the switch west of the [[mancubus]]'s platform to lower it, revealing the entrance to a room with two sergeants, (a baron on medium and hard skills,) a bulk cell and a teleporter. Open the northwestern wall ('''sector 508''') in this room to find a backpack and another bulk cell. |
||
| − | # In the building with the teleporter leading to the walkway on the southeast building, open the northwest wall to find a [[bulk cell]] and a [[backpack]]. ('''sector 508''') |
||
| − | # |
+ | # From the switch you used in secret #2, continue going north, passing a wooden guard tower ('''sector 233'''). Enter the building in its north from the western side and jump from the southern window into the guard tower to acquire a [[box of bullets]], a backpack and a bulk cell. |
| − | # In the central building, cross the |
+ | # In the central building (to the west of the mancubus's platform mentioned in secret #2), cross the southwestern corner to the east, and a wall will open in the northwest of the building. Go back to the northwest to find (a chaingunner on hard and) a backpack ('''sector 149'''). |
| + | # Triggering secret #4 to open also opened a compartment right east of that corner, containing a [[spectre]], (a hell knight on hard,) a shell box and a rocket box. Open the eastern wall ('''sector 153''') to find a [[soul sphere]]. |
||
| − | # In the compartment that opens in the south of the central building, open the eastern wall to find a [[soul sphere]]. ('''sector 153''') |
||
| − | # In that same compartment, open the western wall |
+ | # In that same compartment, open the western wall ('''sector 155''') to find a bulk cell. |
| − | # In the northeast of the central building, flip the switch, and then return to the west to find that the silver bars blocking another switch have been raised. |
+ | # In the northeast of the central building, flip the switch, and then return to the west to find that the silver bars blocking another switch have been raised. Flip the switch, and then enter secret #4 to find another compartment ('''sector 456''') containing a [[blue armor]]. |
| − | # In the |
+ | # In the northwestern room of the easternmost building (east of the one with the mancubus's platform mentioned in secret #2), press on western portion of the southern wall to reveal a corridor ('''sector 524''') containing three [[energy cell]]s. It also leads into another room containing (a chaingunner on medium and hard and) a bullet box. |
| − | # In the northern room of the easternmost building, |
+ | # In the northern room of the easternmost building, enter the room to the east and exit it through the southern door. After that, exit the building and head over to the eastern side to find a newly-opened compartment ('''sector 200''') containing three sergeants and a bulk cell. |
| − | # After jumping the gap into the gray stone building, open the second northern wall after you enter to reveal a backpack, a |
+ | # After jumping the gap into the gray stone building in the north of the one where you found secrets #8 and #9, open the second northern wall ('''sector 296''') after you enter to reveal a backpack, a shell box, a [[berserk]] pack and a blue armor. |
| − | # In the cuboid |
+ | # In the cuboid outdoor area (in the northernmost part of the map) with the switch opening the door to the toxic pool, the southernmost portion of the western wall in the southwest looks different from the others. Open it to reveal a secret room ('''sector 408''') containing a backpack, eight bullet boxes, five shell boxes, three boxes of rockets and a [[megasphere]].<br/>''Since you can open this room only once, you should save it up until right before entering the yellow door as from the area behind it there is no way back to the rest of the map.'' |
| − | # In the same cuboid |
+ | # In the same cuboid outdoor area, the northernmost portion of the western wall has a different texture. Open this wall ('''sector 425''') to find a [[computer map]]. |
| − | # |
+ | # Hit the switch in the east of the toxic pool room to reveal a switch nearby the entryway. Use it, then enter the walkway surrounding the pool and head to the southwest. A wall will have opened here revealing a compartment ('''sector 491''') containing a soul sphere. |
===Bugs=== |
===Bugs=== |
||
| + | * The [[item]]s placed at the spawn points of [[Multiplayer#Cooperative|coop]] players #3 and #4 cannot be collected in single-player mode, but are not [[Thing#Flags|flagged]] as multiplayer only.<br/>At player #3's spawn ([[sector]] 415):<br/>A [[shotgun]] ([[thing]] 482), two [[box of shotgun shells|shell boxes]] (things 485 and 486) and a [[green armor]] (thing 483).<br/>At player #4's spawn (sector 414):<br/>A shotgun (thing 480), a shell box (thing 481) and a green armor (thing 499). |
||
| − | |||
===Demo files=== |
===Demo files=== |
||
| Line 95: | Line 95: | ||
===Things=== |
===Things=== |
||
{| {{prettytable}} |
{| {{prettytable}} |
||
| ⚫ | |||
|- |
|- |
||
| + | ![[Monster]]s||[[I'm Too Young To Die|ITYTD]] and [[Hey, Not Too Rough|HNTR]]||[[Hurt Me Plenty|HMP]]||[[Ultra-Violence|UV]] and [[Nightmare!|NM]] |
||
| ⚫ | |||
|- |
|- |
||
| − | |[[ |
+ | |[[Shotgun guy|Sergeants]]||52||57||62 |
|- |
|- |
||
| − | |[[ |
+ | |[[Heavy weapon dude|Chaingunners]]||11||36||45 |
|- |
|- |
||
| − | |[[ |
+ | |[[Pain elemental]]s||2||2||2 |
|- |
|- |
||
| − | |[[ |
+ | |[[Cyberdemon]]s||0||0||3 |
|- |
|- |
||
| − | |[[ |
+ | |[[Arch-vile]]s||4||8||14 |
|- |
|- |
||
| − | |[[ |
+ | |[[Spectre]]s||5||6||7 |
|- |
|- |
||
| − | |[[ |
+ | |[[Imp]]s||67||66||66 |
|- |
|- |
||
| − | |[[ |
+ | |[[Cacodemon]]s||1||2||4 |
|- |
|- |
||
| − | |[[ |
+ | |[[Hell knight]]s||18||29||27 |
|- |
|- |
||
| − | |[[ |
+ | |[[Baron of hell|Barons of hell]]||7||22||26 |
|- |
|- |
||
| − | |[[ |
+ | |[[Revenant]]s||1||11||12 |
|- |
|- |
||
| − | |[[ |
+ | |[[Arachnotron]]s||1||3||3 |
|- |
|- |
||
| − | |[[ |
+ | |[[Mancubus|Mancubi]]||6||8||8 |
|- |
|- |
||
| − | + | ![[Weapon]]s||ITYTD and HNTR||HMP||UV and NM |
|
|- |
|- |
||
| − | |[[ |
+ | |[[Chainsaw]]s||1||1||1 |
|- |
|- |
||
| − | |[[ |
+ | |[[Shotgun]]s||3||3||3 |
|- |
|- |
||
| − | |[[ |
+ | |[[Super shotgun]]s||1||1||1 |
|- |
|- |
||
| − | |[[ |
+ | |[[Chaingun]]s||1||1||1 |
|- |
|- |
||
| − | |[[ |
+ | |[[Rocket launcher]]s||1||1||1 |
|- |
|- |
||
| − | + | |[[Plasma gun]]s||1||1||1 |
|
|- |
|- |
||
| − | |[[ |
+ | |[[BFG9000]]s||1||1||0 |
|- |
|- |
||
| − | + | ![[Ammo|Ammunition]]||ITYTD and HNTR||HMP||UV and NM |
|
|- |
|- |
||
| − | |[[ |
+ | |[[Box of bullets|Bullet boxes]]||33||33||34 |
|- |
|- |
||
| − | |[[ |
+ | |[[4 shotgun shells|Shells]]||4||4||4 |
|- |
|- |
||
| − | |[[ |
+ | |[[Box of shotgun shells|Shell boxes]]||54||54||54 |
|- |
|- |
||
| − | |[[ |
+ | |[[Box of rockets|Rocket boxes]]||20||20||21 |
|- |
|- |
||
| − | |[[ |
+ | |[[Energy cell]]s||5||5||5 |
|- |
|- |
||
| − | |[[ |
+ | |[[Energy cell pack|Bulk cells]]||11||11||11 |
|- |
|- |
||
| ⚫ | |||
| − | |[[Invulnerability|Invulnerabilities]]|| || || |
||
|- |
|- |
||
| ⚫ | |||
| − | |[[Light amplification visor|Light goggles]]|| || || |
||
|- |
|- |
||
| − | |[[ |
+ | |[[Berserk]]s||5||5||5 |
|- |
|- |
||
| − | |[[ |
+ | |[[Medikit]]s||50||50||50 |
|- |
|- |
||
| − | |[[ |
+ | |[[Stimpack]]s||1||1||1 |
|- |
|- |
||
| − | |[[Soul |
+ | |[[Supercharge|Soul spheres]]||3||3||3 |
|- |
|- |
||
| − | |[[ |
+ | |[[Megasphere]]s||1||1||1 |
|- |
|- |
||
| + | |[[Armor|Green armors]]||8||8||8 |
||
| − | ![[Weapons]]||ITYTD and HNTR||HMP||UV and NM |
||
|- |
|- |
||
| − | |[[ |
+ | |[[Megaarmor|Blue armors]]||3||3||3 |
|- |
|- |
||
| − | |[[ |
+ | |[[Partial invisibility|Invisibilities]]||0||1||1 |
|- |
|- |
||
| − | |[[ |
+ | |[[Computer area map|Computer maps]]||1||1||1 |
|- |
|- |
||
| − | + | ![[Key]]s||ITYTD and HNTR||HMP||UV and NM |
|
|- |
|- |
||
| − | |[[ |
+ | |[[Blue skull]]s||1||1||1 |
|- |
|- |
||
| − | |[[ |
+ | |[[Yellow skull]]s||1||1||1 |
|- |
|- |
||
| − | |[[ |
+ | |[[Red skull]]s||1||1||1 |
|- |
|- |
||
| − | ![[ |
+ | ![[Barrel]]s||ITYTD and HNTR||HMP||UV and NM |
|- |
|- |
||
| − | |[[ |
+ | |[[Barrel|Exploding barrels]]||31||31||31 |
| − | |- |
||
| − | |[[Box of ammo|Bullet boxes]]|| || || |
||
| − | |- |
||
| − | |[[Shotgun shells|Shell]]s|| || || |
||
| − | |- |
||
| − | |[[Box of shells|Shell boxes]]|| || || |
||
| − | |- |
||
| − | |[[Rocket]]s|| || || |
||
| − | |- |
||
| − | |[[Box of rockets|Rocket boxes]]|| || || |
||
| − | |- |
||
| − | |[[Cell]]s|| || || |
||
| − | |- |
||
| − | |[[Bulk cell]]s|| || || |
||
| − | |- |
||
| − | ![[Keys]]||ITYTD and HNTR||HMP||UV and NM |
||
| − | |- |
||
| − | |Blue cards|| || || |
||
| − | |- |
||
| − | |Blue skulls|| || || |
||
| − | |- |
||
| − | |Red cards|| || || |
||
| − | |- |
||
| − | |Red skulls|| || || |
||
| − | |- |
||
| − | |Yellow cards|| || || |
||
| − | |- |
||
| − | |Yellow skulls|| || || |
||
|- |
|- |
||
|} |
|} |
||
| Line 238: | Line 209: | ||
* [http://www.doom2.net/~compet-n/index.cgi?action=pwads&page=mm Memento Mori demos from the Compet-N database] |
* [http://www.doom2.net/~compet-n/index.cgi?action=pwads&page=mm Memento Mori demos from the Compet-N database] |
||
| − | |||
[[Category:Levels by name|City of the Unavenged (Memento Mori)]] |
[[Category:Levels by name|City of the Unavenged (Memento Mori)]] |
||
[[Category:Jens Nielsen levels]] |
[[Category:Jens Nielsen levels]] |
||
Revision as of 04:13, 21 May 2015
- This level occupies the map slot MAP28. For other maps which occupy this slot, see Category:MAP28.
Template:Memento Mori 21-30 MAP28: City of the Unavenged is the twenty-eighth level of Memento Mori. It was designed by Jens Nielsen and uses the music track "Dreadnaught" by Mark Klem.
Walkthrough
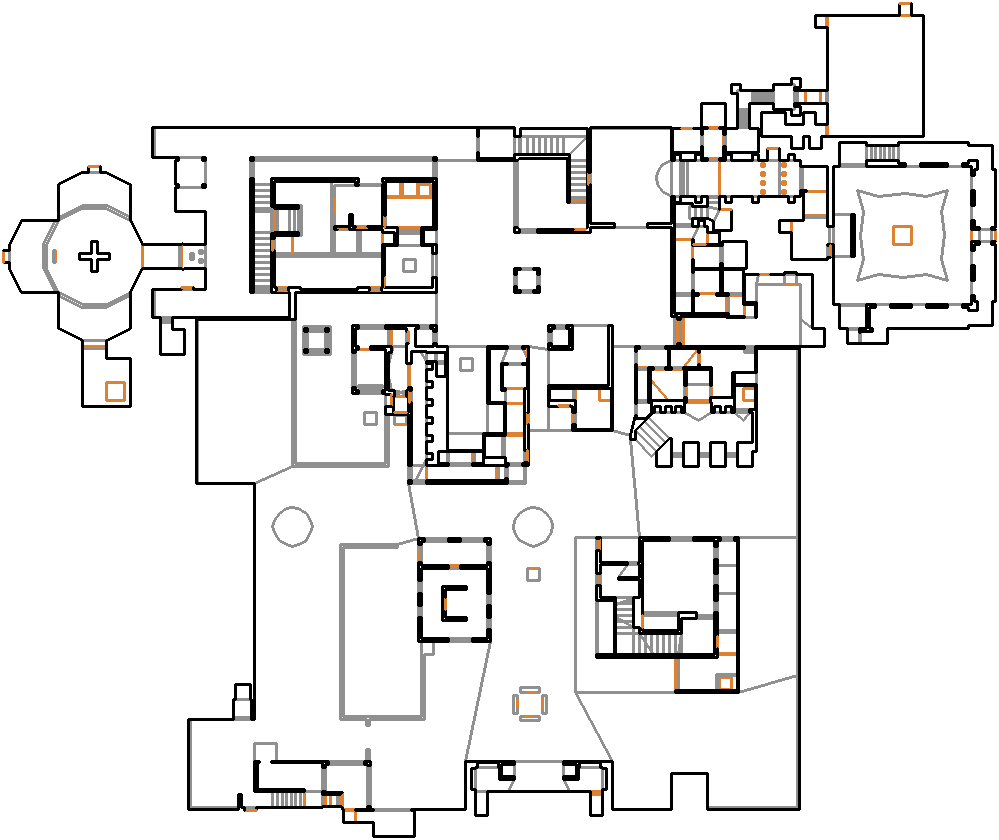
Map of MAP28
- Letters in italics refer to marked spots on the map. Sector numbers in boldface are secrets which count toward the end-of-level tally.
Essentials
Other points of interest
Secrets
- After leaving the map start area, standing in front of four steel walls, strictly go west. In the southwesternmost region of the map, east of the two dead trees, go south, but do not push the switch (it raises a stairway). Instead, run to the inset in the eastern wall, thus opening an alcove in the north of the dead trees, releasing a hell knight on easy, a baron of hell on medium or an arch-vile on hard skill levels and a pain elemental. Open the inset to reveal a lift. Take it up into the baron's pillbox, containing (a BFG9000 on easy and medium skills,) a box of shotgun shells, a box of rockets, a bulk cell and a backpack. Entering this pillbox opens an alcove in its southeast, releasing a sergeant, two (one on easy skills) chaingunners, (an arch-vile on hard skills,) (a revenant on medium and hard skills,) and a baron of hell. (Raising the stairs after opening this alcove will not prevent you from registering the secret.) Enter this alcove to find (another deaf baron on medium and hard skills in front of) an elevator (sector 223) (with an arch-vile on it on medium and hard) that you can take up to the pillbox and back again. Going through the bloodstained door in the northeast of the map will open the wall hiding this elevator in the pillbox if you have not opened it from the elevator before.
- From the four steel walls mentioned in secret #1, strictly go north, passing the super shotgun's plinth and the lit circle with the three medikits. Push the switch west of the mancubus's platform to lower it, revealing the entrance to a room with two sergeants, (a baron on medium and hard skills,) a bulk cell and a teleporter. Open the northwestern wall (sector 508) in this room to find a backpack and another bulk cell.
- From the switch you used in secret #2, continue going north, passing a wooden guard tower (sector 233). Enter the building in its north from the western side and jump from the southern window into the guard tower to acquire a box of bullets, a backpack and a bulk cell.
- In the central building (to the west of the mancubus's platform mentioned in secret #2), cross the southwestern corner to the east, and a wall will open in the northwest of the building. Go back to the northwest to find (a chaingunner on hard and) a backpack (sector 149).
- Triggering secret #4 to open also opened a compartment right east of that corner, containing a spectre, (a hell knight on hard,) a shell box and a rocket box. Open the eastern wall (sector 153) to find a soul sphere.
- In that same compartment, open the western wall (sector 155) to find a bulk cell.
- In the northeast of the central building, flip the switch, and then return to the west to find that the silver bars blocking another switch have been raised. Flip the switch, and then enter secret #4 to find another compartment (sector 456) containing a blue armor.
- In the northwestern room of the easternmost building (east of the one with the mancubus's platform mentioned in secret #2), press on western portion of the southern wall to reveal a corridor (sector 524) containing three energy cells. It also leads into another room containing (a chaingunner on medium and hard and) a bullet box.
- In the northern room of the easternmost building, enter the room to the east and exit it through the southern door. After that, exit the building and head over to the eastern side to find a newly-opened compartment (sector 200) containing three sergeants and a bulk cell.
- After jumping the gap into the gray stone building in the north of the one where you found secrets #8 and #9, open the second northern wall (sector 296) after you enter to reveal a backpack, a shell box, a berserk pack and a blue armor.
- In the cuboid outdoor area (in the northernmost part of the map) with the switch opening the door to the toxic pool, the southernmost portion of the western wall in the southwest looks different from the others. Open it to reveal a secret room (sector 408) containing a backpack, eight bullet boxes, five shell boxes, three boxes of rockets and a megasphere.
Since you can open this room only once, you should save it up until right before entering the yellow door as from the area behind it there is no way back to the rest of the map. - In the same cuboid outdoor area, the northernmost portion of the western wall has a different texture. Open this wall (sector 425) to find a computer map.
- Hit the switch in the east of the toxic pool room to reveal a switch nearby the entryway. Use it, then enter the walkway surrounding the pool and head to the southwest. A wall will have opened here revealing a compartment (sector 491) containing a soul sphere.
Bugs
- The items placed at the spawn points of coop players #3 and #4 cannot be collected in single-player mode, but are not flagged as multiplayer only.
At player #3's spawn (sector 415):
A shotgun (thing 482), two shell boxes (things 485 and 486) and a green armor (thing 483).
At player #4's spawn (sector 414):
A shotgun (thing 480), a shell box (thing 481) and a green armor (thing 499).
Demo files
Areas / screenshots
Speedrunning
Routes and tricks
This level is notorious as the hardest level in Memento Mori to speedrun, due to its impressive difficulty provided by not only the powerful hellspawn, but also impressive complexity that allows for little to no shortcuts. A UV speed run through this level takes close to 8 minutes to finish, and a UV max run requires more than 15 minutes; the slowest UV max demo ([1],) by Istvan Pataki, lasts a showstopping 24:01.
One shortcut is a key grab that can be performed with the red skull key, by straferunning against the northern side of the platform the key is on. However, circumventing the process of lowering the platform also skips the opportunity to grab the plasma rifle, which is a necessity against the powerful enemies that inhabit this level, meaning it is not wise to perform in a single-level run. The only demos in which this is used are Drew "stx-Vile" DeVore's 31:11 MAP21-30 UV Episode run ([2]) and his 83:56 UV Run of the entire megawad ([3].)
Current records
The Compet-N records for the map are:
| Run | Time | Player | Date | File | Notes |
|---|---|---|---|---|---|
| UV speed | 08:16 | Istvan Pataki | 2002-03-28 | Template:Competnftp | |
| NM speed | |||||
| UV max | 17:42 | Drew "stx-Vile" DeVore | 2002-03-01 | Template:Competnftp | |
| NM100S | |||||
| UV -fast | |||||
| UV -respawn | |||||
| UV Tyson | |||||
| UV pacifist |
Miscellaneous demos
| Run | Time | Player | Date | File | Notes |
|---|---|---|---|---|---|
| .zip |
Deathmatch
Statistics
Map data
| Things | 666 |
| Vertexes | 2030 |
| Linedefs | 2592 |
| Sidedefs | 3481 |
| Sectors | 530 |
Things
| Monsters | ITYTD and HNTR | HMP | UV and NM |
|---|---|---|---|
| Sergeants | 52 | 57 | 62 |
| Chaingunners | 11 | 36 | 45 |
| Pain elementals | 2 | 2 | 2 |
| Cyberdemons | 0 | 0 | 3 |
| Arch-viles | 4 | 8 | 14 |
| Spectres | 5 | 6 | 7 |
| Imps | 67 | 66 | 66 |
| Cacodemons | 1 | 2 | 4 |
| Hell knights | 18 | 29 | 27 |
| Barons of hell | 7 | 22 | 26 |
| Revenants | 1 | 11 | 12 |
| Arachnotrons | 1 | 3 | 3 |
| Mancubi | 6 | 8 | 8 |
| Weapons | ITYTD and HNTR | HMP | UV and NM |
| Chainsaws | 1 | 1 | 1 |
| Shotguns | 3 | 3 | 3 |
| Super shotguns | 1 | 1 | 1 |
| Chainguns | 1 | 1 | 1 |
| Rocket launchers | 1 | 1 | 1 |
| Plasma guns | 1 | 1 | 1 |
| BFG9000s | 1 | 1 | 0 |
| Ammunition | ITYTD and HNTR | HMP | UV and NM |
| Bullet boxes | 33 | 33 | 34 |
| Shells | 4 | 4 | 4 |
| Shell boxes | 54 | 54 | 54 |
| Rocket boxes | 20 | 20 | 21 |
| Energy cells | 5 | 5 | 5 |
| Bulk cells | 11 | 11 | 11 |
| Powerups | ITYTD and HNTR | HMP | UV and NM |
| Backpacks | 12 | 12 | 12 |
| Berserks | 5 | 5 | 5 |
| Medikits | 50 | 50 | 50 |
| Stimpacks | 1 | 1 | 1 |
| Soul spheres | 3 | 3 | 3 |
| Megaspheres | 1 | 1 | 1 |
| Green armors | 8 | 8 | 8 |
| Blue armors | 3 | 3 | 3 |
| Invisibilities | 0 | 1 | 1 |
| Computer maps | 1 | 1 | 1 |
| Keys | ITYTD and HNTR | HMP | UV and NM |
| Blue skulls | 1 | 1 | 1 |
| Yellow skulls | 1 | 1 | 1 |
| Red skulls | 1 | 1 | 1 |
| Barrels | ITYTD and HNTR | HMP | UV and NM |
| Exploding barrels | 31 | 31 | 31 |