(Undo revision 97698 by 212.56.115.137 (talk) - Unscrewed source code mess) Tag: sourceedit |
m (→Current records: clean up) |
||
| (9 intermediate revisions by 2 users not shown) | |||
| Line 1: | Line 1: | ||
{{map|slot=MAP31}} |
{{map|slot=MAP31}} |
||
| ⚫ | '''MAP31: DejaVu''' is the secret level of [[Memento Mori II]]. It was designed by Orin Flaharty and uses the music track "Bavor The Mad" by [[Mark Klem]]. The title name comes from the French expression "''deja vu''", the psychological sensation that you are repeating a situation already seen or witnessed in life. ''Deja Vu'' is designed in a techbase style reminiscent of [[Doom]]'s [[Knee-Deep in the Dead]], hence its title, which comes from the French expression "''deja vu''", the psychological sensation that you are repeating a situation already seen or witnessed in life. |
||
| ⚫ | |||
| ⚫ | '''MAP31: DejaVu''' is the secret level of [[Memento Mori II]]. It was designed by Orin Flaharty and uses the music track "Bavor The Mad" by [[Mark Klem]].The title name comes from French expression "''deja vu''", |
||
==Walkthrough== |
==Walkthrough== |
||
| − | [[ |
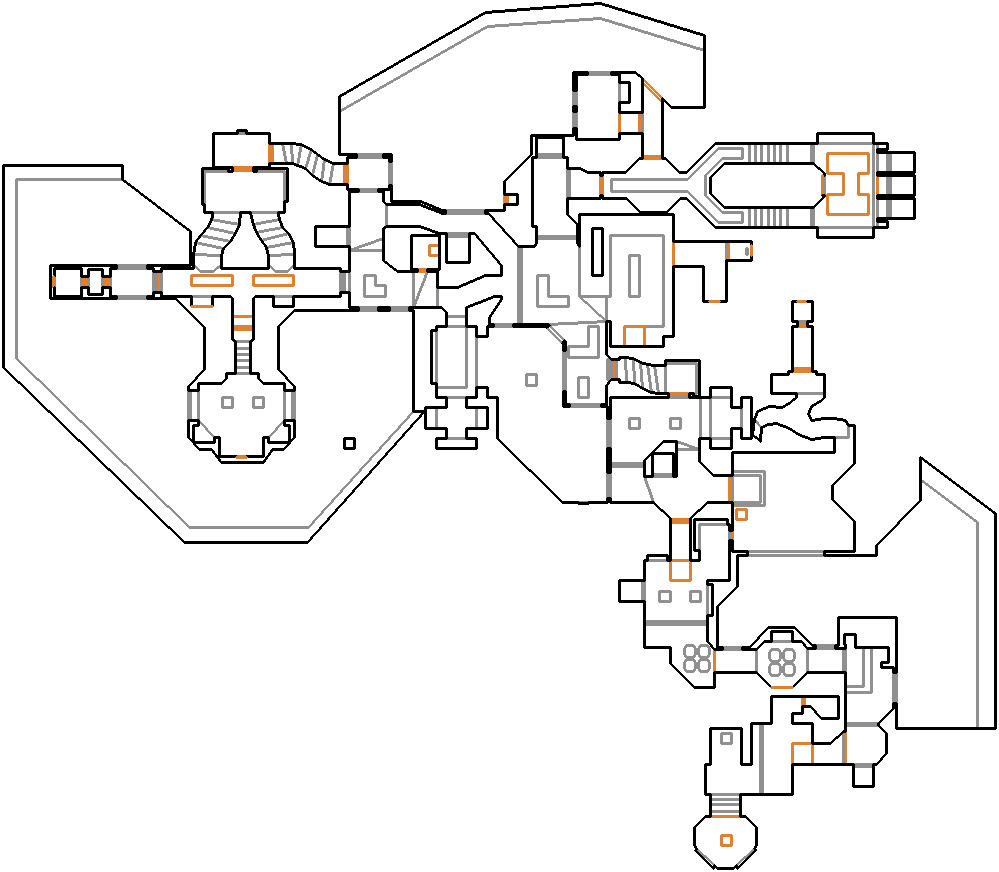
+ | [[file:MM2_MAP31_map.png|thumb|300px|Map of MAP31]] |
| − | : Letters in ''italics'' refer to marked spots on the map. |
+ | : Letters in ''italics'' refer to marked spots on the map. [[Sector]] numbers in '''boldface''' are [[secrets]] which count toward the [[Intermission screen|end-of-level tally]]. |
| − | ===Essentials=== |
||
| − | ===Other points of interest=== |
||
===Secrets=== |
===Secrets=== |
||
| − | # At the beginning of the level, a section of the eastern wall is misaligned. |
+ | # At the beginning of the level, a section of the eastern wall is misaligned. Open it to find a stairway leading to a room ('''sector 57''') with eight [[health bonus]]es, a [[stimpack]], a [[shotgun]], a [[clip]] and a [[blue armor]]. |
| − | # In the eastern hallways accessed by the first switch, press upon the wall west of the northern light in the southern hallway to find a secret room with nine health bonuses and a [[berserk |
+ | # In the eastern hallways accessed by the first switch, press upon the wall west of the northern light in the southern hallway to find a secret room ('''sector 55''') with nine health bonuses and a [[berserk]] pack. |
| − | # After going through the blue [[ |
+ | # After going through the blue [[key]]card door, open the wall in the northern inset to find a secret hallway ('''sector 144'''). Use the elevator to reach a room with a [[trooper]], two (one on easy [[Skill level#Doom and Doom II skill levels|skills]]) [[sergeant]]s, (a [[demon]] on hard skills,) four [[rocket]]s and two stimpacks. |
| − | # |
+ | # Open the northern wall of the secret hallway from secret #3 to access the outdoors area to the north. Go to the southernmost window (eastsoutheast of secret #1). There is a misaligned texture on the eastern wall. Open it to find a [[soul sphere]] ('''sector 170'''). |
| − | # In the red keycard room, there is an arrow made of [[armor bonus]]es pointing at a computer panel. |
+ | # In the red keycard room, there is an arrow made of [[armor bonus]]es pointing at a computer panel. Press on it, and the mainframes to the east will lower to reveal secret compartments. The north and south compartments both contain a few monsters and each a stimpack; the central one ('''sector 224''') contains two rockets and a [[rocket launcher]] and counts as secret. |
| − | # Once you enter the southern computer room, head into the inset to the |
+ | # Once you enter the southern computer room with the glowing lights (north of the yellow keycard), head into the inset to the northeast and you will find a lone [[barrel]] in front of a computer panel to the east. Destroy it and open the panel behind to find a [[computer map]] ('''sector 222'''). |
| − | # |
+ | # From secret #6 backtrack your way to a room with four holes in the ceiling. Go west, upon entering another room with similar holes in the ceiling, run northwards to the elevator's east to find that a door has opened to reveal a [[Damaging floor|nukage]] pool. Cross the pool and you will find a stimpack and a platform ('''sector 169''') with eight armor bonuses, a [[backpack]], a [[light amplification visor]] and a door. Enter this door to find another door that requires a yellow keycard. After grabbing the yellow keycard, return to this area and open the door to find a hallway leading to an exit switch that takes you to the super secret level, [[MAP32: Dances with Demons (Memento Mori II)|MAP32: Dances with Demons]]. |
===Bugs=== |
===Bugs=== |
||
| − | + | * On hard [[Skill level#Doom and Doom II skill levels|skills]] it is only possible to obtain 99% kills in this level, as one [[imp]] ([[thing]] 349) contained in one of the inaccessible monster storages ([[sector]] 252) (which store monsters for teleportation into the level) is glued to a [[barrel]] (thing 383) occupying the same space. Whether this was intentional or not is unknown. |
|
| − | |||
| − | ===Demo files=== |
||
| − | * |
||
| − | |||
| − | == Areas / screenshots == |
||
| − | |||
| − | <gallery> |
||
| − | Image: | |
||
| − | </gallery> |
||
== Speedrunning == |
== Speedrunning == |
||
| − | |||
| − | ===Routes and tricks=== |
||
| − | |||
===Current records=== |
===Current records=== |
||
The [[Compet-N]] records for the map are: |
The [[Compet-N]] records for the map are: |
||
| + | {| class="WikiaTable" |
||
| − | {| {{prettytable}} |
||
!Run||Time||Player||Date||File||Notes |
!Run||Time||Player||Date||File||Notes |
||
|- |
|- |
||
| − | |[[UV speed]]||00:53||[[Radek Pecka]]||2002-11-27||{{competnftp|pwads/mm2/speed/m231s053.zip|m231s053.zip}}|| |
+ | |[[UV speed]]||00:53||[[Radek Pecka]]||2002-11-27||{{External Link|site=competnftp|file_path=pwads/mm2/speed/m231s053.zip|text=m231s053.zip}}|| |
|- |
|- |
||
| − | |[[NM speed]]||01:44||[[Radek Pecka]]||2002-11-29||{{competnftp|pwads/mm2/nmare/m231n144.zip|m231n144.zip}}|| |
+ | |[[NM speed]]||01:44||[[Radek Pecka]]||2002-11-29||{{External Link|site=competnftp|file_path=pwads/mm2/nmare/m231n144.zip|text=m231n144.zip}}|| |
|- |
|- |
||
| − | |[[UV max]]||04:45||[[Anthony "Swedish Fish" Soto|Anthony Soto]]||2003-06-03||{{competnftp|pwads/mm2/max/m231-445.zip|m231-445.zip}}|| |
+ | |[[UV max]]||04:45||[[Anthony "Swedish Fish" Soto|Anthony Soto]]||2003-06-03||{{External Link|site=competnftp|file_path=pwads/mm2/max/m231-445.zip|text=m231-445.zip}}|| |
|- |
|- |
||
|[[NM100S]]|| || || || || |
|[[NM100S]]|| || || || || |
||
| Line 52: | Line 37: | ||
|[[UV -respawn]]|| || || || || |
|[[UV -respawn]]|| || || || || |
||
|- |
|- |
||
| − | |[[UV Tyson]]||08:33||[[Anthony "Swedish Fish" Soto|Anthony Soto]]||2003-02-24||{{competnftp|pwads/mm2/tyson/m231t833.zip|m231t833.zip}}|| |
+ | |[[UV Tyson]]||08:33||[[Anthony "Swedish Fish" Soto|Anthony Soto]]||2003-02-24||{{External Link|site=competnftp|file_path=pwads/mm2/tyson/m231t833.zip|text=m231t833.zip}}|| |
|- |
|- |
||
| − | |[[UV pacifist]]||01:03||[[Radek Pecka]]||2002-11-28||{{competnftp|pwads/mm2/pacifist/m231p103.zip|m231p103.zip}}|| |
+ | |[[UV pacifist]]||01:03||[[Radek Pecka]]||2002-11-28||{{External Link|site=competnftp|file_path=pwads/mm2/pacifist/m231p103.zip|text=m231p103.zip}}|| |
|} |
|} |
||
===Miscellaneous demos=== |
===Miscellaneous demos=== |
||
| + | {| class="WikiaTable" |
||
| − | {| {{prettytable}} |
||
!Run||Time||Player||Date||File||Notes |
!Run||Time||Player||Date||File||Notes |
||
|- |
|- |
||
| || || || ||[ftp://.zip .zip]|| |
| || || || ||[ftp://.zip .zip]|| |
||
|} |
|} |
||
| − | |||
| − | == Deathmatch == |
||
== Statistics == |
== Statistics == |
||
| − | |||
===Map data=== |
===Map data=== |
||
| + | {| class="WikiaTable" |
||
| − | {| {{prettytable}} |
||
|[[Things]]||551 |
|[[Things]]||551 |
||
|- |
|- |
||
| Line 82: | Line 64: | ||
===Things=== |
===Things=== |
||
| + | {| class="WikiaTable" |
||
| − | {| {{prettytable}} |
||
![[Monsters]]||[[ITYTD]] and [[HNTR]]||[[HMP]]||[[UV]] and [[NM]] |
![[Monsters]]||[[ITYTD]] and [[HNTR]]||[[HMP]]||[[UV]] and [[NM]] |
||
|- |
|- |
||
| Line 159: | Line 141: | ||
|[[Yellow card]]s||1||1||1 |
|[[Yellow card]]s||1||1||1 |
||
|- |
|- |
||
| + | ![[Barrel]]s||ITYTD and HNTR||HMP||UV and NM |
||
| + | |- |
||
| + | |[[Barrel|Exploding barrels]]||15||15||15 |
||
|} |
|} |
||
| − | |||
| − | == Technical information == |
||
| − | |||
| − | == Inspiration and development == |
||
== Trivia == |
== Trivia == |
||
Unlike another level from Memento Mori II designed in Knee-Deep in the Dead style, [[MAP24: Io Lab (Memento Mori II)|MAP24: Io Lab]], this level features only Doom monsters. In fact, in DejaVu there is even more restraint than in [[MAP08: And the Dead Shall Rise (Memento Mori)|MAP08: And the Dead Shall Rise]] from [[Memento Mori]], also designed by Orin Flaharty, as [[lost soul]]s and [[cacodemon]]s are also missing. This means that in this secret level the player can only encounter monsters from Knee-Deep in the Dead. Regarding weapons and equipment, the design is slightly less consistent: [[megasphere]]s or [[super shotgun]]s (from [[Doom II]]) are absent, but the player can collect a [[plasma rifle]] or an [[invulnerability]] sphere (present in Doom, but not in its first episode). |
Unlike another level from Memento Mori II designed in Knee-Deep in the Dead style, [[MAP24: Io Lab (Memento Mori II)|MAP24: Io Lab]], this level features only Doom monsters. In fact, in DejaVu there is even more restraint than in [[MAP08: And the Dead Shall Rise (Memento Mori)|MAP08: And the Dead Shall Rise]] from [[Memento Mori]], also designed by Orin Flaharty, as [[lost soul]]s and [[cacodemon]]s are also missing. This means that in this secret level the player can only encounter monsters from Knee-Deep in the Dead. Regarding weapons and equipment, the design is slightly less consistent: [[megasphere]]s or [[super shotgun]]s (from [[Doom II]]) are absent, but the player can collect a [[plasma rifle]] or an [[invulnerability]] sphere (present in Doom, but not in its first episode). |
||
| − | == |
+ | == External links == |
| ⚫ | |||
| ⚫ | |||
| − | * |
||
| − | == Sources == |
||
| − | |||
| − | * |
||
| − | |||
| − | == External links == |
||
| − | |||
| ⚫ | |||
[[Category:Levels by name|DejaVu (Memento Mori II)]] |
[[Category:Levels by name|DejaVu (Memento Mori II)]] |
||
[[Category:Orin Flaharty levels]] |
[[Category:Orin Flaharty levels]] |
||
Latest revision as of 04:39, 23 March 2020
- This level occupies the map slot MAP31. For other maps which occupy this slot, see Category:MAP31.
MAP31: DejaVu is the secret level of Memento Mori II. It was designed by Orin Flaharty and uses the music track "Bavor The Mad" by Mark Klem. The title name comes from the French expression "deja vu", the psychological sensation that you are repeating a situation already seen or witnessed in life. Deja Vu is designed in a techbase style reminiscent of Doom's Knee-Deep in the Dead, hence its title, which comes from the French expression "deja vu", the psychological sensation that you are repeating a situation already seen or witnessed in life.
Walkthrough
Map of MAP31
- Letters in italics refer to marked spots on the map. Sector numbers in boldface are secrets which count toward the end-of-level tally.
Secrets
- At the beginning of the level, a section of the eastern wall is misaligned. Open it to find a stairway leading to a room (sector 57) with eight health bonuses, a stimpack, a shotgun, a clip and a blue armor.
- In the eastern hallways accessed by the first switch, press upon the wall west of the northern light in the southern hallway to find a secret room (sector 55) with nine health bonuses and a berserk pack.
- After going through the blue keycard door, open the wall in the northern inset to find a secret hallway (sector 144). Use the elevator to reach a room with a trooper, two (one on easy skills) sergeants, (a demon on hard skills,) four rockets and two stimpacks.
- Open the northern wall of the secret hallway from secret #3 to access the outdoors area to the north. Go to the southernmost window (eastsoutheast of secret #1). There is a misaligned texture on the eastern wall. Open it to find a soul sphere (sector 170).
- In the red keycard room, there is an arrow made of armor bonuses pointing at a computer panel. Press on it, and the mainframes to the east will lower to reveal secret compartments. The north and south compartments both contain a few monsters and each a stimpack; the central one (sector 224) contains two rockets and a rocket launcher and counts as secret.
- Once you enter the southern computer room with the glowing lights (north of the yellow keycard), head into the inset to the northeast and you will find a lone barrel in front of a computer panel to the east. Destroy it and open the panel behind to find a computer map (sector 222).
- From secret #6 backtrack your way to a room with four holes in the ceiling. Go west, upon entering another room with similar holes in the ceiling, run northwards to the elevator's east to find that a door has opened to reveal a nukage pool. Cross the pool and you will find a stimpack and a platform (sector 169) with eight armor bonuses, a backpack, a light amplification visor and a door. Enter this door to find another door that requires a yellow keycard. After grabbing the yellow keycard, return to this area and open the door to find a hallway leading to an exit switch that takes you to the super secret level, MAP32: Dances with Demons.
Bugs
- On hard skills it is only possible to obtain 99% kills in this level, as one imp (thing 349) contained in one of the inaccessible monster storages (sector 252) (which store monsters for teleportation into the level) is glued to a barrel (thing 383) occupying the same space. Whether this was intentional or not is unknown.
Speedrunning
Current records
The Compet-N records for the map are:
| Run | Time | Player | Date | File | Notes |
|---|---|---|---|---|---|
| UV speed | 00:53 | Radek Pecka | 2002-11-27 | m231s053.zip | |
| NM speed | 01:44 | Radek Pecka | 2002-11-29 | m231n144.zip | |
| UV max | 04:45 | Anthony Soto | 2003-06-03 | m231-445.zip | |
| NM100S | |||||
| UV -fast | |||||
| UV -respawn | |||||
| UV Tyson | 08:33 | Anthony Soto | 2003-02-24 | m231t833.zip | |
| UV pacifist | 01:03 | Radek Pecka | 2002-11-28 | m231p103.zip |
Miscellaneous demos
| Run | Time | Player | Date | File | Notes |
|---|---|---|---|---|---|
| .zip |
Statistics
Map data
| Things | 551 |
| Vertexes | 1296 |
| Linedefs | 1583 |
| Sidedefs | 2088 |
| Sectors | 278 |
Things
| Monsters | ITYTD and HNTR | HMP | UV and NM |
|---|---|---|---|
| Barons of Hell | 1 | 1 | 1 |
| Demons | 18 | 24 | 35 |
| Imps | 39 | 68 | 86 |
| Sergeants | 31 | 54 | 79 |
| Spectres | 3 | 4 | 6 |
| Troopers | 17 | 23 | 27 |
| Powerups | ITYTD and HNTR | HMP | UV and NM |
| Armor bonuses | 35 | 35 | 35 |
| Backpacks | 1 | 1 | 1 |
| Berserk packs | 1 | 1 | 1 |
| Blue armors | 1 | 1 | 1 |
| Computer maps | 1 | 1 | 1 |
| Green armors | 2 | 2 | 2 |
| Health bonuses | 55 | 55 | 55 |
| Invisibilities | 1 | 1 | 1 |
| Invulnerabilities | 1 | 1 | 1 |
| Light goggles | 1 | 1 | 1 |
| Medikits | 4 | 4 | 5 |
| Radiation suits | 1 | 1 | 1 |
| Soul Spheres | 1 | 1 | 1 |
| Stimpacks | 24 | 24 | 26 |
| Weapons | ITYTD and HNTR | HMP | UV and NM |
| Chainsaws | 1 | 1 | 1 |
| Shotguns | 2 | 2 | 2 |
| Chainguns | 1 | 1 | 1 |
| Rocket launchers | 2 | 2 | 2 |
| Plasma rifles | 1 | 1 | 1 |
| Ammunition | ITYTD and HNTR | HMP | UV and NM |
| Ammo clips | 1 | 1 | 1 |
| Bullet boxes | 7 | 8 | 8 |
| Shells | 9 | 11 | 11 |
| Shell boxes | 4 | 4 | 6 |
| Rockets | 7 | 7 | 7 |
| Keys | ITYTD and HNTR | HMP | UV and NM |
| Blue cards | 1 | 1 | 1 |
| Red cards | 1 | 1 | 1 |
| Yellow cards | 1 | 1 | 1 |
| Barrels | ITYTD and HNTR | HMP | UV and NM |
| Exploding barrels | 15 | 15 | 15 |
Trivia
Unlike another level from Memento Mori II designed in Knee-Deep in the Dead style, MAP24: Io Lab, this level features only Doom monsters. In fact, in DejaVu there is even more restraint than in MAP08: And the Dead Shall Rise from Memento Mori, also designed by Orin Flaharty, as lost souls and cacodemons are also missing. This means that in this secret level the player can only encounter monsters from Knee-Deep in the Dead. Regarding weapons and equipment, the design is slightly less consistent: megaspheres or super shotguns (from Doom II) are absent, but the player can collect a plasma rifle or an invulnerability sphere (present in Doom, but not in its first episode).